Vintage wing tipped dress in red: Butterick 6473

Monday, 29 February 2016
At the start of spring last year I pulled out a few fabrics that had been sitting in the stash for a while that I really wanted to use and left them on my cutting table, in the hopes that looking at them all the time would prompt me to make something. Well that didn't work because I ended up using any fabrics other than those I had picked out especially to use, and all it meant was that my cutting table was cluttered! But finally I've used one of the fabrics to make this dress:

vintage Butterick 6473 red white graphic print wiggle dress www.loweryourpresserfoot.blogspot.com

The fabric is a printed cotton sateen bought from Spotlight a few years ago when their sateen was still quite thick and stretchy. I had originally planned to make a simple sheath dress from New Look 6968 because I've made it several times successfully (here, here and here) but also because this exact fabric appears on the pattern envelope - yes I am way too influenced by the pattern...

But instead I decided to use a vintage that I've had in the stash for a while now. I can't remember quite where it came from but most likely picked up from an op shop. The pattern is undated, but the vintage pattern Wiki places it at 1953:


I have been wanting to make this pattern for a long time but could never quite decide on the right fabric. I don't think I've used the right fabric in this version though, because even though the cotton sateen has the right amount of body and stretch to make it fit really well the busy print hides those special details. I think I will make this again in a solid colour, perhaps with a contrast collar and pocket to make those details stand out.

You can see below that the pocket flap is hardly visible:

butterick 6473 vintage wing collar wiggle dress in red and white www.loweryourpresserfoot.blogspot.com

But, oh that collar! I do love an oversized, dramatic collar:

butterick 6473 vintage wing collar wiggle dress in red and white www.loweryourpresserfoot.blogspot.com

I also left off those buttons down the side. It is a key feature of this dress and I think it would look amazing in a solid colour, but the buttons would be completely lost on this dress so I just put in an invisible zip instead:

butterick 6473 vintage wing collar wiggle dress in red and white www.loweryourpresserfoot.blogspot.com

This dress wasn't that easy to make and it took longer than I expected. While there wasn't any particularly tricky sewing involved, just figuring out the pattern took a lot of concentration. It's one of those very old patterns that have no printed instructions, but rather perforated dots of various sizes that you need to connect and figure out the connections.  And for all my complaints about the brevity of Burda instructions, this pattern is just as bad. One page of instructions, and one page of fabric cutting layouts and then you're on your own to muddle your way through.

butterick 6473 vintage wing collar wiggle dress in red and white www.loweryourpresserfoot.blogspot.com


The pattern incorporates an extension to the left side of the bodice and the skirt that gets folded under to form a facing for the buttons which I didn't need since I just used an invisible zip. Which meant I had to cut a few inches from the side seams and sew the side seams a few times to get a close fit, but  got there in the end. No swayback puddle of fabric and only a few wrinkles emanating from the armpit which is to be expected with cut on sleeves like these.

butterick 6473 vintage wing collar wiggle dress in red and white www.loweryourpresserfoot.blogspot.com

butterick 6473 vintage wing collar wiggle dress in red and white www.loweryourpresserfoot.blogspot.com

The skirt isn't as slim fitting as the pattern illustration suggests, in fact it is rather an a-line shape as you can see in the photo below. However that is a good thing, because there is enough room to walk comfortably in this dress without having to leave a split open along a side seam:

butterick 6473 vintage wing collar wiggle dress in red and white www.loweryourpresserfoot.blogspot.com

Overall I'm really pleased with this project. Not only did I use a fabric and a pattern that I've been meaning to use for a long time now, but I also got a very cool dress that is perfect for the still very hot summer weather we're having. And in a great coincidence there happens to be a red dress contest running over at Pattern Review that I will enter, if any of you would like to vote for me! 

Burda of the month: 2/2016 #118 raglan sleeve top

Wednesday, 24 February 2016
Today's post is brought to you by heat wave conditions here in Sydney, a winter-ish issue of Burda and scratchy polyester fabric - in other words I have suffered for the sake of this post. However it was worth it to record the fact that I've made my February Burda of the month project in the month of February - that's 2 out of 2 this year so far, yay for me!

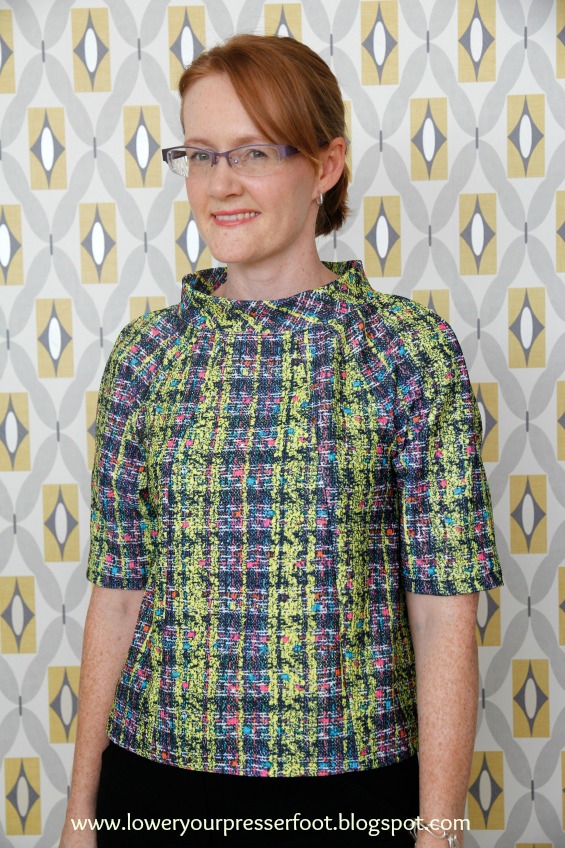
Burda 2/2016 #118 short sleeve raglan top in neon yellow and pink fabric www.loweryourpresserfoot.blogspot.com

I found this to be another great, with several patterns I liked. I ended up choosing to make 2/2016 #118, a raglan sleeve top with a stand up collar although unfortunately I did not have fabric nearly as cool as the perforated metallic high tech fabric used by Burda:

Burda 2/2016 #118 short sleeve raglan top www.loweryourpresserfoot.blogspot.com
Image via Burda Style
My fabric is pretty cool in terms of colour though - neon yellow and pink, with sprinkles of blue and orange for good measure. It has a tweed like texture, although it's only a print and not a woven. I recall this fabric popping up on a few Australian bloggers in recent years, including this dress by Top Notch from 2014, so when I spied it on the clearance table at Spotlight recently for the princely sum of $4/m I snapped up a few metres for myself.

Burda 2/2016 #118 short sleeve raglan top in neon yellow and pink fabric www.loweryourpresserfoot.blogspot.com

The colour may be great, however the feel and texture is not so great. It's polyester/spandex, and it feels a bit like plastic bags woven together - a bit coarse and stiff but with four way stretch. However the stiffness was perfect for this style, as fabric with some body is required to make the collar stand up properly and not collapse. The collar is a straight piece cut on the bias and folded in half. I couldn't add any interfacing because some stretch is needed to ease the collar to the neckline, but luckily this fabric was stiff enough to work without interfacing.

Burda 2/2016 #118 short sleeve raglan top in neon yellow and pink fabric www.loweryourpresserfoot.blogspot.com

It is quite a boxy shape, and I was tempted to shape it more which would have be easy with all those vertical seam lines but I left it as is instead. I generally make forward shoulder adjustments in all my tops and jackets but I wasn't exactly sure how to do that in a raglan sleeve with a collar like this, and you can see in the photo below that the top pushes to the back a bit and the hem at the front rises:

Burda 2/2016 #118 short sleeve raglan top in neon yellow and pink fabric www.loweryourpresserfoot.blogspot.com


Because the collar is so wide it doesn't feel like it is pushing against my neck and is comfortable enough to wear. Overall I quite like how this top has turned out. The hem finishes at my high hip and the sleeves just above my elbow, which is perfect for a casual look with skinny pants:

Burda 2/2016 #118 short sleeve raglan top in neon yellow and pink fabric www.loweryourpresserfoot.blogspot.com

 Overall, another great pattern from Burda. It was very quick and easy to make because it's just a simple raglan top, but I think those seam lines and the stand up collar make it a little bit different. Now if only I could find a fabric like the one used by Burda, I would make another version of this top in a jiffy!

Third time lucky: Vogue 2783 panelled dress

Thursday, 11 February 2016
Vogue 2783 panelled dress www.loweryourpresserfoot.blogspot.com

After having Vogue 2783 in my pattern collection for many years unused, I've now made this pattern three times in last few years. I don't know why I left it so long before I used it in the first place, because it really is a great looking dress. It's now OOP, but it is available through some Etsy and Ebay sellers.

ogue 2783 DKNY panelled dress pattern www.loweryourpresserfoot.blogspot.com

The first version I made in 2013 (posted here) is made from a floral cotton sateen with dark blue piping. The second version I made in 2014 (posted here) is from a cotton/linen in a graphic print with white piping, and little cap sleeves. For the third version I chose to keep the cap sleeves but not to use any piping, and instead use contrasting fabrics. All three dresses look quite different don't they?

Vogue 2783 panelled dress www.loweryourpresserfoot.blogspot.com

How funny that since 2013 my hair has gotten shorter and my hemlines have gotten longer!

The fabric I've used in this version is a printed cotton drill I bought late last year from Tessuti, and cotton sateen in black and white bought from The Remnant Warehouse recently (and specifically for this project). I bought two metres of the print cotton drill planning to make an entire dress from it, but I think it looks more striking mixed up in this way. Plus now I have some fabric left over to make something else since this didn't use much - bonus!

After suffering quite a bit of disappointment lately with cotton sateen (wrinkly, sagging out or losing it's dye easily), I have to say that the quality of the cotton sateen from the Remnant Warehouse is great. It's about the same price as that from Spotlight but it's much thicker, hardly wrinkled after a day of wear and didn't lose it's sheen after a wash. I don't know if it will stretch out because this isn't a fitted dress, but I bought several metres of the black intending to make some pants, so I guess I'll find out soon enough!

Vogue 2783 panelled dress www.loweryourpresserfoot.blogspot.com

Construction wise there isn't too much to say - the pattern runs terribly large, but I had already made changes to the pattern from the previous two versions so I was able to sew this up quickly. Instead of piping around the neckline I used bias tape to finish the neckline and armholes, and as you can see in the photo above I used white thread on the white portion and black thread on the black portion for the topstitching - how is that for attention to detail?

The back is pretty much the same as the front in terms of fabric placement. I didn't even attempt to pattern match along the centre back seam, because I figured this print is small and busy enough that it wouldn't be noticeable:

Vogue 2783 panelled dress www.loweryourpresserfoot.blogspot.com

I do like the fit on this dress, but if you are planning to make this pattern just beware you'll have to take it in a lot to get a close fit. Despite my measurements indicating I should make a size 12, I use a size 6 pattern and still have shaved a few centimetres off each pattern piece above the waist. 

Vogue 2783 panelled dress www.loweryourpresserfoot.blogspot.com

I also chose not to make the matching belt, because without a waist seam I don't think it really needs to be worn with a belt. I also left off the bottom band because I would need to significantly shorten the dress and I thought it would interfere with the strong vertical lines of the dress. Keeping it simple I think is more effective with this pattern mixing instead.

So overall, I really like this dress and if you have this pattern I can highly recommend making it. But after three versions, and with so many other dress patterns in my collection I think this one may be the last.

And the winner is.....

Thursday, 4 February 2016

Check out the evil stare that the illustrated lady is giving the real life lady on that pattern envelope! Nothing to do with anything, but I thought it was quite funny and worth sharing.

So the winner of the pattern give-away is.....well, the winner is actually me and anyone else who ever thought about irons - so much good advice! Thanks to everyone that pitched in with their experience, it is all very useful. I haven't actually made a decision yet, because I plan to go into the store and actually handle the irons as Jessica Malcolm suggested, instead of just relying on technical data and reviews. I'm still tossing up between the Philips or Tefal though, because the Laurastar irons are a bit out of my budget and I don't think the Rowenta irons or Maytag are sold in Australia. I am leaning towards the Tefal though, because like a few of you I have dropped my current one several times and it is still working.

Also, I love how Sofie M and Heber were having a running conversation in the comments about the iron Heber received from her boyfriend - too funny! And thanks to Melissa Lee for answering the question about which pattern I was referring to when I said there was a modern copy of the 70s wrap skirt pattern - I was trying to be diplomatic and not name any names!

Ok, so on to the pattern giveaway. I separated all the commenters into three groups depending on which (if any pattern) they nominated, and then did a random number generator to pick the winners. The names that came up are:

Simplicity 4930 Sundress Pattern - Tina Briggs
Simplicity 2080 mens swimwear pattern - Jessica Malcolm
Simplicity 7189 skirt pattern - jjuzzy

If you could all email me at KristyLChan@outlook.com with your postal addresses, I'll get them out to you shortly.

A big thanks too to Melissa Zillman who not only very kindly emailed me with advice on the Philips iron but even attached photos of the spluttering marks left on her jeans after ironing - I so hate it when that happen.

And a special mention goes to Mike Dunlap - I think you are my first male commentator ever!

Burda of the month: 1/2016 #120 bright yellow jacket

Friday, 29 January 2016
Thank you to everyone who has left a comment on the last post - I really appreciate all the good advice. Who would have thought that we'd have so much to say about irons?!

I've got my Burda challenge off to a good start this year  - not only have I made a project from the January issue in the actual month of January, but I really love how it has turned out and I used a long term stash resident. All round winner in my books. I made jacket 1/2016 #120 which has turned out like this:

Burda 1/2016 #120 tailored yellow jacket www.loweryourpresserfoot.blogspot.com

It looks very different from the pattern in the magazine, mainly because Burda has made their version in a fake fur:
Burda 1/2016 #120 tailored yellow jacket www.loweryourpresserfoot.blogspot.com
image via Burda Style
I've made mine in a thick textured cotton that originally came from my grandmother's stash so it could be many many decades old. But it's such a cheerful colour, and the fabric has a nice thick weight to it so I just knew it would be perfect for a boxy jacket like this.

Except, I don't do boxy very well. I couldn't help myself, I had to shape this jacket by taking in the side seams a little and adding two vertical darts to the back:

Burda 1/2016 #120 tailored yellow jacket www.loweryourpresserfoot.blogspot.com

There is still a little too much fabric there in the back view, especially around the armscye, which if I had made a muslin version I would have resolved but of course I didn't make one so I'm just going to live with this:

Burda 1/2016 #120 tailored yellow jacket www.loweryourpresserfoot.blogspot.com

The other change I made was to draft a neck and front facing from the lining pattern. The pattern suggests using a poplin fabric as the inner fabric and lining to the edge, which probably works ok when using a thick fabric like a fake fur.  But I think a tailored jacket made with a jacket weight fabric looks better with self fabric facings because it prevents the lining peeking out and it sits better as well.

Burda 1/2016 #120 tailored yellow jacket www.loweryourpresserfoot.blogspot.com

I was super short on both lining fabric and the outer fabric for this project. As you can see in the photo above, the sleeve lining is only half the sleeve purely because I didn't have enough yellow lining to make a full sleeve length and nor did I have any other light coloured lining fabric on hand for the sleeves. It's a bit slip shod, but it works and I've tacked it down to the seam allowance so it will stay in place.

I also just managed to eek out the sleeves of the outer fabric by placing the sleeve end on the selvedge of the fabric with no fabric to turn up for the hem. Originally I thought I would just make this a bracelet length sleeve, but it finishes as just the right spot on me so I've left it unhemmed. For the seam allowances of the sleeve I turned the raw edges under and slipstitched them down, so it's quite a neat finish. Again, it's a bit of a dodgy solution but it works!

Burda 1/2016 #120 tailored yellow jacket www.loweryourpresserfoot.blogspot.com

The pattern calls for a snap to be placed there at the centre front of the jacket. This fabric was too thick to make a covered snap, and nor did I have any big enough in my stash but I did have a hook and bar salvaged from a RTW garment some time ago. This is one of those that instead of sewing on you just push the ends through the fabric and use some pliers to squeeze the ends closed. Except I squeezed a little too hard with my pliers and the bar got a little bent as you can see below! (Ignore the colour of this photo, the yellow turned out all shades wrong in this picture for some reason).

Burda 1/2016 #120 tailored yellow jacket www.loweryourpresserfoot.blogspot.com

I do like the discreet look of the hook and bar though - it's hardly visible at all when the jacket is worn open, and it looks very polished not having any visible stitches.

Burda 1/2016 #120 tailored yellow jacket www.loweryourpresserfoot.blogspot.com

As you can see in the photos above, I used some canvas interfacing across the back and part fronts, as well as a lightweight whisper weft iron on interfacing at the top of the sleeve. The thickness of the fabric along with the interfacing has made a beautiful shoulder cap, with no collapsing at all which is a look that I absolutely hate. So happy with how this one turned out:

Burda 1/2016 #120 tailored yellow jacket www.loweryourpresserfoot.blogspot.com

I've seen lots of collarless jackets with pointed front lapels in the stores recently, including the one below left in Trenery which originally retailed for $299, so I was very happy to see that Burda had included one in the January issue. The yellow colour came from an inspiration image I recently pinned from Table Eight - I'm quite glad that I finally used Pinterest for a real, actual use!

left: Trenery Jacket, right: Table Eight jacket
Burda 1/2016 #120 tailored yellow jacket www.loweryourpresserfoot.blogspot.com

So overall, I love this jacket immensely. It's very simple to make and doesn't use a great deal of fabric - I eked it out of 1.2m fabric but I did have to cut a few corners to make it work. For the next version (and yes, there defintely will be one) I will work on that excess fabric at the back, possibly by putting in a centre back seam instead of the darts and reshaping the armscye. I would also narrow the sleeves somewhat as you can see in the photo above that they are quite wide. But apart from these minor fitting changes it is a great pattern that I can recommend if you're after something simple.

Good luck to all of you doing a Burda challenge this year or those thinking about doing one - there were quite a few good patterns in this issue that should make it easier to choose, including this gorgeous vintage dress, this cute draped jersey skirt and this interesting double layer top

Vintage pattern giveaway and request for iron recommendations

Sunday, 24 January 2016
There I go again with the most literal and most boring blog post title ever!

Before I get into that I must apologise for being a bad blogger - I haven't gotten around to responding to comments I received on my last post as yet.  Plus, an email I received just recently from a lovely reader named Hannah who has bought an Orange Viking 3600 Husqvarna sewing machine just like this one I blogged about back in 2013 made me realise that people are commenting on some of my older posts but I'm not getting email notifications of them via blogger and hence I had no idea. So my apologies to anyone who has posted a comment on an older post of mine and I didn't respond - if you're still reading I promise you I didn't mean to ignore you.

Ok, so on to this vintage pattern giveaway. I've been extremely busy these last few weeks and it has been super super hot so I haven't been doing much sewing at all, but I've reacted in that classic way of "if not sewing then buy sewing related stuff"! Admittedly the patterns and few pieces of fabric I bought in the last two weeks were from an op shop, but stash addition is still stash addition regardless of where it comes from.

I bought a big box of patterns of mixed vintage (1950s-1990s) for the happy price of $10, which ended up having a few patterns that I already owned. In the interest of managing my pattern collection, and sharing the love around I'm offering these patterns to any reader who would like them (happy to post internationally).

First up is Simplicity 4930, undated but probably early 1960s sundress and jacket pattern. It's for a size 14 - bust 34", waist 26" and hips 36". The envelope is a little battered but the instructions and pattern pieces are ok. I actually made a dress from this pattern back in 2010 in an aqua/white stripe cotton which I still wear quite a lot, especially in this hot weather, so I can attest to this pattern being simple to make and just lovely.
Simplicity 4930 vintage sundress www.loweryourpresserfoot.blogspot.com

Next is Simplicity 2080, which even if you don't intend making it up is worth having just for the very cool cover art! It's also undated but again I think it's probably 1960s. It's described as a men's beach set - a raglan shirt pattern and swim shorts. The medium size is chest 38-40" and waist 34-36".

Simplicity 2080 vintage mens beach clothes www.loweryourpresserfoot.blogspot.com

Lastly, there is Simplicity 7189, which is a 1978 skirt pattern with three variations: 1) a pleated front, 2) top stitched details and 3) a wrap skirt with waist band ties and gloriously oversized patch pockets. It's a size 12, which will fit a waist of 67cm/26.5" and hip 92cm/36". The wrap skirt version looks very much like a certain indie pattern released in recent years - why pay big $$ for the indie version when you can have the original design?

Simplicity 7189 vintage skirt www.loweryourpresserfoot.blogspot.com

In case you think I'm doing this purely because I am a lovely person - I do have an ulterior motive and I will make you work for it! In the comments please tell me what iron you're using and whether it's any good. I am in the market for a steam station irons, mainly because my iron seems to need refilling with water every two minutes but also because I have weak wrists and lifting a heavy iron is just no good for me.

At the moment I'm leaning towards either the Philips PerfectCare Viva which has good reviews and is on sale at the moment, or the Tefal Effective Easy Steam Generator which also has good reviews and I've had great experiences with Tefal irons in the past. Both have large water tanks, long cords and are light which are my main criteria.

Tefal and Phillips steam station iron www.loweryourpresserfoot.blogspot.com

Even if you don't want one of these patterns, feel free to leave a comment - it's a great opportunity to  rant about a leaking iron ruining a beautiful nearly finished project to people who will sympathise, or to boast about your bulletproof iron that has withstood your cheeky cat knocking it to the floor to get your attention!

Please tell me in your comment which pattern you'd like - if there is more than one request per pattern   I'll do a random draw next Monday.

And thank you all in advance for what I know will be your very helpful comments.

Burda projects of the month: 11/2015 #108 (fail!) and 12/2015 #121 (winner!)

Sunday, 10 January 2016
Apologies for the blog silence - we've been away on a holiday and then had house guests which left me little time to sew or blog. I managed to finish my December Burda project just after Christmas day and then managed to ruin my November Burda project on the morning of the 31st so I guess that counts in last year's tally, right?

I really liked the patterns in both the November and December issues, but since they are all winter clothes and it's so hot here at the moment I always struggle to make something - I just can't bring myself to handle wintery wool fabrics when I'm feeling hot and sweaty. I definitely plan to revisit these issues when the weather cools down around here though, because there are some lovely tops in there.

Let's start with the good project first. I made this lightweight summery shirt dress style from Burda 12/2015 #121:

Burda 12/2015 #121 gingham shirt dress www.loweryourpresserfoot.blogspot.com

Burda 12/2015 #121 gingham shirt dress www.loweryourpresserfoot.blogspot.com

In the magazine this dress is made from a silk, with long sleeves but I made mine with with shorter sleeves finished with elastic so I could scrunch them up higher when need be. The fabric I used is a lightweight polished cotton in a check pattern (it's not actually gingham) which is very badly off grain. I tried all I could to straighten it which didn't work, but I figured that using a contrast band meant that the patterns didn't need to match, and the loose style cinched in with a belt would disguise it somewhat.

This is a very loose style without any shaping to it at all. Without the belt, it sort of looks like a nightgown:

Burda 12/2015 #121 gingham shirt dress www.loweryourpresserfoot.blogspot.com

Burda 12/2015 #121 gingham shirt dress www.loweryourpresserfoot.blogspot.com

It definitely needs a belt to give it shape:

Burda 12/2015 #121 gingham shirt dress www.loweryourpresserfoot.blogspot.com

Burda 12/2015 #121 gingham shirt dress www.loweryourpresserfoot.blogspot.com

I didn't have very high expectations from this dress given it's a style quite unlike what I usually make, but I've worn it a few times during the last two weeks and it's been great for the hot weather. I didn't make any changes to the pattern, although I left off the patch pockets at the front because it looked a little too heavy in the contrasting black fabric but too disjointed in the checked fabric. It was pretty simple to make, and I can highly recommend this pattern if you use a lightweight, drapey fabric.

I did have high hopes for my November Burda project - I wanted to make a light, floaty top to wear to a New Year's Eve party but of course when I am rushing to make a project for a specific occasion it always goes wrong somehow. I used Burda 11/2015 #108:

Burda 11/2015 #108 lace top www.loweryourpresserfoot.blogspot.com

Instead of lace I used a crinkly polyester chiffon that has been in the stash for a very long time and was originally bought from an op shop so no great loss that it didn't turn out well. I started out making this properly, using French seams with was tedious with all those seams and the slippery fabric that wouldn't hold a press. It turned out that the top was too tight under my arms (not discovered until all the seams were sewn and the sleeves set in) which is not something I generally experience with Burda patterns. I couldn't bear the thought of unpicking all those seams in chiffon, so I decided just to finish the top to put it in the donation pile.

But a bit of careless overlocking while attaching the collar completely ruined it - the collar band folded up and got caught in the stitching as well as cutting it beyond repair:

Burda 11/2015 #108 lace top www.loweryourpresserfoot.blogspot.com

So this top ended up in the bin after all. But for the record this is how it looked:

Burda 11/2015 #108 lace top www.loweryourpresserfoot.blogspot.com

There were a few things I didn't like about this pattern anyway. The pattern is the same as pattern #109 which was sleeves with ties so it has a two piece sleeve - totally unnecessary if you aren't making the tie end version and would be much better if it had a one piece sleeve instead. I also don't like the centre front seam - lots of Burda patterns have keyhole necklines with either facings or plackets which would have been preferable.

And in case you're wondering, finishing these two projects does not mean that I finished my Burda challenge for 2015 - my May project is still in pieces after I pulled it apart to fix some fitting issues. My one and only sewing resolution for this year is to complete at least 10 UFOs this year (trust me, there are more than 10!), so I plan on finishing that one soon.