Burda of the month: 7/2013 #110 Cowl neck top

Wednesday 31 July 2013
After running late in finishing my June Burda project, I managed to finish sewing this one about a week and a half ago but it's been sitting on my dress form with various trims pinned on it while I was waiting for inspiration to strike. It just seemed to be a bit bland and needing something more, but funnily enough it was only when I gave up on it and just decided to photograph it purely so I could blog about it while it's still July that I realise it's fine as is. Actually more than fine, I'm happy with how it looks and I'll probably wear it.

burda-7-2013-#110-cowl-neck-top

I made the cowl neck top 7/2013 #110, which you can download from the burda style website here:


The pattern suggests sewing it from a softly draping jersey fabric with satin for the contrast straps, but I sewed mine from a silver lurex knit that I had in the stash because it was very drapey and I was hoping that the fabric would be a bit sparkly in a dressy but a not too over the top way.


I should have used some satin or other fabric for the straps as per the pattern suggestion because my fabric did not press or gather very well at all and when I tried to do rows of decorative topstitching it stretched out in all directions even with interfacing. I thought about putting some beading on the straps or some other form of trim but in the end I decided to leave the straps plain. I think they look extremely home made - a bit puffy and amateurish:

burda-7-2013-#110-cowl-neck-top

I probably should have also interfaced the back neckline and reduced the width significantly, because it gapes a fair bit although it sort of looks like a mini cowl to match the front so I can live with it:

burda-7-2013-#110-cowl-neck-top

But Burda's instructions are also very amateurish in my humble opinion. They instruct you to sew the straps on after you've sewn the cowl down and sewn the front to the back, just pressing and topstitching the seam allowances down, although they do suggest finishing the front strap by hand. They also instruct you to turn down and topstitch the seam allowances of the back neckline and back armhole edge, but the front armhole edge has the self facing of the cowl so that's two different finishing methods for the one armhole.

Instead I drafted a facing for the back neck edge to match the front, so that it not only enclosed the ends of the straps but also finished the neck and armhole edge much neater than I could achieve by turning under and topstitching. And I also ignored the pattern directions as usual and sewed it so that ends of the straps were enclosed in the facing at both the front and the back. 

For the front I slipped the ends of the straps in when I sewed the cowl down to the front at the shoulder seam and armhole edge right sides together, but not down the side seam yet:


And for the back I slipped the other ends of the straps in when I sewed the shoulder seams, armhole edge and back neck edge of the fabric and self drafted facing (right sides together), and again not down the side seams yet.


And then I flipped it all out the right way, and sewed the side seams in one seam starting from the top of the facing and continuing down the side seam:


It's certainly not rocket science or haute couture, but it's a much easier and neater way than the simple but crude way that Burda suggests. I sometimes don't understand why Burda does the things it does - it wasn't much harder to sew it the way I did and it only involved one extra piece but it was a much better and easier way of doing it.

best sewing patterns of the year: New Look 6808

Monday 29 July 2013
So here we are half way through 2013 and I've only just noticed the list of the best sewing patterns of 2012 over at Pattern Review which went up in February - clearly I live in my own little world for most of the time (and happily too, I might add!). Maria - I love your black and white print Peony dress featured there, and Melanie's Renfrew top pictured in Machu Picchu no less!

Anyway when I spied New Look 6808 there - a top designed for wovens with a variety of collars I knew I had to try it. Lately I've been thinking that I need a variety of tops in my wardrobe, and since knit fabrics and I are warming up to each other but are still not BFFs a woven top is just what I need.

new-look-6808-white-blue-polka-dot-top

New Look 6808
I made this version from yet another shapeless shift dress that my grandmother had started but not finished, in a lovely crisp white cotton with blue polka dots. She had only got so far as cutting and pinning the pieces together so unfortunately there were quite a few rust marks in random spots after being folded and stored for many years with the pins in place. Another reason not to let your UFOs linger? An initial wash and soak didn't remove the rust spots, so I had to carefully place the pattern pieces to avoid the worst of the rust marks. This meant that I couldn't cut both the front and back pieces on the fold, so I had to move the zipper from the side seam to the centre back, which also meant that I had to split the back collar piece and back facing piece into two pieces. But it all worked out fine, if you didn't know the pattern you wouldn't even glance twice at the back:

new-look-6808-white-blue-polka-dot-top

Size wise I found this pattern to run a little large. I've made quite a few successful New Look patterns lately that needed little adjustments, with New Look 6000 and New Look 6968 being my favourite dresses fitting wise (see here, here, or here), so I just assumed that this pattern would fit as well as those two. I cut out a size 8 at the top grading out to a size 10 at the waist and then a 12 over the hips, but I probably could have gone down a size overall. This top is also very long - I cut four centimetres off the bottom before I hemmed it, and it still finishes at my lower hip which being my widest part is not so flattering unless I always wear this tucked in with whatever I pair it with.

Speaking of which, I did a quick refashion to this poly-wool blend knit sunray pleated skirt in a yummy caramel colour that I found in an opshop ages ago to wear with this top. It was mid calf length but I lopped off about 15cm from the bottom and did a narrow hem, and then I used a blunt disposable razor to shave off all those annoying pills that certain fabrics get and re-pressed all of those pleats to revitalise it and now it looks as good as new.

new-look-6808-white-blue-polka-dot-top

I decided to make view C with the bow neckline, which is a bit different to my usual corporate, plain minimalist look but I guess every now and then you need to let your inner librarian out to play! Plus I am loving the caramel coloured skirt look, from my pinterest pins I found these outfit inspirations:

from left: maisouivintage.com, perfectsuits.tumblr.com, hautesplainesgirl.blogspot.com

Overall I agree with this being included as one of the best sewing patterns for 2012 (although it has been out for several years now) - it is an easy make, could be a well fitting top if you took the time to fit it better than I have here, and it could look dressy or cute depending on the fabric you choose.  I can see myself making a few more versions of it. Sometimes it is worth following the crowd.......

Sewing and technology

Wednesday 24 July 2013
Wow, thanks everyone for taking the time to leave a lovely comment on my dress in the last post - I'm glad you all like it as much as I do! And I'm glad that a few of you are thinking of doing a colorblock project too, because I'm planning at least one more myself and it's good to know it's not considered passé.

But first I'm contemplating the need to have my sewing machine serviced because it's running quite loudly and seems to be skipping stitches quite a lot even with new needles. I did give it a clean, even taking the needle plate off and vacuuming out all the dust that gets in around the bobbin, but it doesn't seem to have helped. With modern computerised machines there's just not that much you can do yourself really.  At the recent high tea several of us were talking about whether older or newer sewing machines were best - the argument for the older mechanical ones is that they are able to power through any fabric and whilst the newer computerised ones having the fancy stitches and automatic buttonholes that make life easier. When it comes to overlockers though, the new models with their fancy self threading and automatic tensioning are hands down the winner - I just couldn't live without my Babylock and it's sanity saving technology!

I'm the same with my Ipad - before I got one I doubted very much whether I needed one at all since I already had two computers (one desktop and one laptop). But after having one for a while I realise how many uses they have, such as being able to watch helpful Youtube tutorials while sitting at the sewing machine, or using apps to keep track of your fabric stash or patterns. I've put all my scanned sewing pattern covers (saved as jpegs) into photo albums sorted by type, so that even if I'm not sewing I can swipe my way through my pattern collection for inspiration:


Unfortunately my two kids are avid fans of my ipad too - little Toby knows which buttons to swipe and which ones to tap already at only 15 months! They are way too rough with the ipad though, always peeling off the plastic protective screen so that it's now annoyingly bubbled and frequently dropping it so the hard plastic cover has cracked at the corner (but not the ipad so I suppose it's done it's job!).


I have been looking to get a cool cover for it, when serendipitously the lovely people at Snugg asked me if I would like one of their products to review. What great timing! Now you all know I very rarely do product reviews because this is a personal sewing blog and not the home shopping network, but since this is  relevant and something that would be very useful at this point in time I jumped at the chance. So while I was supplied with an ipad cover for review the opinions here are my own.

I chose a lovely deep red coloured leather cover, and I was pleasantly surprised at how light and slimline the case is. Plus it has an elastic strap on the inside cover that when it's open you can slide you hand through to make sure you don't drop it when you're carrying a wiggly toddler while trying to check out Pinterest.

 
It comes with a handy stylus pen holder at the top which will be useful because I recently downloaded a free app called Paper by 53 which I've been using to try to sketch clothes and outfits, especially when I've been people watching or snoop shopping.
 
 
There's a little flap at the back which securely holds the cover folded so that you can prop the tablet up to watch the screen, and it holds it really well unlike my previous magnetic cover which always used to collapse on me.
 

The cover I chose is a textured red leather (although only PU leather). And the white topstitching is a nice touch too.


Plus I just love a company that uses cool retro typography in their packaging:


I've had this on my Ipad for a week now, and I'm pretty happy with it. Toby has had a chew of one of the corners and some of the red PU leather layer has come off, but frankly there is very little that stands up to his chompers - his timber cot is testament to that! So if you're in the market for an Ipad cover I can recommend the Snugg products - the price is about what you would pay in the shops but is a nicer choice in my humble opinion, it arrived pretty quickly from the UK and they offer a lifetime guarantee.

Ok so time to get back to my regularly scheduled sewing posts - believe or not but I've already finished my July Burda project but I'm a bit non-plussed with it. I'm thinking of doing some beading to jazz it up, which is completely unlike me but there is a first time for everything isn't there?

June Burda of the month: panelled dress 6/2013 #117

Friday 19 July 2013
Ta da! June Burda project finally completed.  Yeah I know it's actually the middle of July, but the good thing about a self imposed challenge is that there's no real harm done if you miss a deadline by a little (or a lot!).

Burda-6-2013-#117-color-blocked-dress

I realise the colourblock trend has been around for quite a while now, and I've probably either come in at the tail end of it or have missed the boat completely, but I don't care because I quite like the look. I was heavily inspired by these dresses that I had pinned sometime ago:


I used Burda 6/2013 #117  with a few changes to take it from a summer dress to a winter dress which is more befitting of our current weather:


As soon as I saw this pattern I immediately thought of a colour blocked dress, the only problem being what colours and fabrics to use.  I've proudly made this all from stash fabrics - a grey wool flannel and a white textured wool/polyester blend both bought from Spotlight ages ago, and some black wool crepe leftover from some other past project. I lightly interfaced the black wool crepe to give it the same weight and body as the grey and the white fabrics, and while there's a lot of texture within the one dress I think it works pretty well.
 

Sewing this dress was just like putting together a big jigsaw puzzle, albeit a fiddly one. Getting the yoke and the white side panels to line up at the side seam and zipper required some hand basting to get the panels to line up and not slip when I sewed them. And sewing those white panels in to the grey fabric was really hard to do - the corners are a bit more rounded and not as pointy as I would have liked, and now that I'm looking at these photos I can see that the left side front corner is puckered which I'll have to redo although it's not as obvious in real life.

Burda-6-2013-#117-colour-blocked-dress

Burda-6-2013-#117-colour-blocked-dress

I changed the pattern to have a centre back seam with an invisible zipper instead of cutting the back piece on the fold and putting a zip into the side seam. I did this mainly so I could do a small swayback adjustment, but also because I don't like side zippers all that much.  I only did a small swayback adjustment because the body of the dress was quite narrow at the waist line, and instead I treated the vertical seams of the white panels as darts, and deepened the back seams a bit to get a closer fit. The dress fits like a glove as you can see from the side view, although there is a little bit of fabric pooling/rippling at the back:

Burda-6-2013-#117-colour-blocked-dress


For the sleeves I just used the pattern pieces from a previously traced Burda pattern. I did check whether I needed to alter the armscye to fit, figuring that it would be a slightly different shape for a sleeveless dress as opposed to a sleeved dress but they were exactly the same. I guess Burda uses the same basic block for their pattern designs which is useful to know.

The original pattern is for an unlined dress, with the neck and armhole openings simply turned and top stitched down. Because I've made this from wool and I always wear pantyhose during the winter I lined the dress from the yoke down in a light grey lining fabric from the stash, making the black yoke doubled so that it also acts as a facing to the neckline.

It took me such a long time to sew this dress, thanks to a cranky toddler letting me only sew in short spurts here and there. But overall I quite like this dress, and might make it again in summer from a cotton fabric in a sleeveless version as per the original pattern.

And now onto the July Burda, hopefully done in July and not August......

This from that: Kwik Sew 2276 and McCalls 5962

Wednesday 10 July 2013
Thanks everyone for your comments on the last post and your helpful hints on swimwear sewing - I'll definitely keep them in mind for the next round of swimsuit sewing. Actually I've already tried out the method of sewing elastic on to fabric with the overlocker and then turning it over and topstitching as suggested by both Angie and Maria - I discovered that to disengage the blades on my overlocker all I have to do is half turn a knob so it's easy peasy to do.  My precious Babylock, I love thee more and more each day!

My sewing lately has been so non productive thanks to Toby being a little clingy and whingy lately, he seems to have a sixth sense and just seem to know the exact moment I step foot into my sewing room because he'll then wake up and scream hysterically until I hold him. I've 90% finished my June Burda project, have started a refashion project and cut out a top, but none of these unfinished projects are blog worthy (yet).  I did get a bit of time last Saturday in my sewing room when my husband took the kids to the zoo, and I managed to finish up two pairs of pants for Toby because he's growing so quickly out of his other clothes.

My mum gave me a pair of lovely teal green corduroy jeans that she used to wear when she was younger - I distinctly remember her wearing these and another pair of cord jeans to my school when she was on canteen duty much to my embarrassment at the time. Of course now I would love to wear them myself, except that I can't fit into them and the small issue that my inner thighs are so flabby that when I wear corduroy jeans the noise of my legs rubbing together when I walk sounds like a black hawk helicopter taking off!

kwik-sew-2276-toddler-jeans
So instead I made Toby a pair of jeans from Kwik Sew 2276, a long OOP pattern that I've used before for jeans for Anna. I deliberately made these a size larger and with a little extra length in the legs so they are a little too big for Toby right now, but I'm sure that in no time they'll fit him perfectly (even if only for a nanosecond).

I reused the waistband and belt loops, and added some elastic across the back to make sure they fit properly, and I'm really pleased at how they turned out.

kwik-sew-2276-toddler-corduroy-jeans

kwik-sew-2276-toddler-corduroy-jeans

kwik-sew-2276-toddler-corduroy-jeans

My husband's clothes are perfect candidates for refashioning since he's a six foot something giant and likes to wear his clothes loose so there's a lot of fabric to work with.  Seriously, check this out:


He seems to have a lot of tshirts from charity golf or cricket days etc that are made from really nice fabrics but are covered in sponsors logos which means he never wears them again after the day, which is such a waste of resource.  Refashioning them is such a better idea than sending them out to a charity shop where it's unlikely anyone else would want to wear them either.  I decided to remake this tshirt that was made of a thick, woven knit in grey and black threads into some baggy pants for Toby to run around in when we're at home - no constraints on his overly ambitious climbing and running around now!  I used McCalls 5962 which ironically I whinged about the sizing previously, but this time the oversized, slouchy look is what I was after:

McCalls-5962-toddler-pants
 
McCalls-5962-toddler-pants

This is the waistband I sewed the elastic on with my serger and then turned under and overlocked - such a better method than sewing a casing and threading the elastic through with a safety pin because it stops the elastic twisting. I can definitely see this being a much neater finish on swimwear than a zig zag stitch. The only problem of course is that it's harder to tighten up or loosen the elastic waist if it's not fitting properly because you'd need to unpick all of the waistband, so you need to get that fit right the first time. I sewed on some black cotton tape at the centre of the waistband purely for decoration.

And so these slouchy pants are perfect for hanging out at home and getting into mischief - such as pretending to play golf with the toy golf clubs but really just hitting things with it (such a boy thing to do!)

or running around popping as many bubbles as he possibly could reach:


I braved the city Lincraft store at lunchtime today to buy an invisible zipper for my June Burda project - fingers crossed that Toby sleeps a bit better tonight so that I can finish it, better late than never!


'Tis the season for a swimsuit: Kwik Sew 3785

Monday 1 July 2013
It seems like everyone is making a swimsuit at the moment in the blogosphere. Katie has just wrapped up her SwimAlong 2013 series on swimsuit sewing, and ladies are making the Bombshell swimsuit pattern by Closet Case Files left, right and centre.  We're having some pretty wild and woolly weather here in Sydney at the moment - rainy, windy and pretty cold (all relative of course - it's not snowing or anything!). Apparently we've just had the rainiest June in six years. Not exactly the right time of year to be swimsuit sewing I know. But being the tiger mum that I am (ha ha!) I make my kids do swimming lessons all year round, even though the lesson is early on a Sunday morning and the swimming pools isn't very warm despite being heated. I think knowing how to swim is an essential life skill, especially in Australia where we have such close proximity to so many waterways and plus the swim school we go to is so popular that if you give up your space you're unlikely to get back in on your day of choice. Because Toby is in the baby class he needs a parent in the water with him, so I sit on the sidelines, usually with a coffee in hand chatting to a friend whilst our husbands and kids get in the water and do their thing.

Unfortunately though the pool is so heavily chlorinated it just ruins the swimsuits very quickly. And buying swimsuits for Anna is very difficult because she has a long body but is so skinny, so the suits that fit width ways aren't long enough, and even the tankinis for her size aren't long enough for my liking.  Plus the swimsuits are expensive - the last pair of Speedo brand swimmers I bought her were $41! So what's a sewing mum to do? Sew some of course....

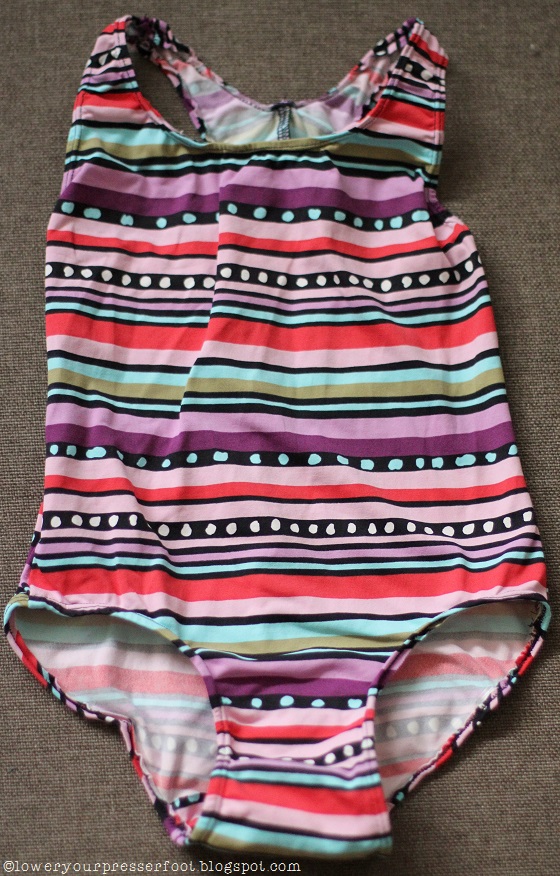
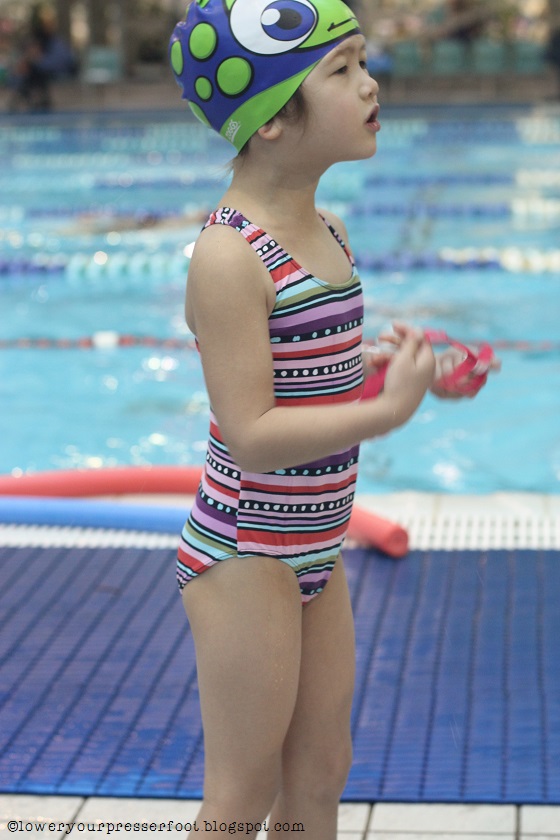
kwik-sew-3785-girls-swimsuit

I bought two pieces of swimsuit lycra from the Remnant Warehouse from their remnant bin for the grand price of $10/m, of which I'll probably get two or three swimsuits out of a metre so it's good value. Actually this is the first fabric I've bought for ages since I've pretty much been sewing the stash all year, but despite the enormity of my stash I didn't have any swimsuit fabric so I'm still being pretty well behaved when it comes to sewing the stash.

kwik-sew-3785-girls-swimsuit

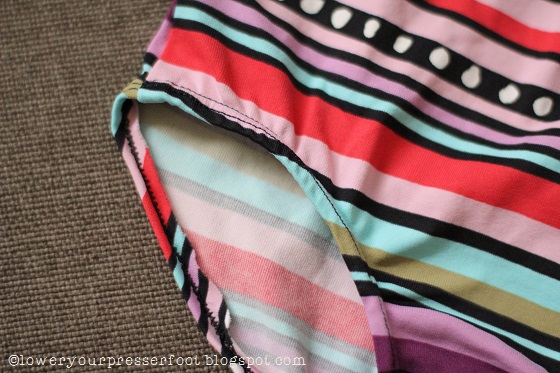
I used Kwik Sew 3785, which is a fairly simple racer back pattern. Sewing swimsuits isn't difficult, but it is hard I think to get a professional look. Sewing on the elastic is fiddly and I think mine looks very handmade even though I twinstitched on the outside, but it's good enough for a pair of swimmers for a little girl that will probably grow out of them in no time or the chlorine will destroy them soon enough. Anna is happy enough with them and they haven't fallen apart after two wears so I guess they are a success.

kwik-sew-3785-girls-swimsuit

kwik-sew-3785-girls-swimsuit

I didn't do a very good job matching the stripes at all did I? I have no tips to offer on swimsuit sewing since I need to practice and improve greatly, this being my second swimsuit I've sewn (the first one being this maternity one I made for myself last year).  I can advise however that the right needle makes all the difference. And you can only tell what the right needle is by doing some sample stitching. I tried topstitching using a stretch twin needle that I purchased especially for this project, but the stitches were skipping a lot. But then I tried just a plain universal twin needle and it worked fine! I also used some clear plastic elastic because I had a lot of it on hand, but I've since discovered that using normal 3/8" wide elastic is better - hopefully my next swimsuit will be better.

kwik-sew-3785-girls-swimsuit

But if you want to sew your own swimsuit, possibly the bombshell swimsuit pattern that everyone is raving about at the moment, here are some useful links and tutorials I found that might help you:

SwimAlong 2013 round up of resources
Creative Chicks roundup of all their tips
Zaaberry's swimsuit tutorial with free downloadable pattern
Pattern Review swimsuit sewing boards
Member's tips on sewing swimsuits on Pattern Review Youtube video by Brian Sews on how to attach perfect swimsuit elastic
Pattern School gives great advice on pattern making as well as some tips on sewing with stretch knits
Tutorial by The Strawberry Milk Run on how to make spaghetti straps from swimsuit material
Kitschy Coo tutorial for sewing a swimsuit with a band finish around the leg openings

And thank you to all who commented on the last post - you all have convinced me to keep the white dress in my wardrobe and not refashion it, although I think I will take it up a bit as suggested by Kim. I've been decluttering the house so much this year that I'm in the mindset of getting rid of things that aren't being used, but now I realise that I should hang on to things that are lovely even if they only get worn infrequently. I have so many dresses what's one more in the wardrobe?