A Sydney blogger making a Sydney jacket....groundbreaking

Friday 25 August 2017

Judging by my instagram feed, it seems practically everyone has made Tessuti's Sydney jacket at least once (some people several times even!). As usual I am late to the game - due to my contrary nature and my delight in avoiding what is popular!


However I wanted a lightweight jacket and I had some lovely wool coating fabric I bought at Easter on my mini-holiday this year from Darn Cheap Fabrics in Melbourne so it seemed a logical thing to do. The part of Sydney that I live in has barely a month of 'real' winter where it's cold enough to need a substantial coat but it is a bit chilly on my early morning commute to the city so the thought of wearing what is almost a blanket draped around my shoulders really appealed.


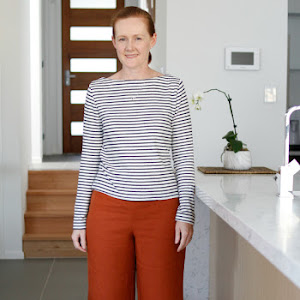
And when you are standing still while wearing this jacket it does drape beautifully and the pockets are at the perfect height to stand around slouchily with your hands hidden in the depths of the folds.


But, it's not really a practical jacket and to be honest I found it quite annoying to wear. I've been wearing this jacket for the last week in some windy weather and without any closures on it I felt I was continually wrapping it around me and constantly re-adjusting the fronts. And I found myself walking around with my arms crossed holding the fronts close in to prevent them flapping around, but that's not an ideal way to wear your clothes.


In terms of sewing it did take a bit of head scratching to figure out how the pieces join together. I didn't think there were enough markings on the pattern to make it quickly obvious which bits all joined together so I had to lay them out like a jigsaw puzzle to visualise how it worked, especially with that lower sleeve piece joining the upper sleeve/back yoke piece and side seams. But once that bit is worked out it's a pretty straight forward sewing project.


It also required a bit more precision sewing than I normally do, because instead of just sewing the seams right sides together the pattern requires one layer to be laid over the other and then top-stitched. First attempt I just winged it by measuring and pinning but that wasn't too successful as you can see below:


So I had to unpick that seam, and then mark chalk lines along all the seams. Actually that's not too much effort, it's just an extra step I don't need to do! But it did help get the top-stitching evenly in the centre of the overlapped edge and looks neat from the outside:


So overall, this isn't a favourite piece in my wardrobe simply due to the fussiness of wearing it. Whilst I really the look of the draped front, I like to put on my clothes and not have to re-adjust them all the time. I do however love this blue wool fabric, and I think next year I may pull it apart and remake it into a simple coat with a button front for next winter!


Burda Challenge: 6/2017 #103 tie neck blouse

Saturday 19 August 2017
My Burda magazines are arriving later and later each month - now they don't arrive until mid to late of the following month. But that's not a problem because I'm quite behind in this year's challenge, but when this magazine arrived I traced out this pattern and started sewing it the very same day. You see, I just bought some lovely Liberty lawn that I was very keen to make into something and this pattern was perfect.


This is Burda 6/2017 #103, a rather simple blouse with some nice piping details:

images via Burda Style

This is a relatively simple project to make, and is also the illustrated sewing lesson in the magazine and a blog post on the Burda website. It is a bit shapeless though, due to the lack of darts and shaping - the recommended fabric is crepe de chine which I guess is needed to make sure it drapes around the body. The Liberty lawn I've used is soft but doesn't drape  as well as a silk fabric would, so it is a bit puffy when worn tucked in. I may put in some vertical darts on the front and back to get rid of some of the looseness, but I'll wear it a few more times before I decide.


It's even worse though if I don't tuck it in. This is a bit wrinkled from wear, but worn out it just looks shapeless and oversized:


It's also a little plain without the neck tie I think, even with the piping details and the cute little collar. I left off the pocket because I was worried it may look like a pyjama top with the print and piping, even though wearing clothes that look like pyjamas in public seems to be in fashion it's not my thing.


The piping is my favourite feature - I particularly like the rounded edge to the collar and cuffs which makes the piping finish neatly. I found some small glossy rounded buttons which are perfect for the shirt, and since I had some extra I decided to add two buttons to the cuffs:


I do think the neck tie could be a little wider though as it seems to be a bit narrow and would look nicer in a fuller bow.


Unusually for Burda there is a drafting error with the neck tie, which they don't acknowledge in their blog post either. In the photo below, the pattern piece (piece 9) as traced is on the left - the instructions tell you to fold in half lengthwise, stitch the edges together and turn the right way out. But as you can see in the photo below on the right, when you fold that pattern piece in half it doesn't line up at all like the diagram in the Burda magazine:


To overcome this, and to make the neck tie wider I think it would be better to cut out 2 pieces and sew the 2 pieces together right sides facing and then turn it right side out rather than folding it in half. I didn't quite have enough fabric left to do this so I've left the neck tie as is.

So apart from the drafting issue, this is otherwise a good pattern. Plus I do love a Liberty print - this one is 'Solar' from the 2016 Silk Road collection that I bought from Tessuti a little while ago on an innocent lunch time walk that ended up in fabric shopping (it's dangerous when both Tessuti and The Fabric Shop are within walking distance of my office!).