September Burda of the Month: 9/2015 #122 the Referee Top

Sunday, 18 October 2015
My latest Burda of the month project is slightly late, but I'm excusing myself since I had a good excuse what with being out of the country. And since my October issue still hasn't arrived, technically I'm still sewing from my current issue.

Anyway, enough justifying myself to no one in particular, here is my latest project:

Burda 9/2015 #122 referee shirt www.loweryourpresserfoot.blogspot.com

In the magazine Burda calls this the referee shirt, pattern #122 from 9/2015, although on their website they specifically say to make it from a luxe fabric such as silk jersey and to wear with stilettos to avoid the referee look.

Burda 9/2015 #122 referee shirt www.loweryourpresserfoot.blogspot.com
images via Burda Style

I've made mine from a pinstriped soft cotton shirting fabric that has been in the stash for quite a long time, so mine has more of a casual business vibe than a sporty look. But a lightweight summer shirt with sleeves and a collar is exactly what I need in summer for sun protection which is why I picked this pattern over the several lovely dress patterns in this issue.

Because my fabric isn't as drapey as the silk jersey used in the magazine and I don't particularly like the tunic look, I shortened this pattern quite a lot - about 12cm off the length of view A so that it doesn't look like I'm wearing a nightie. I did keep the curved hem, which is slightly shorter at the front than the back, which gives it a sporty vibe:

Burda 9/2015 #122 referee shirt www.loweryourpresserfoot.blogspot.com

You can see that this shirt is a loose fitting style - there are no darts in the back at all but it was quite nice not to be obsessed with fitting my swayback for a change. I don't think it looks too bad from the back view:

Burda 9/2015 #122 referee shirt www.loweryourpresserfoot.blogspot.com

I didn't have a white zipper in the stash which is why I've left it off, but I did discover that the top is too low cut not to have the bottom section at least closed up. So I just put a button and a loop part-way up to keep things decent looking.

Burda 9/2015 #122 referee shirt www.loweryourpresserfoot.blogspot.com

I think my collar has turned out looking more like a sailor's uniform than a referee shirt though I think my past projects have shown that I'm not adverse to an oversized and sometimes ridiculous looking collar!

Burda 9/2015 #122 referee shirt www.loweryourpresserfoot.blogspot.com

I also found the sleeves quite long, but instead of just chopping them off at the elbow I decided to turn it up and sew it into a cuff instead - I think it goes well with the casual vibe:

Burda 9/2015 #122 referee shirt www.loweryourpresserfoot.blogspot.com

Overall this is a pretty easy pattern. I took a few shortcuts though - leaving off the zipper was one, but I also just turned the hem under and top-stitched instead of using fiddly binding strips. Confusingly, the pattern includes the seam allowance for the side seam and hem of the back pattern piece but not any others and then the instructions also say to include 1.5cm seam allowance at the slit edges of the back pieces! I can't explain why this is, but as usual with Burda it is usually best just to ignore the instructions and get on the best you can!

Burda 9/2015 #122 referee shirt www.loweryourpresserfoot.blogspot.com

Japan: inspiration overload

Friday, 9 October 2015
Apologies for the blog silence around here lately, but I've just come back from an amazing few weeks in Japan so actually I'm not really sorry at all! It's my ten year wedding anniversary and my parents kindly offered to watch the kids while we went on holidays without them - so the holiday was doubly fantastic.

Japan was just amazing and overwhelming with inspiration - the architecture was a real highlight for us, not only the ultramodern skyscrapers that dominate the cities but also the beautiful and serene lines of the residential dwellings. The food was outstanding, the culture very interesting and I loved people watching for Japanese fashion, from the crazy and colourful young girls in Harajuku, to the head to toe designer labels in Ginza and the simple chic in Kyoto.

And of course I did a fair amount of fabric shopping!


I hadn't planned to buy much fabric given that my stash is already overloaded and the fabric prices in Japan are comparable to Australia, but the huge range and variety of beautiful fabrics in Japan that are not easily found here soon persuaded me to buy more that just one piece per city! I came to Japan travelling very lightly, with one small suitcase that was carry on size:


But left Japan with another bag filled with fabric (but still well under my luggage allowance so I should have bought more):


Fabric shopping in Tokyo

Of course I went to the Nippori Fabric Town in Tokyo, which is as exactly as everyone describes it: one really long street with so many shops it's impossible to go into each on one day only. We came here the first day we arrived but it turned out to be a public holiday, so we made a second trip at the end of our holiday the day before we left for home. In hindsight that turned out for the best, because by the end of the trip I had given up my commitment to only buying one piece per city and I ended up buying a lot more fabric than I intended!


There was an overwhelming number of stores to choose from, and in the end I only shopped at 3 stores, plus the fantastic 5 storey Tomato store. I was there on a Saturday morning and the ground floor where the beautiful Japanese linens, cute cottons and infamous 100 yen shelves was so packed with people that I couldn't get near the fabrics at all. But I purchased quite a few knit fabrics on the second floor, plus a few pieces and some cool zips from two other stores as well:


Fabric shopping in Kyoto and shibori dyeing

The hotel we stayed in Kyoto happened to be directly across the street from the main Nomura Tailor store, so I had to walk past this shop multiple times over 5 days and restrain myself! This is a three storey shop crammed with the most beautiful fabrics and notions, but I managed to restrict myself to only four pieces of Japanese linen, cotton and seersucker because at this point I was still committed to just buying a few pieces in each city. I am now sorry I didn't buy more!


Also in Kyoto I visited the tiny, hidden away courtyard shop of the Misuyabari needle shop, which I found really easily thanks to the numerous other bloggers who have visited there and posted very helpful directions (such as this and this). They had ultra cute decorative pins all handmade, and a huge range of needles too, but since I'm rather practical I bought a mini sewing box which contained a tiny pincushion, some thread, small snips and some needles in a timber box:


We also visited the Kyoto Shibori Museum, thanks to the recommendation of a friend from my ASG group. We were able to learn all about the art of shibori, which is a very labour intensive method of wrapping minute portions of silk with threads to do a very elegant form of tie dye. We did a class where we folded some pure white silk concertina style, clamped with blocks and then dyed multiple times in different coloured dyes. This is how my scarf turned out:


Fabric shopping in Hiroshima

I hadn't planned on doing any fabric shopping in Hiroshima because we were only there for a few days, but we arrived on a rainy afternoon and ended up doing a bit of window shopping in their department stores marvelling at the crazy and cute stuff for sale. I accidentally stumbled on the craft area of the Sogo Department store, which up on the 9th level had quite a large range of fabrics, both by the metre and pre cut lengths, as well as patterns, notions and other crafty items.

I only bought one piece of fabric and a pattern from here, because I was still restraining myself at this point:


Fabric shopping in Osaka

In Osaka I made a bee-line for the Nano Iro store, which again I found quite easily thanks to those helpful bloggers who post very detailed directions (such as this post). The showroom was quite sparse, with not a huge range of fabrics available for purchase but they were all very beautiful.  The lovely sales assistants were quite interested and amused as to why I had travelled so far just to come to their shop! I bought one piece of fabric and a beautiful watercolour calendar which I then had to carry in my hands through 4 more cities because it didn't fit in my suitcase!


Overall I can highly recommend Japan as a travel destination. There's just so much for everyone - technology freaks, architecture buffs, foodies, culture vultures, shopaholics - you name it you can do it in Japan!

Luckily our return home has coincided with the arrival of hot weather here in Sydney, so I am very keen to start sewing at least a few of these fabrics (some of those knits will have to wait until next winter).

August Burda of the Month: 8/2015 #120 another pink drape top

Saturday, 5 September 2015
In my last post I was lamenting doing horrible things to a nice fabric - in this post I will lament doing nice things to horrible fabric! I picked a long term resident from my stash because I liked the colour and it draped nicely, composition unknown though, maybe some sort of woven polyester.

Unfortunately it's one of those fabrics that creases the second you dare touch or move it, so badly so that when I pressed one section another would immediately crease and so this top looks creased, puckered and altogether terrible. I'm calling this one a muslin, because I did need to do some fitting changes to get the pattern right so it still has some value in that regard and I definitely plan on making another one in a more beautiful fabric. But for now, here it is:


I used pattern #120 from the 8/2015 Burda magazine:

images via Burda Style
I have to say this issue is fantastic - after struggling to pick anything for the last few months this month I struggled just to pick one thing because there were quite a few great patterns. Yay Burda! But (and there's always a but), it does annoy when Burda does what they have done here and treats very slight variations on the pattern as three separate patterns. Honestly, the only difference between view B and C is using contrast fabric on the neckline, and the only difference with A is that the drape is sewn from two different fabrics.

As you can see from the line drawing, the top is rather shapeless. I seem to have an allergy to shapeless, unfitted garments and can never leave well enough alone! I curved those side seams in quite a bit at the waist line tapering out to nothing at the bottom. I think this has made it look very shapely whilst still being loose enough to wear with a zipper in the back.


I also significantly curved in that centre back seam to get rid of the excess fabric at my swayback as usual - I took it in about 5cm in my lower back tapering out to nothing at the top and bottom which has given me a slim fit at the back too. The hem dips slightly at the back too which is a nice touch:


I really like how the drape overlay on the front comes out of the shoulder seam - close to the sleeve but not part of it:


And I've certainly learnt my lesson from previous Burda projects that have a keyhole neckline and I lengthened the opening by another 4cm to make sure it would fit over my head (which I'm sure is normal sized!).


The model in the magazine is wearing her blouse tucked in, but I'm not so sure about this look. Because the drape sits over the waistband it just looks like the top is sloppily half tucked in and half slipping out to me:


The sleeves are a very slim fit, which I very much like the look of but they do mean you have a bit less movement. Which is fine because I won't be wearing this top playing tennis but if I stand with my hands on my hips or arms crossed (which I do far too often), the sleeve cap does pop up:


But overall I love this pattern - it's simple but still interesting. It did take me longer to sew than I expected though - several hours over a few nights mainly because I was fighting the whole way with the fabric but also because I basted those side and back seams several times to gradually take it in and doing a narrow hem on the drape edge is a bit fiddly. I did think about doing a rolled edge on my overlocker except I didn't have enough matching thread to do it.

When I make this again I think I will round out those angles on the drape so that it's one continuous seam instead of having those sharp corners to make it easier to sew. And hopefully I can find a decent fabric in a pink colour because I am still keen on making on a pink top despite two failures in a row now!

When sad things happen to nice fabric: vintage McCalls 5700 chambray polka dot shirt

Sunday, 23 August 2015
One of the reasons I think many of us have beautiful and lovely fabrics sitting in our stashes unused is because of a fear of ruining it. I know it's certainly the case for me - many times I've either completely stuffed up the project or I've made it into something less than stellar that made me wish I'd waited for a better pattern or project idea to come along. And that's why I have many pieces in my fabric stash that I really want to use but just can't bring myself to do so.

Sadly my latest project is a bit of both - a few small stuff ups and a poor pattern choice has meant that  I used this lovely dark indigo chambray with polka dots in a poor way. It's only a Robert Kaufman fabric bought from fabric.com last year so it's not irreplaceable, but still I wish I'd made something better than this:


I wanted to make a loose fitting shirt to layer over t-shirts to wear with skinny pants for a casual winter look. I almost reached for a standard button down shirt pattern of which I have many, when I came across a vintage McCalls pattern in my stash which is a raglan sleeve woven shirt pattern. I am inexplicably drawn to raglan sleeves (probably all sorts wrong for my narrow, sloping shoulders but still I love the style) and it is a 1977 pattern (my birth year) which I took as a good sign to try it out.


I did say I wanted a loose fit, but this pattern turned out huge. I didn't get a photo of it but basically it looked like an oversized art smock. Easily fixed though - I ended up taking 10cm out of the side seams and the sleeves to get it a bit more slim line but still a relaxed fit. The back has an inverted centre pleat which adds quite a bit of volume to the back and is the complete opposite of my usual obsession of removing excess fabric in my lower back area, but a different silhouette is good for a change:


Unfortunately re-sewing those side seams led to a stuff up - I accidentally caught the fabric in the side seam when I was overlocking the edge and cut a nick which is of course right in the centre front and too low to cover up with a pocket:


I applied some of that iron on mending tape to the back of it which I hope will hold. I may need to sew it down after a few washes if it starts fraying though. So annoying when something like that happens!

The collar is a one piece collar (i.e. the collar stand and collar are combined) which is not my favourite way of doing things because it means the collar tends to sit more widely open and it doesn't seem to roll over properly the whole way around the collar, although it easier and quicker to sew. I suppose I could have put that first button up a little higher (or put another one in) to bring it in closer, but I don't think it looks too bad and certainly has a 1970s vibe:


Buttoned up to the top just looks a bit too work shirt style to me and a bit lopsided for some reason:


I do like the curved hem at the sides, and I remember to shorten the shirt quite significantly (about 20cm) from the pattern because I didn't want a tunic length shirt:


So overall not one of my best projects, but it's not always rainbows and lollipops around here. Or highly structured tailored jackets and pencil skirts! I might try styling it differently before I give up on it, perhaps some skinny pants would make it work after all except that I don't have any and I don't plan on doing double denim. And if it is unsalvageable, well I guess I can always order some more fabric!

Vogue 9716 - tailored white wool jacket

Saturday, 8 August 2015
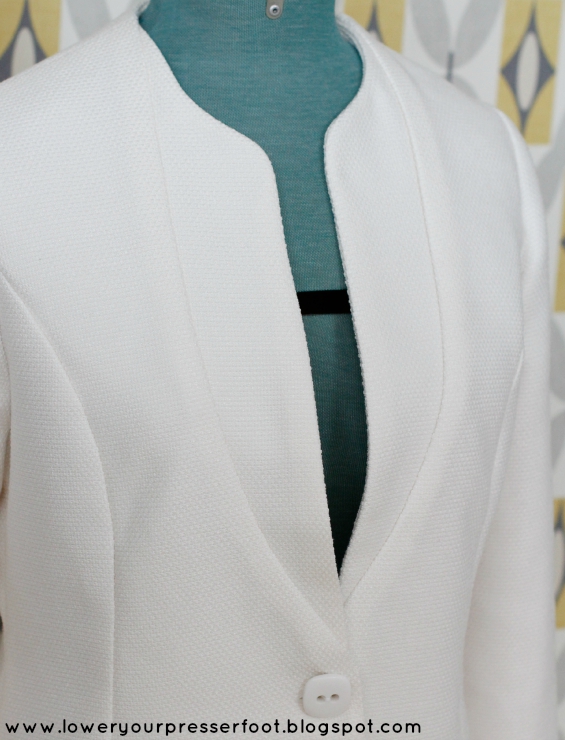
I've had a terrible case of start-everything-but-finish-very-little lately - I think I currently have about 5 projects in varying stages of progress (not to mention a rather large box of UFOs that have been hanging around for years). I forced myself to finish this latest project because although we are still having very cold weather our winter will shortly come to an end and I really want to get some wear from this tailored jacket I've made in a polyester-wool blend:

Vogue 9716 white wool tailored jacket with inset collar www.loweryourpresserfoot.blogspot.com

I used Vogue 9716, which is an OOP pattern from 1995 which doesn't seem that long ago to me! It's an obscure pattern and I could find no reference to it on the internets except for a few for sale on etsy and eBay. I'm not sure what the difference is between Vogue Woman and ordinary Vogue patterns - the body measurements are the same, so maybe they are a more mature style perhaps?


I've actually sewn this jacket before in my pre-blogging days in a powder blue cotton sateen which was terribly frumpy - those extended shoulders and mid thigh length certainly do not suit me at all. That jacket has long since gone off to the charity shop.

For this version I shortened it significantly, by almost 15cm which meant I had to leave off those patch pockets, and I narrowed the shoulders to a more natural line because I didn't plan on wearing armour style shoulder pads with this jacket. I also nipped in the centre back seam and princess seams on the back to deal with my swayback - there is still a little bit of excess fabric in the back but I really didn't want a jacket to be too fitted since it's meant to be worn over other garments.

Vogue 9716 white wool tailored jacket with inset collar www.loweryourpresserfoot.blogspot.com

Vogue 9716 white wool tailored jacket with inset collar www.loweryourpresserfoot.blogspot.com

I only did a minimal amount of tailoring since there was no rolled collar or lapels to pad stitch and support, but I put in a back stay in a crisp cotton to prevent the shoulders stretching out and I added a sleeve header to get that nice rounded look to the top of the sleeve. I left out shoulder pads though because I felt it was structured enough without them:

Vogue 9716 white wool tailored jacket with inset collar www.loweryourpresserfoot.blogspot.com

I really do like that inset collar - tailored jackets with a quirky collar is definitely my favourite garment to make and wear. I find them a bit more feminine and interesting than a traditional notched lapel tailored jacket, especially when worn with a dress. I could have done a much better job in grading the seam allowances though, because the wool is quite thick and the ridge of the seam allowances is clearly visible.

Vogue 9716 white wool tailored jacket with inset collar www.loweryourpresserfoot.blogspot.com
 
But apart from that nitpicking (why are we so harsh on ourselves?) I'm really pleased with how the jacket has turned out. A white jacket will go with so many things in my wardrobe so it will be really useful. I just need to stay away from my small children when I'm wearing it though!

Vogue 9716 white wool tailored jacket with inset collar www.loweryourpresserfoot.blogspot.com

Vogue 9716 white wool tailored jacket with inset collar www.loweryourpresserfoot.blogspot.com