Burda of the month: printed pants 10/2013#127A

Monday 28 October 2013
I was reading Paola's blog recently where she was wondering whether she was too late to join the coloured pants trend with her lovely green pants (definitely not). But I was wondering the same thing because I had been thinking about making some floral pants for spring/summer, a trend that has been around for a while but after a bit of snoop shopping I figured they are still pretty much current. And besides the point of sewing for ourselves is to be able to make what we like, when we like without being dictated to by seasons or fashion designers!

This is quite out of my usual sewing zone - to be sewing pants first of all which I rarely ever do, and to be making a pair from a print fabric instead of a subdued solid colour. But the good thing about my Burda challenge is that everyone now and then I like to try something new and different to what I would usually sew and see what comes out.


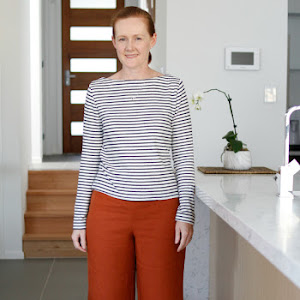
So for my October Burda challenge (made during the actual month of October too!) I chose to make the slim fitting trousers 10/2013 #127A:


These are pretty simple pants, rather quick to make but as we all know it's the fitting that takes the most time and effort to get right. Being rather cavalier as usual, I chose not to make a muslin instead just doing some flat pattern measurements. Surprisingly it turned out pretty well (phew!). I wanted to make some slim fitting but slouchy summer pants so I didn't narrow the leg to match those worn by the model in the photograph. I cut out a size 38 to fit over my hips, and took in a little at the waist to stop the gaping that inevitably happens. The back view really shows off my pear shape in an unflattering way, but hey I'm all for truth in reporting around here!


There are some diagonal folds emanating from my saddle bag thighs downward to my knees, but apart from that the fit isn't too bad. What I really liked about this pattern is that it is sewn like men's pants - the centre back seam is done last after the waistband is attached to the pants in two pieces, which means you can take in the centre back seam to fit:


As you can see I did make the centre back seam a little deeper at the waist to get it to fit snugly. I also like that this pattern, like most Burda pants patterns uses an extended pocket piece that connects to zipper, which is a much neater way of doing things:


The fabric I used is a cotton/linen blend bought from Spotlight a few years ago. The fabric didn't wrinkle very much at all much to my surprise, but it did 'grow' a lot after wearing as I suspected it would. After a few hours it bagged out at the knees and the seat giving me the dreaded saggy butt look but I made the waistband facing from interfaced cotton poplin and put belt loops on the waistband so I could wear a belt and make sure they stayed at my waist. So since they didn't fall down I can live with a bit of sagginess - they are meant to be slouchy linen summer pants.


So overall, I'd say this pattern is pretty good (but I'm not all that experienced with pants pattern so I can't say definitively that it's any better than any other pants pattern). One thing I didn't like at all was their instructions for the fly zipper with shield. As much as I read and read those instructions, I just couldn't understand them at all so instead I used this very helpful tutorial with lots of pictures over at Grainline Studio. If I make these again though I would add fly extensions to the centre front of the pants when cutting out rather sewing on a fly extension - it's just a bit quicker and simpler to do it that way.

I took about 4cm off the length of the pants and still have a 5cm hem on these - clearly my legs aren't as long as the leggy models in the magazine that these patterns seem to be drafted for. I did hem them to wear with flats and not heels so they are a bit shorter:


I wanted to try wearing these pants with heels to see how they looked, but my mini-me decided to wear my heels around and copy my poses instead:


How scary that at 4 and half years of age she thinks that posing for photographs like this is normal!

Kelly green and wrinkled: New Look 6144

Tuesday 22 October 2013
Thanks for all your lovely comments and commiserations on the skirt in the last post - it seems we all have 'one of those weeks' every now and again! The comment that stood out most to me was Carolyn who commented that I was wearing red and not grey.

And it's true - these days I'm making quite an effort to wear a lot more colour, made easier by the fact that we're having very hot Spring weather and there's just something about the sunshine that makes me want to wear a bright colourful dress. Which brings me to my latest project, another dress made using New Look 6144, this time from a bright Kelly green cotton sateen:

Let me just say it is IMPOSSIBLE to get a decent photo of this dress! The smooth surface and slight sheen of the cotton sateen shows up every wrinkle, ripple and seam of the dress in photographs - it doesn't look that bad in real life. The back looks even worse in the photo although in real life it looks ok (from what I can see over my shoulder in the mirror that is).


After I made the plaid version a while back that turned out slightly too big, I decided to make this dress a bit smaller given the fabric has a slight stretch to it. So I cut out a size 8 at the bust and a size 10 for the rest which was a mistake because it turned out very tight and I had to let out the side seams so much at the hips that it has the tiniest seams.

I made a small 2cm swayback adjustment but it wasn't quite enough because there is still a bit of pooling of fabric in my lower back, especially at the base of the zipper:


And something funny is happening at the centre front because there is a bit of fabric folding and not sitting flat under those front neckline pleats:


From what I can see from other people's review of this pattern they didn't experience this problem, so it's probably caused by operator error. The pleating at the neckline was rather complicated and involved slashing one part so that the other could slide through it - perhaps I didn't slash down far enough so it doesn't sit flat. I'm not going to unpick it and do it again though to fix it - I'll just lazily wear a brooch there or ignore it instead! I also think the centre front darts extent too high onto my bust instead of finishing below the bust point as they should (that's what breastfeeding two kids will do to you sadly).

So my verdict: I love the colour of this fabric, but not so much the dress. Partly that is because cotton sateen is quite wrinkle prone and I should have either lined or underlined this dress (which I did neither because I want it to be a cool summer dress), or made a less fitted style. Partly though it is the pattern, whilst I like the neckline and sleeves if I want to make this again I think I'll frankenpattern it onto my favourite New Look pattern, New Look 6968 which is a similar fitted sheath dress but has a waist seam so it achieves a much better fit. I'll still wear it though because it still looks better than a lot of RTW dresses I see being worn out on the street and it is a gorgeous colour.

Out of interest I took another photo of the dress when I got home from work in the afternoon to see how badly wrinkled it became:


and funnily enough it doesn't seem to be that much worse really!  Sure there are quite a few more horizontal wrinkles around the body and the sleeves, but I think wearing cotton sateen is just like wearing linen or any other natural fibre - you just have to accept a few wrinkles. Although if I ever see some wool crepe in this shade of green I'll snap it up in a second and sew a replacement dress.

Thanks to Oscar for photobombing me - now I can see that black and white are the perfect colour to wear with this shade of green!

Burda of the month: 9/2013 #130 a.k.a the skirt that tried to break me

Monday 14 October 2013
So I have finally finished the evil sewing mojo sapping skirt. Not my finest work, for sure, but this is one of those projects where the whole is more than the sum of it's parts, because the skirt was made purely to form a suit with the red blazer I made recently:

I never imagined myself wearing a red skirt suit, it always screamed 80s power suit stereotype to me, but after pinning quite a few lovely red outfits (such as this, this or this) I thought why not try it?
 
Plus I had some left over pieces of the red wool crepe I used to make the jacket recently that were just the right size to make a skirt. And since I needed to do a project from the September issue of Burda I decided to kill two birds with one stone and make the designer pattern - 9/2013 #130:

Just a simple, pegged skirt with a bit of interest at the back (let's not talk about that jacket though shall we?). I've made a similar style skirt a long time ago with great success from Vogue 7937 that with hindsight I should have stuck with and made something different from this issue of Burda!

So what went wrong? Well it started with me not reducing the skirt length by 5cm when I traced the pattern (a typical change I have to make for Burda patterns), which meant that those back splits were about 2cm long when I folded the hem up which looked quite silly not to mention not achieving the function of a walking vent. One of the suggestions at the ASG sewing day was just to instead make them splits rather than lapped vents, which is what I should have done because my next mistake was to use the very last bit of fabric to cut out new centre back panels with the jutting out bit for a mitred vent at the right length instead of the side back panels. This meant that the centre back piece now lays under the side pieces and looks a bit strange in my opinion because it's not how I've seen any vent made:
Burda-9-2013-#130-red-skirt

So I may just undo that again and make it into splits anyway! Then again no one will probably notice and I should just get over myself.

The other mistake I did was to over fit the skirt because the wool crepe has a bit of stretch to it and having it too tight really highlighted my pear shape in a very unflattering way, but that was easily fixed by letting out each of the seams a little bit. I also stitched in the ditch down those side seams to anchor the skirt to the lining because the lining seams kept showing through if it wasn't aligned perfectly. I think if I had underlined the skirt to give the lightweight wool fabric a bit more body it may have prevented the lining being so obvious underneath the fabric. Again live and learn.

Letting it out a little means the skirt is a little looser than the Burda model version:

but it's comfortable to walk in and I can sit in it without showing too much leg (this is a work skirt after all):
Burda-9-2013-#130-red-skirt

What's not shown in the line drawing is the deep hem - it is about 8cm deep which is a nice touch. I topstitched my hem since my thread matched the fabric almost perfectly and I wanted the deep hem to be a feature on the rather plain front. Overall the pattern is ok, nothing special, so if you want to make it go ahead but I for one shan't be tempting fate with this pattern again in case it tries to rob my sewing spirit again!

And did you all notice that polka dot top I'm wearing with it? Well that is a success story in it's own right - I salvaged it from another Burda of the month project and remade it into a wearable top that perfectly matches this suit. The cream with grey polka dot silk was far too nice to remain as this abomination I made in September last year (Burda 7/2012 #116):

Using a shell top pattern from Vogue 1826, an OOP Michael Kors pattern, which is a TNT of mine because I've made it quite a few times now (here and here) instead turned it into this with a bit of help from some left over pieces of the fabric (yay for holding onto scraps):


I used some buttons from the stash that happened to match perfectly as closure at the back seam rather than a zipper:

It's the perfect top to be worn under suits, and since I fully lined the silk fabric with a thin cotton shirting fabric it will be nice and cool to wear during summer and our so far very hot spring. Plus I've made a complete outfit so there's no risk of the red skirt or jacket becoming orphans and rarely worn - how very grown up of me!

Control, alt + delete

Friday 11 October 2013
I've had the most frustrating two weeks, sewing wise. All I'm trying to do is sew a simple pencil skirt to go with the red jacket that I made recently but all I've had is one thing after another. I did sew and fit the skirt at my ASG sewing day two Saturdays ago, but I forgot to reduce the skirt length when I traced the pattern, so the back vent of the skirt was a ridiculous 2cm long. Unpick, recut the back panel. Then when I made the lining it was too tight because it doesn't have any stretch like the fabric. Unpick some more. Then the lining was too loose for the skirt because I could see wrinkling through the fabric. Unpick some more......

And then I slightly burnt the tips of a few fingers on my right hand trying to make a toasted cheese sandwich while juggling a wriggly toddle on one hip (note to self: don't do that again!) which were too sore and then too calloused to sew! At this point I figured the sewing universe was trying to tell me something and I gave up on the skirt for the moment. We also took the kids camping, proper bush camping, which was fun but very very tiring so I needed a few days to recover from that too! So the skirt is still unmade, but I have cut out a simple dress to make for my next project when the skirt is done and I tidied up my sewing room ready for a fresh start.

Which is where I found a dress that I had started sewing for Anna two ASG sewing days ago (end of August) and had forgotten about it even though it only needed a zipper and some ric rac. So I tempted fate and finished the dress - seems my sewing fingers may have returned because I had no problems and the recipient is very happy with her new dress:
Style-2168-purple-polka-dot-twirly-dressFor a change this isn't stash fabric, which I remember now is why I set it aside at the time - it was towards the end of the stashbusting contest and I was trying to finish stash projects first. I used a vintage Style pattern which I had used before so I knew it would fit and I added an extra layer to the skirt for additional twirliness:
Style-2168-purple-polka-dot-twirly-dress

Style-2168-purple-polka-dot-twirly-dress

I love the cute peter pan collar which I made from a white cotton shirting fabric and the little ruffle sleeves.
Style-2168-purple-polka-dot-twirly-dress

Now onto finishing that skirt - I won't let a simple pencil skirt defeat me!

Pinspiration: lace tipped scarf

Thursday 3 October 2013
I was a bit of a latecomer to Pinterest - I deliberately held out thinking it was just another time waster! I'm a bit contrary like that, I don't Twitter, Instagram or Tumblr, I deleted my Facebook account and I don't have the time or energy for Polyvore (although I like looking at the boards that other people have created). But since succumbing to the allure of Pinterest this year I've become a mad pinner, pinning all sorts of images, tutorials, recipes and things at any spare moment of the day.

But there does come a point when you wonder what's the purpose? Why do you pin all these things? Clearly I'm not alone in thinking this:

image source
image source
image source
Another eternal quest I'm on is to use up fabric scraps in meaningful and useful ways, and not add to the scraps pile after making a project. Which is where Pinterest and the whole point of this post comes from. I spied this beautiful scarf pinned, which is no longer available but was for sale for a ridiculous $1100:
image via styleawip.blogspot.com

After finishing the plaid dress I made from New Look 6144 recently, I happened to have a long rectangular piece of fabric leftover that was too short to be made into an infinity scarf or a normal scarf on it's own, but with the addition of some white stretchy lace fabric from deep within the stash look what I turned it into:


Obviously mine isn't as elegant as the original, because I think the black lace on the beige cashmere is a sophisticated mix and the jagged edge of lace where it joins the fabric is a nice detail but I still like mine nonetheless. The teal plaid fabric of my version is so soft too, almost like flannelette so it's the perfect fabric to be wrapping around one's neck.


And I'm not the only one to copycat this project - look at this lovely green jersey and white lace version that Jen made a while back over at Sea lo que sea.

I just can't bear to waste good textiles and throw away scraps any scraps that aren't tiny, but since I'm not a quilter they certainly are piling up. I'm lucky that I have two small children to sew for because their clothes use up the larger left over pieces, and in the past to use up the smaller fabric scraps I've made:

What's your battle plan for using up fabric scraps? Anyone got any burning good ideas?

And yes Marjorie - I've kept the scraps from my Liberty shirt because they are way to precious to throw away! Thanks everyone for your kind comments on the shirt, it has certainly been on high rotation in my wardrobe.