I see red

Friday 28 May 2010
through my red bloodshot eyes, that is..... This last week and a half has been absolutely horrible, I think I may have been awake for 22 hours each and every day because Anna is cutting some more teeth. These ones must be painful, because she hasn't responded to any painkillers, and even holding her didn't calm her down at all. On Monday night she screamed so loudly and for so long that she actually lost her voice! So she took to banging on her bedroom wall to get our attention, and when we ignored that she swan dived out of her cot and landed with a loud thud on the floor.

So she has been sleeping in our bed this week a lot. Which is fine with me because it means we all get a bit of sleep and there's no chance of adult activities which lead to more babies being made - I am so not ready to go down that path again any time soon!

As a result of spending so much time alternating between trying to settle a screaming toddler and collapsing exhausted into bed, I didn't manage to get much sewing done at all. Which is really getting to me because I have so many projects rattling around in my head that I'm itching to get started on. Today I hosted a little sewing school at my place, I'm teaching two friends how to sew so it was fun but chaotic trying to show them how to sew and keeping an eye on three rambunctious toddlers. And I do have a skirt pattern for myself pinned out, and guess what?! It's in red fabric! Although I'll probably wear it with a grey top LOL....

I've changed the thread in my overlocker to red, and since I'm too lazy to change it for each project and mess around with getting the tension right, I plan to sew a few things out of red before I'm done with it. First up though I made Anna a pair of pants out of a red corduroy skirt that I started a few years ago that never made it out of the UFO box. It's a bright red, almost tomato red colour, which isn't so great for a poorly sewn adult skirt but it just right for a pair of little pants with some stripy bias trim:

I just used my trusty Kwik Sew kids pants pattern again, and since I've made this four times now I've pared the process right down I can make them in less than 2 hours from start to finish. It was very difficult to get Little Miss Cranky to model them this week, here's pretty much the only pic I was able to snap at playgroup last week:


Thank you all for the lovely comments on the green suit. I feel like the popular girl in school with so many of you taking the time to leave a comment.

Toocutedobs - I am guilty too of not leaving comments on other people's posts that already have a lot, since I can't think of anything different to say. But it is nice to get lots of comments so I shall try better in the future.

Mary Nanna you are absolutely right - a sway back adjustment is just what I should have done. I normally do an adjustment for fitted clothes, but I thought I may have been able to get away without one on this jacket thinking it would finish at the small of my back. Guess I was wrong! Ah well, I can live with it as is though....

Bonny - these are my favourite shoes, they are pretty high but they are quilted satin inside so they are very comfortable. In fact I wear them so often I've just had them re-heeled so they can live on for another season (I had them done at Brices in Castlereagh St for any Sydneysiders - they are the best in the CBD).

Anyway happy weekend everyone, hopefully I shall get some quality time with my sewing machine and scissors. Although tonight my husband is out at a dinner with his mates for his cricket club reunion, so I may just have ice cream for dinner!

Burda 9/2009 #127 and Burda 1/2009 #128: the green suit

Saturday 15 May 2010
I've finally finished my green skirt suit, green in both colour and eco credentials because it's made completely from thrifted materials. Seriously, the fabric, lining and buttons are from op shops, the zipper is pulled out of a doomed project and even the interfacing was bought at a garage sale. Only the thread is newly purchased, because I've had heartache in the past using very old thread and it's associated snapping, tangling and fluffing as it passed through my sewing machine.

So if I just ignore the cost of the pattern, which is probably astronomical given how little I use the Burda magazines compared to the cost of the subscription, overall this suit cost me next to nothing but turned out fantastic:


The jacket is from Burda 9/09, pattern 127. This jacket is so easy to make, particularly if you're wary of setting in sleeves or dealing with notched collars. The sleeve is in two parts, and the sleeves get sewn on to the front and back pieces separately, and then you sew one long sleeve from the neckline along the shoulder seam, down the outside arm seam to the cuff. This makes it very easy to construct, but I found it hard to get a close fit. The Burda description is that this is a loose fitting jacket, but while I got the front to sit well, the back is a little baggy:


I guess a muslin would have come in handy here! Oh well, I have to keep reminding myself that I don't normally stand around in a photographic pose, and in real life it may not be noticeable.

The fabric is a wool or wool blend possibly, and it presses easily especially since I block interfaced all of the jacket pieces. Interfacing and putting in a back stay was about the extent of proper tailoring techniques I used, because I couldn't tell where the roll line was for the collar to do any padstitching, but there is an internal button just under the collar point on the inside which holds the collar in place properly anyway.

The skirt pattern I wasn't overly enthused about. It's the exclusive design from Burda 1/09, which is the first time I've sewn one of the exclusive designs in the magazine. Even though they are supposed to be designed by international designers and not Burda designers, I didn't find much difference in terms of pattern design or instructions really. I picked this skirt because of the vertical lines to match the jacket, and so that the tabs at the waist would make the skirt interesting if worn on it's own. The tabs at the waist are just decorative, and are actually sewn to the front skirt panel. They were super fiddly to sew on. Even with a thorough pressing and clipping the curves they still look a bit dodgy.


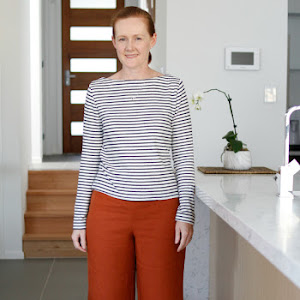
I also found the skirt to be very boxy, the side seams had hardly any shaping to them whilst my body has lots of shaping! So I ended up taking the side seams in a few centimetres above my hip and below my hip to the hem line just to give it a little more shaping.

I underlined the skirt with organza because the fabric is a loose weave and I hope that interlining will help prevent it bagging out as well as reduce wrinkling. The real test will come when I wear it for a full day at work next week. I used fabric covered buttons on the skirt to match the jacket, but they are hidden by the jacket when worn together.

I possibly will make this jacket again in a funky colour or fabric to wear casually with jeans, although I will pinch out a fair amount of excess in the back and probably make the sleeves full length. I meant to make these full length sleeves, but somewhere between deciding that when looking at the pattern photo and tracing out the sleeves I completely forgot! I think it looks ok though with a long sleeved top underneath poking out, my wrists get far too cold at work otherwise.

And for my next trick, I've threaded my overlocker with red thread so be prepared for some primary colour happening here soon!

utility sewing

Friday 14 May 2010
I've practically finished sewing the skirt and jacket shown in the previous post, all that's left to do is sew on the buttons - all eleven of them! Not that sewing on buttons is that hard, but getting them lined up properly and sewing them on by hand since they are shank buttons is a little tedious.

But I got a little distracted last week because we had an unexpected cold snap, well relatively cold for Sydney because it's not like there was snow or even frost, it was just a little chilly! Anyway I finally took the hems up on two pairs of jeans I bought over a year ago - how unbelievably lazy of me when it takes about 5 minutes to do. Especially when I did three pairs a few months ago for a friend! I also whipped up some fleece tracksuit pants for Anna to wear around the house, so unexciting they aren't even worth taking a picture of.

I also made her some grey corduroy jeans from my trusty Kwik Sew pattern 'cos nothing says cosy winter clothes like corduroy. I know, I know, grey again! But grey is a good neutral to offset all the pink hand-me-down clothes she has (I avoid buying her pink clothes). However, to liven them up, and because I cut these from some left over fabric and didn't quite have enough fabric, I cut out the cuffs, pockets and rear patch pockets in a grey and white stripe seersucker cotton.


Aren't those autumn leaves pretty? Anna had a ball grabbing handfuls of them, and if she could talk she could tell you what they taste like as well! She is still in that stage where everything goes in the mouth, and not just once either, she likes to try things several times especially if I say not to. I swear Crayola should release some icecream flavours because those crayons seem to be a favourite for munching on too....

A few questions popped up in the comments to the last post, which some of you very experienced sewists out there might be able to better answer, but here's my 2 cents worth:

Mamalucy asked about padding her recently acquired dressform to use it to it's fullest potential. I have to say I rarely use my dressform for anything other than hemming and hanging UFOs on to gather dust, because even with padding to more closely match my extra padded bits it still doesn't really resemble me and I don't get a good fit. I think it's to do with my forward sloping shoulders (aka bad posture) and narrow shoulders - those are things that just can't be padded out. But to answer your question mamalucy, I have seen other people use those body shaping slips over padding on their dressforms, because it fits closely to the dressform and is a slippery finish so that your clothes don't stick to it.

Ribbons Undone asked about the top layer of her fabric shifting when she is sewing. I find this happens to me when I'm sewing layers of different fabrics together, like when I'm using organza for underlining to a thicker fabric it shifts like crazy. And recently when I was sewing some curtains (still not finished, alas) I found the coated lining fabric and the cotton curtain fabric did not play nicely together either. But as to why it is happening when sewing two layers of the same fabric together I don't know, it may be the differential feed because I don't know if you can change the pressure of the presser foot (maybe check your manual?). What I usually do when this happens to me is to periodically lift the presser foot up and smooth the fabric out before it's shifted too far, sew a bit further, do it again etc and that distributes the fabric evenly. Or I try to feed the fabric through holding the top layer taut and letting the machine pull the bottom layer through to even up the rate at which the fabric moves through.

All highly nontechnical answers I'm afraid! Anyone else know what is going on? Here's a direct link to Ribbons Undone's post if you can help a fellow sewist in need.

in progress.....

Wednesday 5 May 2010
I don't normally post about things I'm in the midst of making, I'm much more of a 'ta da' look what I've made kind of blogger. Probably because I have such a high rate of UFOs, but also because I did start this blog to share my latest creations with friends (RL and new virtual ones too). However I'm comign to realise that perhaps by posting what I'm working on it will not only encourage me to finish them but also if I hit a stumbling block and a project is in danger of becoming a UFO I just know that all you clever clogs out there will come up with suggested solutions to finish them!

So here's the jacket I'm working on that I alluded to in the previous post:
It's pattern 127 from Burda issue 9/2009. I've practically finished it too, aside from doing nine (gulp!) buttonholes and handstitching the lining down. The skirt I've started to go with it is pattern 128 from Burda issue 1/2009, part of the exclusive design pattern in that issue:

I chose this skirt pattern because it will look good on it's own, what with the front seams and tabs, but also because the vertical seams on the skirt sort of line up with the vertical princess seams of the jacket. Told you I'm a matchy matchy kind of person!

As for a blouse (geez, Ms Carolyn you are demanding!) I'm not sure because the wide shawl collar of this jacket precludes a button up collared style I think, just too much going on there at the neckline. But we are coming into winter now I will wear this with turtleneck knits for the next few months until I think of something else to go with it.

How funny that so many of you remember that 'Goodbye Tonsils' golden book! I guess it is a pretty memorable title. And yes Judy, the doctor in there is Dr Constantinople, I can't believe you remember that. You either have a very good memory for useless facts or you read that book many many times....

fair enough call, point taken!

Monday 3 May 2010
I don't know why cooler weather makes me want to sew in shades of grey, but every year it does. In fact I seem to recall Carolyn calling me out on it last year, but once again this year I fell into the same old predictable pattern! I wasn't overly concerned because I don't wear a lot of black so I guess grey is my 'go to' neutral, but then I saw this line of clothes waiting to be ironed in my ironing room (also known as my guest room when we have guests and junk room at other times, I'm sure you all relate):


Yes that would be four grey dresses and two grey skirts worn in recent weeks waiting to be ironed and put away - I like to air my clothes in between wear, aka being too lazy to iron them straight away! Even I admit that this grey obsession is possibly a bit much and I should branch out.

So I thought about making a bright fuschia dress in some wool from the stash, but baby steps here! Hopefully you'll all be pleased to know my next project, a skirt suit for work, is made from a green woven wool, with flecks of gold and blue through it:

And in even more surprising developments I'm actually trying to do things properly for a change. I have bought a few sewing books over the years but haven't really used them, so I thought it was about time I cracked this one open and followed it's advice:

The Classic Guide to Sewing the Perfect Jacket is a really good book, all the photographs make it easy to understand and it goes through the techniques for full handstitching of the jacket and also the technique for using fusible interfacing which gives you the choice to pick how involved you want to get. Following the book, for my current jacket I've block interfaced all of the jacket pieces with lightweight interfacing (whisperweft I think it was called), and I've also made a back stay from some tightly woven but thin cotton, all to help stabilise the fabric because it's quite a loose weave:

Now to make the lining for the jacket, the most boring part. I did read a tip somewhere or other recommending that you make the lining first which means you get the worst part over and done with first and may make it less likely you'll end up with a UFO.

My business trip to one of our regional offices to deliver some training last week was a success. My job for the main part is writing policy, but I sometimes run training sessions for staff although I haven't done so since before I went on maternity leave well over a year ago now. Not only did all my knowledge of the legislation I was training the staff in come flooding back to me and the training session went really well, but I also managed to visit two op shops and score some bargains. First up a big bag of button covering kits in varying shapes and sizes:

Some knit fabrics to add to the stash until I get over my dislike of sewing with knits - a black heavy cotton like ponti de roma, and a thin polyester in a nice green brown pattern:


A 1939 McCalls sewing book, which is heavy on the handstitching techniques and interestingly refers to zippers as "slide fasteners".


And best of all was a stack of vintage golden books, with the funniest title ever:

I guess "goodbye tonsils" is the precursor to modern educational but entertaining books for children such as "why does daddy live in his own house now?" and "why do I have two mummies?" Aaaah, innocent times of eras gone by....

As for me, I'm off to insert an invisible slide fastener into a skirt. Happy sewing everyone.