So I may have finished my October Burda of the month project in mid November, however since my November issue hasn't yet arrived I am technically up to date in my Burda challenge - yay for me!
There were quite a few lovely dresses in this issue, however I decided to step outside my comfort zone and make something I don't think I've ever made before - a pair of wide leg pants:

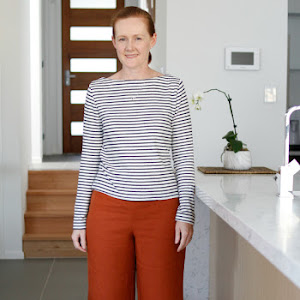
This is Burda 10/2016 #113, which are called 'Sailor Pants' by Burda however I decided to leave off the buttons on the pockets which I think are a bit OTT nautically themed:

These pants legs are super wide, and it feels quite strange to have fabric swishing around when I walk after so many years of wearing skinny leg jeans and pants. And I'm still not sure where I will wear these pants - even if fashion magazines are declaring the death of skinny legs, no-one in my neighbourhood is getting around in flares or palazzo pants yet.


There were quite a few lovely dresses in this issue, however I decided to step outside my comfort zone and make something I don't think I've ever made before - a pair of wide leg pants:
This is Burda 10/2016 #113, which are called 'Sailor Pants' by Burda however I decided to leave off the buttons on the pockets which I think are a bit OTT nautically themed:
These pants legs are super wide, and it feels quite strange to have fabric swishing around when I walk after so many years of wearing skinny leg jeans and pants. And I'm still not sure where I will wear these pants - even if fashion magazines are declaring the death of skinny legs, no-one in my neighbourhood is getting around in flares or palazzo pants yet.
I wasn't sure if I'd like this pattern and I was just hoping these would turn out to be a wearable muslin (ie the cross your fingers and hope you make something half decent approach!). I've had this fabric in the stash for a long time - it's just a poly/cotton mix which came from an op shop and I have lots of it so there was nothing to lose, but it has the perfect weight and drape. It does however wrinkle terribly - those creases at the front aren't whiskers due to tight fit but rather wrinkles for sitting down for the 3 minute car drive to get to the waterfront!
I'm also a bit unsure on how to style wide leg pants. Consulting Dr Google, apparently a chunkier shoe such as a wedge or a platform should be worn - neither of which I own. I did try them with flat shoes, but of course that only works if you have hemmed the pants to the right length. These pants were ridicously long - I chopped 15cm off the bottom, sewed a 5cm hem and they are still way too long to wear these pants with flats because it just looks baggy and a bit sloppy:
Because I didn't make a muslin I had to make some fitting changes which didn't turn out so perfect. I should have known before I cut these out that I would have gaping issues at the centre back - I ended up re-cutting the waistband to have a centre back seam so that I could curve it more, and I had take a wedge out of the centre back seam at the waist, which means the waistband dips a bit too low. There are also loads of annoying wrinkles at the back, partly due to the annoying fabric showing everything but also due to these lazy fitting changes:
I also found this pattern to run rather small. My measurements placed me between sizes, so I sized down because I find there is usually a lot of ease in Burda patterns, however these turned out really tight and I had to let out all the seams as far as I could to make them more comfortable. But you can see in the photos above and below those wrinkles pointing to my saddlebag thighs which are my widest point and cause of most of my fitting woes:
But enough about the negatives, on to the good points. I do like the pockets that sit flat on the front of the pants - because pockets usually sit at my widest point I generally avoid putting them in the side seam because they just add bulk. I also did a pretty good job at matching the stripes on the pocket and the pants front:
I also like the wide waistband - I find them more comfortable and they generally sit across my stomach rather than cause a muffin top. These pants have an invisible zip on the side, so the waistband pieces are cut on the fold. Because of the curve in the waistband it wasn't possible to match up all the pinstripes, so I focused on matching those at the centre front:
So overall I'm a bit on the fence about this project. On the one hand, I think they look pretty good in these photos (apart from those wrinkles) and it was a very easy pattern to make. However I'm not sure how practical they are in real life - what to wear with white and blue pinstripe pants? Where to wear such swishy, wide leg pants? And how to keep them clean? Just wearing them for these photos resulted in the hem getting so dirty I had to change out of them straight away. This is one of the few times I've worn something just for the sake of taking blog photos - I feel like a bit of a fraud to tell you the truth!
Anyway, if wide leg pants are your thing I can thoroughly recommend this pattern to you, I think they would look quite dramatic in silky black material paired with a sparkly top for evening wear, but overall this is a lot of look for a daytime for quiet ol' me!