Burda pants again and bonus Style Arc top

Friday 16 June 2017
Usually when I make a dud project I put it into a big box with all the other less than ideal projects with the vague idea that one day I'll remake it into something else. That box is as large as my UFO box! Unfortunately the allure of a new project, from a fresh length of fabric is too strong and those projects sit there for a long time.

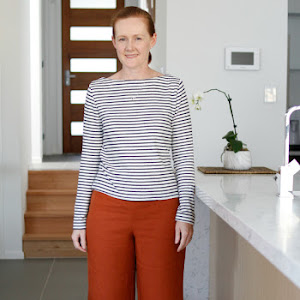
Not this time though - I've remade the ridiculous wide leg pants that I made last month (posted here). Partly because my refashion box is in storage with the rest of my sewing room supplies, but mainly because I really love this beautiful rust coloured wool fabric.

The original pants (3/2017 #115) had very wide legs, pleats at the front and angled pockets at the side. I remade them using Burda 10/2016 #113 which I made last year in white and blue pinstripe fabric (posted here), which I thought were really wide leg pants until I made this pair!


These new pants are flat fronted with a wider waistband and slightly narrower legs. I decided to leave off those curved patch pockets because I think that's more of a casual look and I wanted to be able to wear these to work. I also hemmed these short enough to wear flat shoes with them, which works because of the slightly narrower legs:


I still have those annoying wrinkles at the back of my legs though - the combination of my saddlebag thighs and prominent calves make fitting my legs an absolute nightmare. 


Now I am much happier with these pants, they are far more wearable in this form. I wore these to work with my new top and a white tailored jacket I made back in 2015 from an old Vogue pattern (posted here) - a far more interesting combination than my usual matching top and bottom suits!


The top I'm wearing in these photos is new too - it's the Style Arc Skye top. This top is super simple - it took me less than 3 hours to cut it out and sew it up at a sewing weekend away I went to in May, but it took me 3 weeks to sew a button on the back to finish it! My approach to sewing is so illogical sometimes....

image via Style Arc
The fabric I've used is a polyester woven fabric called 'Shooting Star' from Pitt Trading, which they still have on their on-line store if you're interested. I don't normally sew with polyester fabric because I don't like wearing it, but this graphic print really caught my eye. The fabric is really spongy though and it was quite difficult to press, although it doesn't wrinkle when wearing it so I guess that's the trade off! 


The top is essentially a front and a back with facings so it made up quite quickly. The hem has two curved facings which makes it far easier to finish off the rather than trying to turn up a hem.


I do think the method of sewing the top could be even more simplified though. The back is sewn in two pieces, with the facings sewn to the right side and flipped to the inside, and then the centre back seam sewn below the facings. The Burda method for this style of top - sewing the facing as one piece, stitching a long 'v' down the centre back and then cutting it before flipping it to the inside is far neater, quicker and means you can cut on the fold.


Likewise, the sleeves are finished by turning under twice, and then sewing the side seams from the marked point down which I think could be made simpler and neater simply by folding it over once only so that it goes from the sleeve hem into the pressed open seam allowances without the need for clipping.


The only change I would make to the pattern itself would be to lengthen it slightly. The sides curve up quite high, and if I'm not wearing something high waisted a bit of skin peeks out which is not a good look.


I'm happy that I made the effort to remake these pants and that it turned out far better than the original, which is fortunate because I have a few other projects I've made recently that I've stuffed up haven't turned out as well as expected and now need the same treatment!

de ja vu: my Castaway to Couture competition entry

Monday 12 June 2017
I wasn't planning on entering this year's Castaway to Couture competition run by the Australian Sewing Guild, despite the amazing prizes on offer. I was just plain out of ideas, but the weekend before the competition closed I happened to find myself in an op shop where a large box pleat skirt made from wool in a bold print caught my eye. And in that instant I decided to enter the competition with only a few days to go.

Using New Look 6968, which is my go to sheath dress pattern, I turned the oversized skirt into a fitted sheath dress which is perfect for me to wear to work:


If you're thinking this refashion looks very familiar, you'd be right! I guess I am a one trick pony because this year's entry is pretty much exactly like last year's entry (posted here) which was also a large box pleat skirt I made into a fitted sheath dress using New Look 6968. I wear this grey dress frequently and there's always space for another great dress in my wardrobe, so despite being unimaginative I decided to stick with what I know works best and what I knew I could make in a short time:


In an attempt to be a little more creative, I decided to use the border print vertically instead of around the bottom of the skirt. There was enough fabric to make it either way, which is why a box pleat skirt is a perfect candidate for a refashion - once you've unpicked it and pressed the pleats out you have two large rectangular pieces of fabric just as though you had bought it fresh cut from a roll.

This skirt started life as a size 20 Fletcher Jones skirt, which was an iconic Australian label known for using Australian wool but has sadly since closed. I bought this on a 50% off day, so it cost me $6:


Using Claire Schaeffer's brown paper and vinegar method I managed to press the pleats mostly out, and although they are slightly still there it gives a bit of texture to the fabric.

I decided to place the coloured stripes on one side of my body, which meant that I had to cut one side out upside down. If you look closely you can see some white horizontal stripes within the grey and yellow vertical stripes which are on opposing sides on the front and back, but I doubt anyone else will notice this little detail.


I tried my best to line those stripes up vertically and horizontally, but the darts made that impossible:


I had to eke out the sleeves from the leftover fabric which meant that I couldn't match the stripes there either, but I think all these mismatched stripes makes the dress look very RTW. And the fact that several people have complimented me on the dress but no one has mentioned the stripes not lining up exactly just proves that no one cares about these details as much as we do!


Because I've made this dress so many times before, it came together quickly and fitted like a glove first time. The original skirt was unlined and had a short invisible zip, so I had to use new lining and a new invisible zip but I'll reuse the original zip in another project and there was hardly any fabric left of the original garment, and overall it was a good reuse of the original garment. The whole point of refashioning and recycling is to reduce waste, and it makes little sense to me when I see refashioning projects that use just a little bit of several garments - so much leftover scraps which absolutely no one needs anymore of. I'm also a little bit horrified when I see beautiful garments 'refashioned' just by chopping off sleeves or the skirt to make a mini dress, it makes me wonder if that project won't be worn often or last too long and is in effect just fast fashion as well.

Anyway, if you've read this far can I ask one more favour from you? You can vote for your favourite project over at the ASG website - there are some great other entries in the gallery, but if you like mine the best vote for entry 19 (vote here)!


Burda of the month: 1/2017 #119 cowl neck top

Tuesday 6 June 2017
Burda drape top in bronze knit fabric

I made my January Burda project way back in April, but I held off posting about it because I wasn't entirely happy with it and wanted to make some tweaks to it. I'm still not happy with it, so I'm recording here for posterity while I think what else I can do to make it better (probably a complete refashion).

This is 1/2017 #119, which Burda refers to as cowl neck shirt:
It's a typical Burda top which is very low cut thanks to that deep cowl, but interestingly for Burda this time they have included a camisole to wear under for modesty. You just know that if Burda think it needs an top to wear under it then it definitely it scandalously low!

The fabric I used is a cotton knit in dark brown with a metallic gold finish that gives it a bronze sheen, bought from The Fabric Store eariler this year during one of their sales. It really is lovely fabric, which is why I was so keen to make this work:


Unfortunately this top has turned out very frumpy. I do love a cowl neck, but the whole front of this top is essentially draped, and it just feels very big on me:

Burda drape top in bronze knit fabric

Burda drape knit top in bronze knit fabric


I cut out a straight size 36, even though according to my measurements I should have used a 42 at the hips and this still turned out huge. There's just way too much fabric across the front, and a bit too much at the back as well:


I did wear this top out to dinner and drinks one night back in April, and I found myself constantly adjusting it all night long. Tucking it in didn't look any good and nor did pinning out excess at the sides work because that just spread out the folds at the front but didn't make it fit any closer.

So I did what I usually do - let it sit in a little ball in my half made projects box for two months while I thought about it. Finally I decided to try sewing clear elastic along the side seams to gather the bottom half of the top and hopefully create some ruching across the middle that would reduce the length and maybe tighten it up a bit.

Well, that didn't work out that well either - it still looks frumpy:


Enough of the negative hey? The things I do like about this top beside the fabric is the shoulder pleats because they are a nice feature at the shoulder but also help the top drape in the front:


Construction wise this is pretty straightforward and simple to make. I didn't have enough fabric to make the camisole style top to wear underneath, so I literally have made a strapless crop top by sewing a tube with an elastic casing at the top, using the last bit of fabric I had left. This covers the necessary bits so it works.

So overall, I don't love this top at all and as I said at the outset I'm thinking of pulling it apart and making it into another top. There is plenty of fabric to work with, and I have loads of other cowl neck patterns that I can use, so I'll add this to my to do list.

But if you have a far better endowed bust line that I do, this top may look great on you so don't let my failure here put you off this pattern!