Liberating the Liberty

Friday, 27 September 2013
Wow - thanks everyone for leaving a comment on the last post about my red jacket. I think that is the most comments I've ever received, except for those times when I made a baby, so I guess that jacket is the third most special thing I've made!

I haven't done much sewing in the last week but I'm finally getting around to blogging a shirt I made a few weeks ago, the last garment I made in my stash busting entry actually. At our very first Sydney sewist's/blogger meet up back in November 2012 I only bought three pieces of fabric - some blueberry ponte and Liberty cotton from Tessuti, and some blue floral cotton voile from The Fabric Store. After making the ponte and cotton voile into dresses (here and here) I am pleased to announce I've finally used the Liberty cotton thus using up all the fabric I bought that day!

I only bought 1.5m of the fabric at the time thinking a blouse would be the best use (and because it's quite expensive) but I hesitated every time I went to use it because it's just so lovely. But then I realised it's only cotton, and I can easily buy more to replace it if I stuff it up so I should just get on with it. So I bit the bullet and made it into a long sleeved button down shirt that I've made several times before:


The print I bought is Liberty Wiltshire, which has been in their classics line since 1971 and was originally designed in 1933. It doesn't seem to be available on Tessuti's online shop but you can buy from Shaukat & Company.

You will laugh when you see the pattern I've used, because frankly it's an ugly 1980s pattern that is rightly OOP and should never be sewn as intended unless you were going to a costume party. But it's a size 6 which is the perfect size for my narrow shoulders and small bust - I just add width from the waist down to make sure it fits over my waist and hips. Ok, are you ready for the pattern reveal?


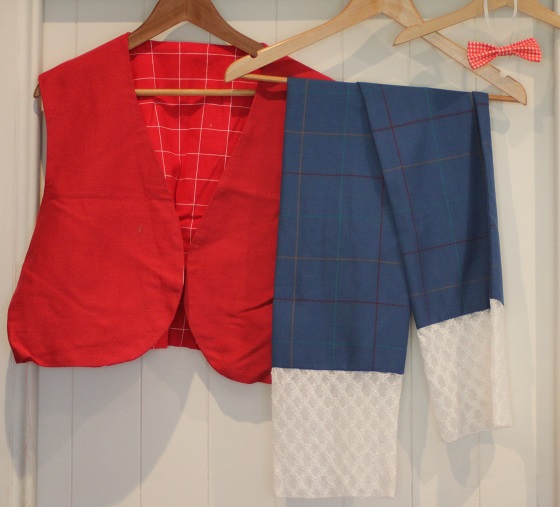
Yee ha! It's a cowboy inspired shirt which is just plain wrong. You can see I picked up this pattern in an op shop for the princely sum of 20c!! Obviously I made this without the attractive yoke or bow tie and also resisted the urge to add any fringing! I've made this at least 3 times previously that I can remember (pre blogging days), and I still frequently wear one that I made in a textured white cotton so I just knew it would be an easy sew. At some time in the past I actually traced the pattern and made it into a personal block pattern for my go-to shirt pattern.

It has an extra wide cuff that uses three buttons instead of two, which is a nice point of difference to an otherwise standard pattern (ignoring those cowboy points of difference that is):


Although I usually prefer to wear my long sleeved shirts folded up for a more casual look.


And in that fountain of knowledge that is Pinterest I discovered (after taking these photos) that there is a special way to fold up your sleeves so that the cuff is still visible - the J Crew method that apparently is the "perfect way".

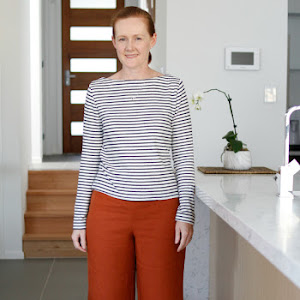
I love this shirt - I wish I didn't take so long to take the plunge to make it! I've worn it to work under a boring dark grey suit, I've worn it casually with my green skirt to make it a very colourful combination, as well as the more standard combination of a denim skirt and dark denim jeans. I realy like wearing lightweight long sleeved shirts in summer to keep the sun off my skin, so this has been perfect for a few really hot days we've had recently. And look - I've braved the nosy, quizzical looks of onlookers and took a photo of myself out in public!


Won't be doing that too often though, I felt a bit silly doing it!

Tomorrow is my ASG sewing day - hopefully I can knock over my September Burda project and make up for my lack of productivity this week. I'm itching to make some summery dresses now that our weather has really heated up, you know the usual - so many projects so little time!

Burda of the month: 8/2013#106 red wool crepe jacket

Thursday, 19 September 2013
It's becoming a bit of a habit of mine to finish my Burda projects in the following month instead of the month of issue as I originally vowed to myself - but I'm getting them made and that's all that counts. Plus this month I made a rather involved project instead of something simple, and lo and behold it's not a dress for a change!


Yes that's right - I made a tailored jacket. It's jacket #106 from the 8/2013 issue which looks like this in the magazine:


I admit that I may have been more than a little bit influenced by the magazine photo, but I've had a beautiful piece of raspberry red wool crepe in my stash for a while just waiting for the perfect project which turns out to be this pattern.

This pattern is the illustrated step-by-step guide for the month. Confusingly the page says it's both easy sewing and a "sewing lesson for the advanced" - although now that I've completed it I realise that what they meant was that it's an advanced pattern that they show you how to make in the most basic (but not best) manner to make it easy. I did read the instructions, and they were helpful to figure out the collar construction but mostly I did it my own way from experience and other resources.


Here's what I did differently to the pattern instructions:

1. Used way more interfacing than suggested. The pattern calls for interfacing only on the front facing piece, collar and hem lines, but I chose to block interface all my fabric pieces with a light weight interfacing, and then put an extra layer on the collar and front inset piece for extra stiffness. This gave the crepe a bit more substantial body appropriate to a jacket, although I suppose if you were using a fabric that was more substantial to begin with it wouldn't be needed.

2. I used the organza patch method to finish the back of the inseam buttonhole. Burda gives instructions to cut a slit in the fabric, turn under the edges and hand sew. Instead I used the method described in the Vogue Sewing book to use a square of organza to make an opening that you would use on the back of a bound buttonhole - it looks neater than the hand stitching I could achieve and is less likely to fray.


3. I bagged the lining instead of hand slip stitching the lining down at the end. I don't know why Burda didn't recommend this method - it's much a quicker and neater method and isn't really that difficult. The first time you do a bagged lining you don't think it could possibly work but it does! I like this tutorial over at Grainline Studio which clearly shows how it all comes together. For my lining I used a pink polyester of some sort that has been in the stash for years - one side is a soft, furry feeling which I used as the wrong side and the other has a slight ribbed texture that is more slippery - I have no idea what it is but it's a nice enough colour match with the raspberry red.


4. In addition to the suggested shoulder pads, I added a sleeve head cut from some wool melton to support the top of the sleeve as recommended in many tailoring books. It's the first time I've done this, but I do think it's made a difference - the sleeve sits so nicely. I also narrowed the shoulder by 2.5cm which is my usual adjustment.


Apart from the shoulder adjustment I made no alterations to the pattern which I cut out using the smallest size, size 34. Of course it's not perfect, but since I didn't make a muslin what can I expect? If I make this again I would take out a small wedge of the centre front panel because I'm rather flat chested and this bit sticks out a bit from my chest.

But overall I really love this jacket and am glad I put in the effort to make it properly. I made a fabric covered button because I couldn't find a perfect match, which I think looks quite smart. And the best thing is that the jacket sits equally well open or closed:


So well done Burda - a lovely pattern and well drafted. I'm actually thinking of making an evening version of this jacket in a tuxedo style in black satin with a matte finish for those front inset panels. I'll just add that to my very long to do list!

Babylock love

Saturday, 14 September 2013
I'm glad so many of you enjoyed the orange sewing machine, and shared your memories of older machines. I wonder why sewing machines haven't been given the retro makeover like other home appliances have undergone? You can buy a toaster, kettle or mixer in an array of colours and styles but when it comes to modern sewing machines it's white, white, white and maybe a cream! Paola is spot on - the modern world has become very colourless. I'm very guilty of this too - our new car: silver, our kitchen: white, our bathroom: sandy beige, our lounge: beige: our large floor rug: mostly white and grey, even my dog is black and white (ha ha ha, just threw that one in to see if you're reading closely!).

And it was quite ironic that the prizes on offer for the stash busting competition was more fabric - I don't think there was a single entrant there that had made a significant dent in their stash despite all that stash sewing! The winner received a $50 gift card to Spotlight, so I guess they could be sensible and buy notions instead of more fabric. And Sharon is right - I did win a second prize for sharing a photograph of my stash but I chose not to select a second prize because I just didn't want anymore fabric! Maybe I am becoming sensible.......

Craftastrophies and Cha-Cha both asked in the comments to the last post about my Babylock and my thoughts about it. I have a Babylock Enlighten model and every single day I think how  glad I am that I ponied up the rather substantial amount of money to buy it. I bought it for myself for mother's day back in 2011, the best mother's day present I've ever received!


I didn't really have any problems with my old overlocker, a basic Toyota model and in fact I used it for nearly 10 years before servicing it for the first time! It was just that I had to spend at least 45 minutes or more adjusting the tension each time I changed threads and never really getting it quite right. Not having to adjust the tension each time I change threads because the Babylock has automatic tension adjustment itself is worth every cent because it saves me time and stress. And with the air jets threading the machine at the press of a button it's super quick to change threads too.

Another feature I really like is that to do a rolled hem edge all I need to do is switch a lever and take out one needle. On my old overlocker I had to unscrew the plate, put another plate on, and then take out the needle, which was fiddly and time consuming. I use the rolled hem feature on fine fabrics that I don't want to do a narrow hem or on knit clothes for Anna that I want to get the lettuce hem effect.

I also like being able to disengage the knives with the twist of one knob instead of having to loosen the screw to drop the knives and then having to put the knives in the right spot again and tighten the screw really tightly when I'm done. I've been using the overlocker with the knives disengaged to sew elastic onto waistbands so it's really useful to be able to do this quickly and easy. Time and less stress is everything these days!

Apart from these things, I must admit to using the Babylock really just for conventional serging of raw edges and sewing kints together and haven't really used any of the other fancy stitches and features of the machine such as flatlocking or wave stitching. I've been using it constantly for the last two years without a single problem so it's been very reliable too. It goes over thick fabrics and thin without hesitation, and the bright LED lights are really good too.

So I can thoroughly recommend a Babylock if you're in the market for a new overlocker. But if you're a whiz at threading and adjusting the tension on overlockers and you don't use those other features too often then you'd probably be right with a less expensive model/brand of overlocker and use the extra $$ on fabric! But I do hope I've helped some of you make a decision, it is a fantastic machine and I'm just paying the favour forward - it was Carolyn over at Diary of a Sewing Fanatic that inspired me to get one! 

The orangest sewing machine you'll ever see

Wednesday, 11 September 2013
A few weeks ago I commented on Pam's post on sewing with denim at Threading My Way that my sewing machine isn't very good on the thicker fabrics - it tends to skip stitches even using a thick denim needle.  It's a mid range newish computerised Brother model. Instead I use my mum's Husqvarna Viking 3600 mechanical machine when I need to sew something really thick - it is an absolute powerhorse of a machine. She bought it in 1975 for around $300 which was the best part of a fortnight's wages for her back then but it definitely proves the old adage of buying the best you can afford.

The machine has never been serviced or oiled, the outside gets wiped down every now and then, and apart from a light globe or two it's all original and still in perfect working order. Sure my mum doesn't sew as much as I do, but this machine has been used to sew zippers into motorbike leather pants and jackets, the thickest denim, and old style canvas tents and it didn't even flinch, yet it also sews through thin cottons and other delicate fabrics without problem too. It's a really heavy machine though, having a metal casing and not a plastic one like newer models.

But this level of amazing services pales in comparison to it's most outstanding feature - it's a bright orange sewing machine! Pam replied to my comment that she had never seen an orange sewing machine before, so Pam this one is for you:


Aren't newer models with their streamlined white plastic so boring compared to this sewing machine? In this post at Apartment Therapy they describe the Husqvarna 3600 as a "workhorse and a beauty" and apparently the orange colour is quite rare. In fact they link to a store that had this machine for sale for $700!

Now I hope I haven't tempted fate or invoked Murphy's Law by writing down that the sewing machine hasn't needed servicing or repair in 38 years - fingers crossed it keeps on giving! But I've never given either of my Brother sewing machines a service in all their years of use and they are both still going strong despite lots of use. Fingers crossed they carry on strongly for years to come as well.

Speaking of which I'm taking my beloved Babylock in for a service tomorrow since it's been over two years of constant use and the dealer I bought it from says it needs regular servicing to keep the jet air threading tubes clear and working. So it looks like I'll be spending the next week sewing things that don't need overlocking - I'm beginning to understand why people have multiple machines!

Oh and I didn't win the stashbusting competition - the winning lady sewed 60+ garments and used over 90m of stash! But I did get a special prize for the most children's clothes sewn and received a lovely book and a piece of fabric (just what I need right?).

Vintage fabric and sewing notions auction

Friday, 6 September 2013
The Shapiro Gallery is auctioning vintage couture from the Victoria and Albert boutique, which was a couture boutique in Double Bay in the 1960s, on Sunday 14 September in Woollahra. Amongst the beautiful vintage clothes and accessories there are also various lots of buttons, belt buckles, ribbons, trims and best of all - rolls and rolls of vintage European fabrics. Seriously, check out these beauties:

Five rolls of European fabric, cotton, crepe and silk from the 1960s, 70s and 80s which range in length from 2m to 9.5m and are expected to fetch $200-$300:


Another lot of five rolls of French crepe, silk georgette, silk organza ranging in length from 6m to 14.5m with a price estimate of $400 - $600:


Ribbons and trims, with a price estimate of $50 - $80.


Over three hundred red buttons and buckles, with a price estimate of $80 - $120.


And there are loads more beautiful items available.  I am very tempted to go to the pre-auction viewing only - much safer to the bank balance that way! I would love some of those fabrics - but what would I do with such long lengths? My stash is too much out of control as it is.......

Anyway for my Sydney readers and anyone else who just happens to be in Sydney on 14 September consider this my public service announcement!

Stash status update

Wednesday, 4 September 2013
Thanks for all your comments on my last post - I'm pleased that you're all as impressed as I am with myself! I was fortunate to have two months at the beginning of the year when both the kids were at daycare three days before I went back to work which gave me a good headstart, but overall I think I've kept up quite a steady output of finished items.  And thanks KC and Summerflies for your perspective - I hadn't really thought about making only one wadder out of all those projects (though there were a few close saves and some borderline ones too!).

Some of you may remember that earlier this year I started cleaning up my stash which had gotten very unruly indeed. I got as far as doing the purple, red and grey shelves of fabrics before my enthusiasm petered out - it takes quite a long time to measure and catalogue all those pieces of fabric before folding them neatly. Not to mention having to make some hard decisions about culling some of the less lovely pieces out of the collection. I'd much rather be sewing!

But I had an unexpected two days off work earlier this week with an annoying cold, and while I was too sick to do any actual sewing I did put the rare child free time to good use to do a bit more stash cleaning up. So I decided to focus on the blue and green shelves of the stash, which looked like this before I started:


What a complete mess! But after a day of culling, measuring and refolding (interspersed with resting and Dr Phil) this is how it looks now:

Much better. I didn't actually get rid of too much from these two colour groups, it's just that folding and storing them neatly takes up much less space.  Those three shelves there contain about 290m (317yds) which kinda puts the 55m of stash fabric I've used this year into perspective doesn't it? Especially when I have 9 other shelves equally full of fabric (gulp!). No wonder there was no noticeable difference in the stash despite sewing so much from it.

Handling all those fabrics was certainly inspiring - I have lots of future project ideas swirling around in my head and being added to my very long 'one day' sewing to do list. And better still I found a few gems amongst it all: two Liberty cottons that I have no idea where they came from, or how long they've been there:


So now I'm about one-third the way through sorting out my stash - still so much to do....

Year to date stocktake

Monday, 2 September 2013
I know it's a little unusual and quite random to do a post tallying up the projects I've completed so far this year, but since I had to compile a list and photograph it for my entry in to the Australian Sewing Guild stashbusting competition I thought I'd share it here too. The rules for the contest were that the projects had to be wearable, made since January 1 2013 and from fabric that was in the stash prior to March 2013.

It turns out that I've made a total 41 projects that fit into the parameters of the competition (although I've made a few more projects from non stash fabric and some non wearable projects) and I've used a total length of 54.9m (total area of 76m) of fabric from the stash! When I put it down in cold hard figures like that I'm quite impressed with myself - I think that's quite a reasonable effort.

Unsurprisingly the most items I made were dresses for myself:


Only two skirts, and one pair of pants and shorts:


One shirt yet to be blogged, one jacket and three tops (one of which was a UFO for 14 years!)


Quite a few things for Anna:


And nearly as many things for Toby:


And one thing only for my husband, plus accessories for myself and Toby:


Not pictured are two pairs of pants I made for a friend's son and a blouse that turned out so horrible I've already binned.

I'd love to say that my stash is now reduced greatly and there are gaping holes in the shelves, but no - there is no discernible difference in my stash despite using all that fabric!