Vintage Simplicity 8682: summer dress in a jiffy!

Monday, 29 January 2018
Apologies for all readers in the Northern Hemisphere, but here in Australia we are still sweltering through summer. It has been extremely hot and humid and will probably be really warm for at least another month or more, so it's a perfect time to whip out a new summer dress.


I used a vintage Simplicity pattern that has been in my stash for a long time, picked up in an op shop a long time ago. The pattern cover promises that this is an easy cut and easy sew Jiffy dress and it certainly was! I washed the fabric, hung it out to dry in the sunshine, cut it out and sewed it all in the SAME day!


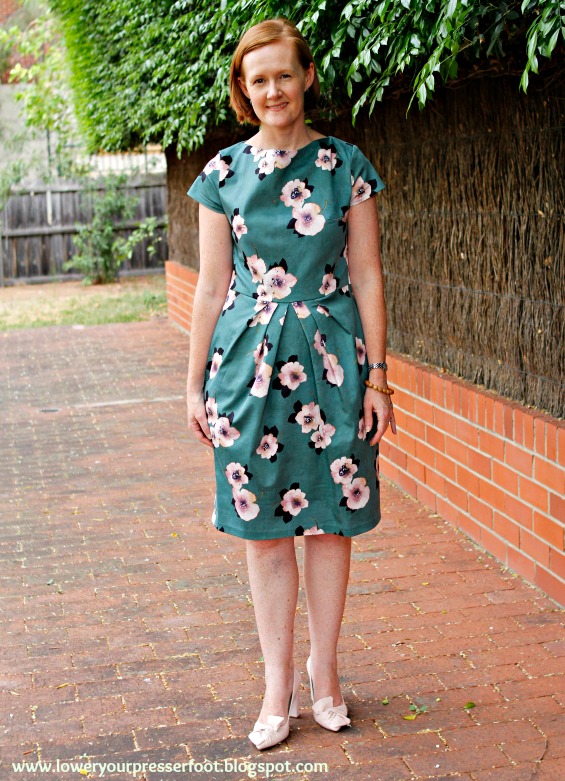
The fabric I've used is such a fun print. It's a Sevenberry print that I bought from No Chintz of all places, last year during their sale (No Chintz is a decorater/upholstery shop). It's a substantial cotton drill so it didn't need any lining, and it doesn't have much drape which suits the a-line style of the dress. Even after washing and line drying it didn't lose any of it's vibrant colour, and it was a dream to sew and press.


The dress is quite a simple shape, but the curved French darts on the front and two vertical fish eye darts in the back give enough shaping that it doesn't look like a potato sack. I didn't even do a sway back adjustment yet look at the nice fit I achieved in the back:


I didn't make too many changes to the pattern: I added 1.5cm to the sides below the waist line to make sure the dress was roomy around my wide hips and took it in by about 1.5cm above the wais tat the side seams to make it fit better across the bust. It all seemed to balance out in the end! I also reduced the length by about 5cm and used an invisible zip because I find them faster than a lapped or centred zip.


I did lower that neckline slightly though at the front because it's quite a high jewel neckline and felt a little uncomfortable against my neck. Even lowering it at the front by almost 2cm you can see it still sits quite high:


The only change I would make for the next time I make this dress (and there will be a next time since it was so fast, easy and well fitting) is to convert the neckline and armhole facings into a single facing. You can see in the photo below that there isn't much gap between them, and I had to hand stitch the facings down to stop them flipping out. It's a pretty simple matter to do an all in one facing and makes it possible to cleanly finish the neckline and armhole as well.


And I hope you're all enjoying the change of scenery in my blog photos - I took the kids to Shark Beach at Nielsen Park which is part of the Sydney Harbour National Park in Sydney's east today and made my daughter take some photos for me. This is such a lovely harbour beach, with only gentle waves, white sand, clear water and the CBD as backdrop. Despite it's name, there were no sharks today and there is a shark netted area to swim in anyway! Ferries passing by, a rock shelf to explore and a great cafe for lunch - it has it all (except for ample parking, you need to get here early). 


Burda 8/2009 #128 - the queue jumper dress

Wednesday, 24 January 2018
The reason I don't participate in SWAPs (Sewing With A Plan) even though I think they are eminently sensible is because as soon as I make a list of projects to sew I will sew anything but what is on that list! And this dress has just proved that to me again.

Over my Christmas holiday when I couldn't sew I bought a few pieces of fabric and made a list of projects I wanted to make this summer using fabrics and patterns I already own. And it's a loooong list so I had no business buying new fabric and adding to it.

But when I was in Spotlight a few days ago buying thread this beautiful sage green floral cotton sateen caught my eye and before I knew it I had bought it, washed it and made it into a new dress.


This dress is Burda 8/2009 #128 which is from their Parisian collection and unfortunately doesn't seem to be available on line to download:


I've made this dress 3 times before: the first version in a grey herringbone fabric that I made in 2010 and still wear frequently; the second version in a fuschia cotton drill which I wore until the fabric frayed at the shoulder seam from my handbag; and the third version  modified for maternity wear made in ponti knit which I wore until I was no longer pregnant (obvs).


For this green floral version I made the same modifications I made for the second version - used cap sleeves instead of three quarter sleeves and seperated the single back piece into a bodice and skirt so I could continue the waist seam all the way around and better adjust for my sway back. I also re-traced the pattern in a size larger because that grey dress is currently very tight on me, but due to the stretch in the sateen I shouldn't have bothered because I ended up taking it along the side seams anyway.

Unfortunately going up a size has meant it's too wide for me at the neckline and it gapes a bit much like the maternity version above. The first version does this slightly too, which is probably due to my poor posture and forward sloping shoulders, but going up that extra size really exaggerates it. I think I will add two small angled darts at the neckline to reduce that gaping, because it fits ok across the bust. Although I probably should also have re-positioned the bust dart too, because I've breastfed two babies in the years since I made that first dress and things just aren't what they used to be!


Being a pear shape, I am usually loathe to add extra fabric around the lower half of my body but I think this tulip shape is quite flattering as it emphasises my waist more so than my hips. The back is a plain sheath dress so there isn't any volume there, and the side and back views are quite streamlined to offset the front:


The original pattern doesn't include a vent or a split seam at the back which makes walking in it quite restricted. Especially in that grey version I made because the fabric has no stretch at all. For the fuschia version and this version I added a vent extension so I could move normally in this dress, because even though there is plenty of room at the hips the skirt is quite pegged at the hem:


I think the dress benefits from a belt though - without it the dress just lacks a certain something but it still fits ok.


The belt also works to cover up the waistline seam at the front - it appears a bit curved due to the pleats I guess even though it's actually a straightline. Not that anyone would notice this, especially when it's over a rounded tummy, but I think it looks better with the belt.


When I wore this dress to work today I got loads of compliments from my colleagues - from those who know I sew and others who asked me where I bought it from. The fabric is certainly eye-catching, it was a great buy on sale of course because I'm thrifty like that!


I think the quality of sateen has improved at Spotlight, at least this one anyway. In the past I've had problems with darker colours fading quite significantly after the first wash but this one didn't seem to lose any colour and just a small amount of shine after a wash and line dry so I have high hopes for this dress remaining in my wardrobe for many years.

Burdas of the month: 4/2017 #116 and 12/2016 #110 - clothes to survive a Sydney heatwave

Saturday, 20 January 2018

Looking back through my blog archives I discovered that I started my Burda of the month challenge way back in 2012, inspired by ReadyThreadSew who sadly no longer blogs.

I didn't do very well in my challenge last year though - I only completed projects from four issues. So this year I'm on a mission to not only complete at least one pattern from every issue this year, but also to catch up on those I missed last year as well! And while I'm at it, I may as well try to finish any issues from the previous years that I missed as well. It's an ambitious goal I know, but the beauty of a self imposed challenge is that there's no penalty if I don't succeed, only personal satisfaction (and a lovely wardrobe) if I do.

My January 2018 Burda issue still hasn't arrived, so I'm starting off with issues from the two previous years. Yes that's right - two for the price of one - I'm starting off with a bang. Admittedly they are two simple projects, but I badly needed some more summer pyjamas since Sydney is absolutely sweltering at the moment.

Firstly, the top. This is Burda 4/2017 #116 (no download at the Burda site strangely) which is a simple singlet style top where the side seams wrap around to the front.

images via burdastyle.ru


The construction is quite interesting and I definitely needed to read the instructions though it wasn't difficult to make. No seam allowances are added to the pattern except at the shoulders, because that is the only seam sewn in the traditional right sides together. All the other seams are bound with bias tape, and then the back is laid over the front at the side and topstitched down.


The only problem with this method is that it's impossible to adjust the fit at the side after the pattern has been cut out. I cut out a straight size 36 for this top, but in Burda patterns I usually use a size 34 at the bust grading out to a size 38 or 40 at the hip, so not unexpectedly this top is too loose at the top and too tight at the hip. I tried to change the angle of the side seam to overlap it more at the top and less at the bottom, but that meant the underarm edges no longer meet so the armhole binding wouldn't have worked:


So be warned - if you want to makke this pattern definitely make a muslin because if you need to adjust the fit at the side seams you'll need to redraw the armhole edges accordingly.

And now onto the sleep shorts. These are made from Burda 12/2016 #110 (which you can download from the burdastyle site), which look like this:

images via Burdastyle.com 

There's not much to say about these really - they are simple elastic waist shorts, with a folded down top to form the waistband casing. They took all of about 30 minutes to sew - can't get more simple than that!


The fabric I bought from Pitt Trading in their recent sale for the princely sum of $5 per metre. It's a lovely crisp cotton which I'm hoping will soften in time after wearing and washing. The navy blue cotton bias tape seems to suit the colours perfectly.


And finally can I just say how ridiculous I felt taking photos of myself wearing pyjamas, and then posting those photos on the internet! Thankfully my next finished project is a dress, which is much more my usual style.


My verdict: the top is interesting but I don't think I'll make it again. I had visions of making it in a silky or sparkly fabric to wear with wide leg pants on a hot summer night, but the straps are too thin and the neckline is too wide - it feels like the straps are about to fall down at any minute. Perhaps fixing the size issue might help with that, but I have lots of other patterns to use that it's not worth the time to fix this. It works fine as pyjamas though! The boxer shorts I think will get made many more times again - such a simple and quick pattern.


New Look 6106: The Big Ease

Friday, 12 January 2018

After seeing some great versions of summery a-line skirts made from New Look 6106 on IG in the last few months, I decided to buy a copy of the pattern during a recent pattern sale at Spotlight. For those of you not familiar with this one, it looks like this:


I quite like New Look patterns and have had good outcomes with them in the past. In fact, New Look 6968 is my TNT sheath dress pattern that I've made many times with no problems. So it baffled me when I saw the finished pattern measurements on this pattern:


After having a mini rant about this on IG, it was confirmed that the pattern is a misprint and where it states the finished bust measurements it should actually state hip measurements. But the amount of ease and finished garment measurements is correct though - this skirt has a whopping 19cm/7.5in of ease! I'm currently muslining a New Look pencil skirt pattern which has 5cm of ease and have nearly finished a New Look semi fitted dress (11.5cm of ease at the hips), so clearly there is no consistency and the amount of ease depends on the type of garment, but 19cm is far too excessive. At that much ease the skirt would just slip off the hips? Surely this is a pattern drafting error?

Anyway, after reading many reviews of this pattern and doing some flat pattern measurements I decided to size way way down. My body measurements put me at size 16, but I made a size 10 instead and it fits perfectly. I also added 5cm length to view A because it's a bit too short for my liking and I didn't want to sew on the band of view B.


I really like those cut in pockets at the front, they are far more flattering and streamlined to my figure than side seam pockets because I really don't need anymore bulk around my hips. However I don't like the pocket bags loosely flapping around inside and if I make this skirt again I would draft an extension to the pockets so the pocket bags are joined.


I used some contrasting cotton in a bright mustard colour for the pocket lining and waistband facing. It peeks out a little bit at the pockets, but I don't mind as this is meant to be a casual skirt.


I also really like the wide waistband as it sits below my natural waistline and is very comfortable. Looking at the side and back profiles I can see a little fold of fabric just below the waistband which is probably due to my swayback and would be something to change for the next version.


The a-line shape of this skirt is really pronounced, although it's probably exaggerated by my choice of a heavy linen/cotton tweed fabric that has no drape whatsoever. This shape has plenty of room for movement though, so it's a comfortable choice. And the fabric is leftover from a pair of maternity pants I made back 2011 when I was pregnant with Toby, so yay for stash sewing and yay for using up remnants!

I also chose to do a centred zip instead of a lapped zipper application which the pattern suggests or an invisible zip which is what I would usually do, purely because my fabric is quite thick and there would be too much bulk at the waistband seamlines.


It's still school holidays here in Australia, and I've been busy ferrying the kids around from one activity to another. To keep them quiet whilst I was doing a bit of fabric shopping in the Fabric Cave I let them play with my phone, so here's a cheeky photo they took of me doing some serious browsing! I've mentioned the Fabric Cave on here before - it's a volunteer run shop raising funds for Achieve Australia which provide disability support services. The shop is stocked entirely with donated fabric, haberdashery, knitting and crochet wools, patterns, books and magazines so it's unknown what you'll find there on any given day but it's always fun having a dig through the treasures! Plus the ladies (and odd gentleman) that work in there are friendly - they also plied my kids with biscuits while we were there.


Of course I purchased some fabric while I was there - 2m of maroon drill, two 2m lengths of white lawn (already used for lining) and two 1.5m stripe cotton shirting pieces all for the grand total of $21.


My verdict - I like this pattern once the fitting issues are sorted out. You just need to be aware of the excessive ease and choose a size accordingly, but after that it's a pretty simple skirt to sew. I also think the pattern instructions with this pattern are pretty good - it illustrates how to do a lapped zipper quite clearly so this pattern would be great for a beginner (but only if they pick the right size!).

Nine birthday dresses

Monday, 8 January 2018


Another January means another birthday dress I've sewn for my daughter. Since she turned 9 this year I decided to let her choose the fabric and the pattern - this way I know she'll like it and wear it. Although I was a bit sad because it didn't feel like I was giving her a surprise gift but rather just another dress of the many I've made for her, but at 9 she has strong opinions (which is a good thing!) and knows her own mind so I decided to play it safe.

She chose Simplicity 1702, which is a Project Runway pattern that comes with a few different variations. It looks like it's now out of print, but you can find it from various ebay and etsy sellers.


Anna chose the view with the asymmetrical neckline, but wanted the bow to be detachable in case she decided she didn't like it. So I've sewn the bow to a brooch pin so it can be easily removed, although the two times she has worn this so far she's kept it on.


Simplicity's kids patterns, actually nearly all the Big 4 patterns, have a ton of ease. I find Burda and Ottobre to be far better fitting, but because I knew to ignore the pattern sizes and instead check the finished measurements on the pattern I made a size 6 with a size 8 length and it turned out perfectly.

The fabric is a cotton broderie anglaise that I bought in Melbourne on our Easter holiday last year from Darn Cheap Fabrics, and is fully lined with some white cotton lawn.


The neckline at the back matches the front - it's a little bit different without being age inappropriate or completely off the shoulder.


And I even managed to convince her little brother to sit still for one short moment so I could snap this photo. He's only giving a half smile though, he's too cool for mum's photos these days!


My how time flies when you have small children in your life growing up before your eyes. I cannot believe that the years have just flown by!