What to wear on top of the world

Thursday, 21 December 2017
Apologies for the blog silence but I have had an eventful few months lately. I spent most of November having a solo holiday in Nepal, most of October preparing for my adventure and the last few weeks since I've returned dealing with the normal busyness of this time of year!


The highlight of my trip to Nepal was spending 20 days hiking in the Himalayas, trekking to Everest Base Camp via the spectacular glacial Gokyo Lakes. It was incredibly hard work as the terrain is either steeply up or steeply down, the trail is rocky and uneven and of course it's all done at high altitude and in extreme cold. But the scenery of the Himalayas is amazingly beautiful and I had a huge sense of personal achievement, especially on some of the harder parts like ascending Gokyo Ri which is a lesser mountain (5373m peak) and crossing the Cho La Pass which involved climbing up a very steep rocky path to a height of 5545m and then descending on the snowy and icy side.

Gokyo Lakes, Nepal
Coming from Australia it was really difficult to prepare. We don't have any high mountains in Australia - our highest peak Mt Kosciusko is only 2228m which is barely considered a hill in Nepal! So I focused my training on increasing my physical fitness as much as possible. Nor do we get particularly cold weather in Sydney, but I knew it was going to be cold so I made a stack of merino wool tops to wear while I was travelling.


I bought the merino wool from The Fabric Store who have a great range in various weights and colours. I made two tops in a fleece back merino wool to wear as outer layers, and three tops in a lightweight wool to wear as inner layers and wearing these in various combinations depending on how cold it was kept me very warm. Plus despite wearing these for a month without washing they didn't smell or even look dirty at all.

I used McCalls 7261 which is a top with princess seams, raglan sleeves and collar variations that is actually meant for activewear fabrics but the wool had a slight amount of stretch so I figured it would be ok.
I found this pattern to run rather large - I used the correct size for my first version in black wool but it's rather sloppy and has excess fabric under the armpits in particular. I do like how the back dips down because it covers my lower back nicely when sitting down - no cold drafts there!


I also like the lapped neckline even though it's quite bulky and there are numerous layers at the front where the two ends of the collar overlap. It did keep me warm though when popped up which is the main thing!


mountain views, Himalayas Nepal

suspension bridge, Himalayas Nepal

For the next version I used the same fleeceback wool but in grey, and used a size smaller so it would be more fitted and it looks much better while still being big enough to wear over other clothes. For this version I also used my coverstitch machine to stitch along the seam lines, with the bobbin thread on the outer side so it has a real active wear look to it.


Durbar Square Kathmandu

I also made three tops in thinner merino wool using my go to t-shirt pattern Burda 2/2011 #106 to use as lightweight layers. These were fantastic - in Kathmandu I wore them on their own, and up in the mountains I just layered two or three depending on the time of the day and the coldness and they were just perfect.

image via Burdastyle.com 
One top is in a vibrant green, one in a black and white fine stripe and one in a grey marle which I didn't get a photo of but trust me looks just like the others!

Narrow shopping street in Bhaktapur, Kathmandu


So as you can see from the few photos above, Nepal is a remarkably beautiful country. The city of Kathmandu is still recovering from the earthquake 2 years ago, and the lowlands are still recovering from the damage caused by the monsoon floods and landslides from earlier this year but it is still an amazing place and the people are so friendly. I travelled by myself leaving my husband home looking after the kids for the month - it was my 40th birthday present to myself. I joined an organised group for the trekking part but met lots of locals and other tourists during the times I was on my own - I never felt lonely or unsafe at all. I can highly recommend a trip there if you need some excitement in your life!


Animal print is a wardrobe staple, right?

Monday, 16 October 2017
For my recent trip to Melbourne to see the Dior exhibition I had a mini panic about not having anything to wear (even though my wardrobe is heaving). The weather forecast was for cold and rainy weather and it's well known that Melbourne is an extremely fashionable city and I just didn't think any of my casual and colourful Sydney clothes would do. I'm pretty sure every woman in her life has thought at least once (if not at least once a week) that I have nothing to wear!

So I decided to make a simple top to wear that I not only wore whilst on that trip away but I've worn quite a few times since - it's fast becoming a favourite.


This is Burda Style 2/2016 #118, a raglan sleeved top with a stand up collar:

Image via Burda Style
I've made this once before back in February 2016 (it was one of my Burda of the month projects) in a neon multi-coloured scuba fabric:


For this version I used a mystery knit fabric I bought for a couple of dollars from The Fabric Cave, which is a charity run craft shop selling donated items, so who knows how old this fabric is or the fabric composition. It is definitely a polyester knit, with very little stretch so it's not my favourite fabric to wear but I figured it would be ok to wear in cold weather and I could live with it just to use this funky print:


The neckline is my favourite part of this top - I like how wide it is and how it stands up. I think it has quite the 60s vibe, especially in an animal print. The collar is just a rectangle piece folded in half and cut on the bias so it's pretty simple to attach as well. I chose not to interface it because I wanted it soft around my neckline, but the fabric has enough body that it stands up properly.


In this busy print you can't really see the vertical seam lines in the front and back of the body of the top - if you look really closely you can faintly see the seam lines but they are there, trust me!


Those vertical seam lines certainly give a bit of shape to an otherwise boxy top, and I think both back and front have a nice, gentle curve at the waistline which is quite flattering whilst still concealing the after effects of a big lunch!


For my Melbourne trip, I also made a simple tube skirt from some black ponte knit which I wore with black tights and black brogues so I think I fitted in with the Melbourne aesthetic, and it kept me warm on a chilly weekend. Here is a photo from inside the exhibition where the lighting was quite dim hence all the shadows:

Thanks to the lovely Stef for the photo
But I also wore it on the weekend out for a lunch near my parents house (where my photo bombing child thought he was absolutely hilarious), so it's quite a versatile top and as we all know animal print is definitely a neutral basic!


So as I said back in 2016 in my original review of this pattern, it's another great Burda pattern that is well drafted, easy to make and looks great. And when I was in the Remnant Warehouse last week I spied a mesh fabric that would be perfect to make a version very similar to the Burda version, so I don't think this is my last version of this top at all!

Susan Khaljie and Dior in Australia!

Tuesday, 19 September 2017

I've just spent an amazing weekend in Melbourne with a big group of like minded sewers seeing the House of Dior exhibition at the National Gallery of Victoria (as well as a little bit of fabric shopping and a lot of eating and drinking!).

A post shared by Mel (@whatpiggydoes) on
Image via Mel @whatpiggydoes - organiser extraordinaire!

So many amazing dresses, hats and shoes, ranging from the early years of Dior through to the current designer Maria Grazia Chiuri. If only my lifestyle were more glamorous, I would so be making copy cat garments right now! Well maybe that sundress at the far right in the photo below would work for me, but that beautiful stripe skirt on the left is a lot beyond my skill set - apparently had the ribbon sewn on to organza and then the fabric was professionally pleated to get that amazing fullness.


The interesting thing that I noticed though is that close up some these garments aren't perfect at all. Sure, the tailoring, the cut and the drape are impeccable but I did spot a scallop finish on a pocket that was a bit jagged rather than curved and a centred zipper that was rather ripply. If I had made those garments I would definitely unpick them and re-sew them, which only indicates to me that we are way too harsh on ourselves!


But, there is a lot to be admired in a beautifully made couture garment and the amazingly talented and knowledgeable Susan Khaljie is heading back to Australia again next year for another round of couture sewing workshops. Once again supported by the Australian Sewing Guild (members get a 10% discount), she'll be heading to Sydney, Melbourne, Brisbane and Fremantle in January to March 2018.

Having recently finished my version of the Classic French Jacket (with plans for another one eventually) I can highly recommend her workshops. Even doing just a two day workshop on couture techniques taught me so much, and they are skills that I use in my everyday sewing even when I'm not sewing a couture garment.


Sharon over at Petite and Sewing has done a few posts giving a detailed review of the course we both did earlier this year - from that you can see how intensive and how much hard work the workshop is, but it's also lots of fun and inspiring spending your days with Susan and the other equally passionate students.

It's not very often that we are spoiled with so many opportunities here in Australia - I always see people going to fabulous exhibits at the V&A or attending workshops at the FIT both of which are sooooo far away from Australia.  I don't know why I torture myself following these on Facebook when there is no chance I'll get to attend! Sadly I don't think I'm going to be able to make any of the workshops this year as I will be having a busy end of the year and equally busy start of next year but if you're free and able I can highly recommend making the time to see the exhibition and attend Susan's workshops.

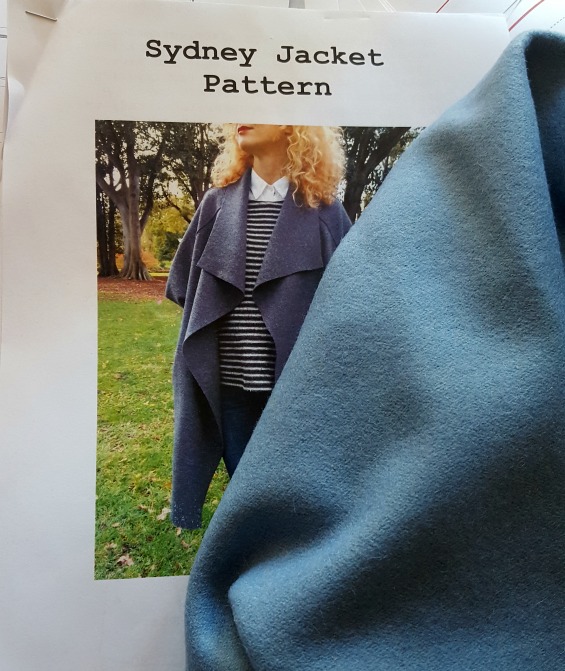
A Sydney blogger making a Sydney jacket....groundbreaking

Friday, 25 August 2017

Judging by my instagram feed, it seems practically everyone has made Tessuti's Sydney jacket at least once (some people several times even!). As usual I am late to the game - due to my contrary nature and my delight in avoiding what is popular!


However I wanted a lightweight jacket and I had some lovely wool coating fabric I bought at Easter on my mini-holiday this year from Darn Cheap Fabrics in Melbourne so it seemed a logical thing to do. The part of Sydney that I live in has barely a month of 'real' winter where it's cold enough to need a substantial coat but it is a bit chilly on my early morning commute to the city so the thought of wearing what is almost a blanket draped around my shoulders really appealed.


And when you are standing still while wearing this jacket it does drape beautifully and the pockets are at the perfect height to stand around slouchily with your hands hidden in the depths of the folds.


But, it's not really a practical jacket and to be honest I found it quite annoying to wear. I've been wearing this jacket for the last week in some windy weather and without any closures on it I felt I was continually wrapping it around me and constantly re-adjusting the fronts. And I found myself walking around with my arms crossed holding the fronts close in to prevent them flapping around, but that's not an ideal way to wear your clothes.


In terms of sewing it did take a bit of head scratching to figure out how the pieces join together. I didn't think there were enough markings on the pattern to make it quickly obvious which bits all joined together so I had to lay them out like a jigsaw puzzle to visualise how it worked, especially with that lower sleeve piece joining the upper sleeve/back yoke piece and side seams. But once that bit is worked out it's a pretty straight forward sewing project.


It also required a bit more precision sewing than I normally do, because instead of just sewing the seams right sides together the pattern requires one layer to be laid over the other and then top-stitched. First attempt I just winged it by measuring and pinning but that wasn't too successful as you can see below:


So I had to unpick that seam, and then mark chalk lines along all the seams. Actually that's not too much effort, it's just an extra step I don't need to do! But it did help get the top-stitching evenly in the centre of the overlapped edge and looks neat from the outside:


So overall, this isn't a favourite piece in my wardrobe simply due to the fussiness of wearing it. Whilst I really the look of the draped front, I like to put on my clothes and not have to re-adjust them all the time. I do however love this blue wool fabric, and I think next year I may pull it apart and remake it into a simple coat with a button front for next winter!


Burda Challenge: 6/2017 #103 tie neck blouse

Saturday, 19 August 2017
My Burda magazines are arriving later and later each month - now they don't arrive until mid to late of the following month. But that's not a problem because I'm quite behind in this year's challenge, but when this magazine arrived I traced out this pattern and started sewing it the very same day. You see, I just bought some lovely Liberty lawn that I was very keen to make into something and this pattern was perfect.


This is Burda 6/2017 #103, a rather simple blouse with some nice piping details:

images via Burda Style

This is a relatively simple project to make, and is also the illustrated sewing lesson in the magazine and a blog post on the Burda website. It is a bit shapeless though, due to the lack of darts and shaping - the recommended fabric is crepe de chine which I guess is needed to make sure it drapes around the body. The Liberty lawn I've used is soft but doesn't drape  as well as a silk fabric would, so it is a bit puffy when worn tucked in. I may put in some vertical darts on the front and back to get rid of some of the looseness, but I'll wear it a few more times before I decide.


It's even worse though if I don't tuck it in. This is a bit wrinkled from wear, but worn out it just looks shapeless and oversized:


It's also a little plain without the neck tie I think, even with the piping details and the cute little collar. I left off the pocket because I was worried it may look like a pyjama top with the print and piping, even though wearing clothes that look like pyjamas in public seems to be in fashion it's not my thing.


The piping is my favourite feature - I particularly like the rounded edge to the collar and cuffs which makes the piping finish neatly. I found some small glossy rounded buttons which are perfect for the shirt, and since I had some extra I decided to add two buttons to the cuffs:


I do think the neck tie could be a little wider though as it seems to be a bit narrow and would look nicer in a fuller bow.


Unusually for Burda there is a drafting error with the neck tie, which they don't acknowledge in their blog post either. In the photo below, the pattern piece (piece 9) as traced is on the left - the instructions tell you to fold in half lengthwise, stitch the edges together and turn the right way out. But as you can see in the photo below on the right, when you fold that pattern piece in half it doesn't line up at all like the diagram in the Burda magazine:


To overcome this, and to make the neck tie wider I think it would be better to cut out 2 pieces and sew the 2 pieces together right sides facing and then turn it right side out rather than folding it in half. I didn't quite have enough fabric left to do this so I've left the neck tie as is.

So apart from the drafting issue, this is otherwise a good pattern. Plus I do love a Liberty print - this one is 'Solar' from the 2016 Silk Road collection that I bought from Tessuti a little while ago on an innocent lunch time walk that ended up in fabric shopping (it's dangerous when both Tessuti and The Fabric Shop are within walking distance of my office!).

Oooh la la! A classic French jacket

Tuesday, 4 July 2017

The very cold weather we have been having in these parts lately has meant quite a  few nights on the lounge under a blanket but it has resulted in me finally finishing my classic French jacket. Sure, it's many months after I started making this jacket at Susan Khaljie's week long course in February but to be honest, I still can't quite believe how many hours of work has gone into this jacket - all that hand-stitching certainly takes time.


Admittedly, since I last posted about this jacket back in February I didn't do much work on it because the weather had been too hot - I couldn't find the motivation when I knew I wouldn't wear it straight away. But this is very much needed though, and even though my outer fabric is quite lightweight and loosely woven, with the silk fabric lining it's a very warm jacket.

Sewing on the trim is quite time consuming, and luckily I kept my trim quite simple so I had less work to do than some of the ladies in my course. The white grosgrain ribbon is hand-stitched down the centre of the ribbon, and the black gimp braid is hand-stitched on both edges. It's about 5m around the jacket and cuffs, so that is 15m of hand-stitching of the trim alone!


I agonised over that trim and buttons. There aren't many stores in Sydney with a wide range, so it wasn't easy finding something that would work. I was lucky to have stumbled across the white grosgrain ribbon from Tessuti, but I couldn't find any flat black ribbon to my liking so I went with braided gimp. The buttons are from a store called Buttons Buttons Buttons now located in the Dymocks Building on George St - if you are ever in the Sydney CBD you should definitely drop in because there are literally thousands there to choose from. I narrowed it down to three choices, but went with the white and black stripe button in the end because I thought it looked a bit more modern.


The other big area of hand-stitching is the lining. All the lining seams internally are hand-stitched, and then the lining is stitched to the edge of the jacket around the entire edge of the jacket and cuffs. The traditional chain, which is placed along the bottom of the hem to help the jacket hang properly, is also hand-stitched:


My jacket is cropped to hip length so I've decided to leave off the pockets at the front but now I'm wondering if the front looks too plain. After all, the pockets (either two or four) are a signature look of the classic French jacket.


When I wore this jacket to work last week I kept the jacket done up because it's really cold in my office and I like the symmetry of the trim along the centre front. The neckline is really high though so I had to leave the top hook & eye undone so that I could hunch over my computer without choking. Susan advised making the neckline quite high because the eye would be drawn to the lower edge of the white trim due to the high contrast between black and white and not the upper edge of the jacket. 


My favourite aspect of this jacket is the fit - with Susan's expert pinning and tweaking I've managed to get a very close fit around the shoulders and the lower back which are areas I always struggle with. I think the fit of a jacket around the shoulder is the key to a good looking garment, but with my narrow and forward sloping shoulders I don't always achieve a close fit.


I've even bought a vintage bakelite brooch off ebay to wear with this jacket, which I think is a very sweet look:


Being a classic black and white jacket its pretty easy to find many things to wear it with, including my recently re-made wide leg pants:


So will I make another classic French jacket? Definitely! I may leave off the trim in future versions because that is the time consuming part and it makes the jacket very distinctive, and instead just make a simple collarless jacket which would suit my corporate wardrobe really well. I've done the hard yards with Susan's help to get the pattern to fit me perfectly, so it would be a waste not to make more. Watch this space....