Burda of the Month: 2/2015 #128 the seam crazy top

Friday, 27 February 2015
My February issue of Burda was really late in being delivered this month - it didn't arrive in my letter box until the 21st of February which was really annoying. It wasn't worth the wait though, because there's not much in this issue that's really my style, but because of my Burda challenge I forced myself to pick something: a boxy top that I thought I'd be able to write a sarcastic hate post about. Funnily enough though, I like how it turned out!

Burda 2/2015 #128 angular seamed top with slit neckline www.loweryourpresserfoot.blogspot.com

The pattern I chose is the slit neckline blouse  #128, which is described as a straight cut with "panel seams to give the blouse structure and visual interest".

Burda 2/2015 #128 angular seamed top with slit neckline www.loweryourpresserfoot.blogspot.com
images from Burda Style
The recommended fabric is jersey, and looking closely at the magazine photo it appears to be a textured, thick fabric. I had a mystery knit fabric in the stash which was textured and slightly stretchy which I didn't realise is actually a length of wool fabric until I pulled it out of the washing machine with the unmistakable smell of wet dog and a few tell tale signs of moth holes in one corner. I think it might actually be wool crepe that has been washed a few times and shrunk considerably, because it has that sort of texture, is a bit spongy and presses really well.

Those seams lines certainly are very interesting, and I particularly like how the triangular piece on the lower front lines up with the upper back yoke piece at the side seams. Although all those intersecting seams are a bit bulky and despite pressing it really well it still bulges out a little bit.

Burda 2/2015 #128 angular seamed top with slit neckline www.loweryourpresserfoot.blogspot.com

It felt like I was sewing the sleeves completely wrong because they turn out terribly twisted, but once I'm wearing it it's actually quite comfortable and hangs properly because it hugs the arm and elbow.

Burda 2/2015 #128 angular seamed top with slit neckline www.loweryourpresserfoot.blogspot.com

I should have made a forward shoulder adjustment like I need to do to everything I sew that has a shoulder seam, because I can see in that photo above that the should seam is sitting back a little bit too far, and the front of the top is lifting up higher than the back. Luckily it's not a high neckline so it's not uncomfortable, but it is quite short in the front. This pattern is sized for petites, which I can usually make with no problems since I'm not overly tall, but this seems a tad on the short side to me.

Burda 2/2015 #128 angular seamed top with slit neckline www.loweryourpresserfoot.blogspot.com

True to the description in the magazine, it surely is a straight cut top, aka boxy and shapeless. I admit had to fight every urge in my body to take in every seam a bit to give it more shaping because it looked like I was wearing a big white pillow case. But in the end I just shaped the centre back seam to account for my sway back and took in the centre front seam by 2cm just to make it slightly more fitted, but not skin tight. The back neckline seems a lot lower than the technical drawing suggests:

Burda 2/2015 #128 angular seamed top with slit neckline www.loweryourpresserfoot.blogspot.com

The armscye front and back turned out weirdly though. Looking at the technical drawing and the pattern pieces, the armscye is supposed to be pointed, not curved.

Burda 2/2015 #128 angular seamed top with slit neckline www.loweryourpresserfoot.blogspot.com

However I had a difficult time setting in the sleeves and trying to get that pointed effect, and what I ended up with is just a strangely curved armscye instead!

Burda 2/2015 #128 angular seamed top with slit neckline www.loweryourpresserfoot.blogspot.com

 The only change I made to the pattern aside from taking in the front and back centre seams was to finish the neckline, hem and sleeve edges by pressing under 1.5cm and topstitching with a twin needle. Burda always recommends cutting narrow strips of bias fabric for bindings, but since these flap about and need to be topstitched down anyway I figure I may a well cut out that extra step of sewing a binding on.

So my verdict: an interesting but simple, casual top that was well worth sewing, despite my initial low expectations. Overall, an interesting version of the Burda boxy top! Bonus for my choice being a quick and simple project too, so that I could complete it within February. Who knows when the March issue will arrive though..........

Burda 9/2007 #128: simple skirt in a stunning floral

Saturday, 21 February 2015
Sometimes a project is all about the fabric, and not the pattern. It certainly is the case for my latest finished project - a simple straight skirt:
black floral pencil skirt burda 9/2007 #128 www.loweryourpresserfoot.blogspot.com

Nothing too groundbreaking about the skirt style, but oh! the fabric. It is so gorgeous. It's one of the pieces I bought in January from Tessuti during their sale - a cotton with slight stretch in a dark floral print on a black background with white mini polka dots:

black floral fabric www.loweryourpresserfoot.blogspot.com

Because the fabric is rather busy, what with the polka dots and a floral pattern, I decided to keep the pattern relatively simple. I say 'relatively' because even though the pattern is a simple shape, it needed quite a lot of fitting changes to make. I used a pattern from a 2007 Burda magazine, one of the random issues I used to buy purely because I really liked the patterns before I started subscribing in 2009 and took the good issues with the bad. Being such an old pattern it's not available for download on the Burda Style site, but for reference it's skirt #128 from 9/2007 which looks like this:
Burda 9/2007 #128 pencil skirt

The thing is though, that this skirt is actually a plus size pattern and is mid calf length with a godet at the back, so I basically grafted the bits I liked - the wide waistband and pockets - onto another pencil skirt that I had made recently (this one here). It took a bit of fiddling to get the fit right, and even a muslin (yes I do make them sometimes) but in the end I think it's turned out great.

I love those pockets, they sit really flat against the body without gaping open but aren't too deep either that causes funny lines or extra bulk in the pelvis region.

black floral pencil skirt burda 9/2007 #128 www.loweryourpresserfoot.blogspot.com

The pattern for the side hip piece extends all the way across the front of the skirt, which helps keep the front flat and stops those pocket pieces flapping about or folding back on themselves. This is an excellent feature that Burda patterns quite often incorporate but not always:

black floral pencil skirt Burda 9/2007 #128 www.loweryourpresserfoot.blogspot.com

Even though the skirt is quite straight and not as pegged as I made my last pencil skirt (here), it's still a close fit and looks quite flattering from the side view. This is probably dodgy pattern making on my part, but I usually angle the seam line in below the zip towards the hem line so that it sits close to the body without making it too tight overall. I put in a walking vent so it's still comfortable to walk in. As I said, it's probably all sorts wrong but it works for me.

black floral pencil skirt Burda 9/2007 #128 www.loweryourpresserfoot.blogspot.com

So if you're wondering about the grey tshirt I'm wearing in some of those photos above, the explanation is that I was trying to be cool like a Pinterest worthy fashion blogger. These are my inspiration photos:
gray tshirts with floral skirt www.loweryourpresserfoot.blogspot.com
credits l-r: uberchicforcheap.com; pursuitofshoes.com; bittersweetcolours.com 
And this is my reality:

black floral pencil skirt Burda 9/2007 #128 www.loweryourpresserfoot.blogspot.com

Not quite as cool. In fact I quickly realised that I'm a middle aged mother of two working in a government job taking photos in my sewing room and not a cool fashion blogger running about town with a photographer boyfriend in tow to scout out quirky locations for a public photo shoot! So my reality is I probably won't wear a slouchy grey t-shirt with this skirt because it just looks like I forgot to take off a tshirt I wore to bed when I got dressed in the morning, and instead I'll wear it with a tailored cotton shell top (made here) and more than likely with a black blazer on top because it's really cold in my office:

black floral pencil skirt Burda 9/2007 #128 www.loweryourpresserfoot.blogspot.com

black floral pencil skirt Burda 9/2007 #128 www.loweryourpresserfoot.blogspot.com

So overall - really happy with this project despite my cranky face in some of these photos!

Simple dress in stripes: Vogue 2659

Sunday, 15 February 2015
I live a pretty casual lifestyle - apart from corporate wear for work, the rest of my wardrobe needs are for simple, casual and comfortable clothes. Of course that's what I rarely sew! After making that very pretty but limited occasion wear purple floral print dress I decided to make a simple t-shirt dress that would easily go from the school gate to the playground to the shopping centre. I had some firm ponti fabric in white with navy blue stripe in the stash bought some time last year from Spotlight that I turned into this:

I used Vogue 2659, an early 2000s pattern that is now OOP and no one else on the internet seems to have made! I've made the top a few times but not the dress,


I chose this pattern because I didn't want darts or seam lines to mess up the stripes, and I was going for a loose fitting style. I was hoping that the firmness of the fabric would mean it would skim over my curves and not cling, but it actually billowed out and puffed up in a rather unflattering way around my lower back and on the front in the area around my waist. So, as usual I ended up making a very fitted dress because I took it in slightly at the sides and put two darts in the back to get rid of that excess fabric. So now the dress follows my natural shape much better:


The two vertical darts at the centre back aren't too noticeable, altough the back view clearly demonstrates that old adage that horizontal stripes do make you look wider, or in my case emphasise the width! But now I'm in my late 30s and having had two children I've come to accept my body shape as it is, so I still like this dress big butt or not.


The front view shows that a curved French dart would have done wonders for those slight folds of fabric at the front, but I can live with it. I give myself 90% on the stripe matching - the side seams lined up perfectly, but the stripes on one of those shoulders is slightly off. I did find the sleeve cap on this to have quite a lot of fabric to ease in, so I was just happy enough to get those sleeves in without puckers let alone matching the stripes fully.


Construction wise not much to say - I sewed it all on the overlocker and at the neckline I just used steam a seam to turn under the edge and top-stitched it with a twin needle. I shortened the sleeves from elbow length to cap sleeve because it's still pretty hot around here

Despite the fact I had intended to make a loosefitting casual dress and I ended up with a fitted dress that is shorter than I usually wear instead, this dress was perfect to wear to a 6 year old's birthday party yesterday with some flat sandals so I'm still calling this one a success!


January sewing stats

Wednesday, 4 February 2015
This will probably be of limited interest to anyone, but I find keeping track of things on my blog is the most reliable method for me. I'm going to keep track each month of garment sewn, fabric bought and fabric used. If you're feeling guilty about buying more fabric than you use each month, then these posts will remind you that you're not alone! In fact you could 'fess up if you too have bought more than you've used too!

Garments Made: 8 (3 for me, 3 for Toby, 2 for Anna)

Fabric Used: 8.5m

Fabric Bought: 10m (5m each from Tessuti and The Fabric Store due to their too tempting sales)

stretch cotton sateen, textured poly/cotton, textured white cotton from Tessuti
Marc Jacobs knit, Tory Burch poly cotton, stretch linen, cotton twill from The Fabric Store
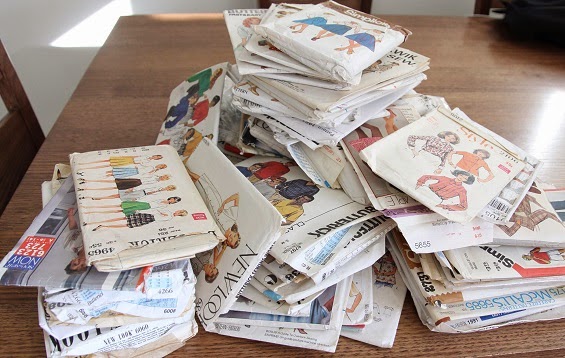
Other: a bajillion patterns made their way into my stash this month, so many that I had to buy a third chest of drawers to fit them all in. Firstly a sewing friend gave me a quite a few patterns at our sewing day at Tessuti Fabrics earlier in the month, including some great suit and jacket patterns which are right up my alley (thanks Sandra!).


Then I bought sight unseen a big box of patterns from an auction house, which had loads of Designer Vogue patterns which were mostly hilarious and somewhat ugly ones from the 1980s, but a few earlier patterns and a few decent ones that I will use (one day):


And then my dad found this massive pile of patterns at his local op shop that he bought for the princely sum of $10! Again there was a bit of craziness but also quite a few lovely patterns too:


January Burda of the Month: vintage dress 1/2015 #126

Sunday, 1 February 2015
I finished my first Burda of the month project yesterday on the very last day of January (already?!) so I managed to meet this month's self imposed deadline just in time. I found it hard to choose this month between a boxy top with an attached draped scarf across the shoulders that I could see made in a nice midnight blue silk or satin or the vintage dress pattern. In the end my fabric stash determined my choice because I have plenty of dress fabrics but not much in the way of silk or satin so I went with the dress, although with a few modifications:


My apologies - between the wallpaper and the print on my dress there's a lot of pattern going in these photos!

For some reason this pattern isn't available for download on the Burda Style website, so you'll have to track down a copy of the magazine if you want this one I'm afraid.

original images from Russian Burda Style
The obvious change I made to the pattern was to swap the full skirt for a fitted skirt, using the lower part of my trusty TNT fitted dress, New Look 6968. As much as I like the look of a full skirt on a dress, when I'm wearing one I feel like I'm in fancy dress but a fitted skirt is much more my style. I went to the effort to shift the darts on the skirt so that it aligned with the darts on the bodice, but of course you can't see that because the fabric is so busy!

Also obscured by the busy print are those gathers on the sleeves - it's the main feature of the dress so it's a pity I didn't think a bit more about it when I chose this fabric. I do like the extended width of the sleeves though, a bit of shoulder coverage always makes me feel a little less casual and better dressed.


The size range for this pattern is 36 - 44, so I had to grade the bodice down a size since I usually sew a size 34. I don't think I did a great job in the sizing down because it looks a little too big still with some excess fabric around my bust. Plus the sleeves turned out to be very low cut to the point where there are glimpses of my bra strap if I lift my arm. But looking closer at the pattern drawing and the model's version it looks like that side seam stops at the top of the waist darts which means it is below the bust line.


I did contemplate pulling it apart and taking it in at the side seams and gathering the width of the sleeve a little more to make it narrower, but that join at the underarm between the fabric and the lining was really fiddly so I've decided to leave it be, I just need to remember to wear a nice bra with this dress in case anyone gets an accidental peek!

Because I made the lower half from my TNT dress pattern I managed to get a close fit with no fabric pooling around my swayback:


I switched the size zip to a centre back invisible zip because I wanted to keep the walking vent of the skirt at the centre back. Doing this also meant I could fully line the bodice using the method where you sew the neckline and sleeve edges , pull the back pieces through the shoulder area and then do the side seams and centre back seam last - it's a much neater finish and easier too.


The fabric is a printed cotton bought from Spotlight quite a few years ago that I've been wanted to use for a long time because I really like it even though it's a weird looking flower print and the colours are bright fuschia with lime green micro polka dots. I'm not sure if the print is deliberately on a slight diagonal or if it's printed off grain, but that hem is straight even it doesn't look that way. But the good thing about the busy print is that it hides the bad with the good!

My verdict: I like this style, it has a vintage vibe without being too over the top and therefore wearable in everyday life. The pattern is ok but I do think the sleeves might be drafted quite low under the arm and I would fix that if I ever made this pattern again. I should have muslined the bodice first to find that out and fix it, but life is too short to make a muslin for each and every project. I probably also should have also picked a solid fabric to show off those sleeve gathers better, but I am glad I've finally made something with this fabric, so despite the faults I'll definitely be wearing this dress,