Showing posts with label tutorials. Show all posts

ooooh, look what I found!

Monday, 29 November 2010
I had a very annoying 60 minute wait at the doctor's surgery last week, luckily neither Anna or I were very sick but it's still very hard work trying to control a toddler in a small room with other people waiting, when she should be having a nap and instead wants to go berserk! But it proved fortuitous because while waiting there I managed to speed read an old Shop Till You Drop magazine and spied this:

It's a notepad that comes complete with preprinted female croquis (ie body outlines) that you can sketch your fantabulous fashion designs on! Hokey Croquis sells this one and a smaller travel notepad on their website, and I think I shall be sending the link to my husband as a not so subtle hint for a Christmas present, because sadly I'm not being sponsored to do this post. Although I would accept sponsorship if you're reading Hokey Croquis! (*chirp* chirp* why do I hear the sound of crickets?)

I am a very ordinary sketcher, but I am constantly drawing loads of pictures of gorgeous outfits I see on people in the street in my Filofax (yeah, I'm old skool too) to the point where there's hardly any room for writing down appointments in there. So this would be a great addition to my handbag, as well as improving my fashion sketching no end. The only thing these notepads are missing are little holders for pens or pencils, because they always seem to go missing from my handbag, thanks to a pair of little hands treating my bag as a lucky dip.....

And if you want to try before you buy, or you need it now, or you're a bit of a tightwad (no shame, that's me to a tee), they even have some free downloadable croquis on their site too. I know there is a set of croquis over at Burda Style as well, but the good thing about the Hokey Croquis ones is that it includes a number of different body poses so you can choose the best one to illustrate your idea that is burning a hole in your mind (or is that just me?).

Thank you all for the lovely comments on the dress in the previous post. I am pretty happy that a simple fitted dress style paired with a graphic colourful print resulted in such a great outcome, and I suppose it makes a nice change from my usual grey and neutrals too! Did you all see the interesting tip in the comments from Pin Queen to sew a skirt bar (from a hook and bar) across the top of the vent to hold it together in the event of the seam ripping? I've never heard of this before, but I'm definitely going to do this because it's a simple thing to do but would prevent an extremely embarrassing wardrobe failure. Although I suspect as Amanda pointed out that the dress probably doesn't even need an opening because it's not really that tight around the knees (it's just that I'm too lazy to unpick the hem and seams of the dress and lining and sew it all back up!). And sewingelle thank you for confirming for me that the Vogue is the superior choice to the Burda pattern, although I do confess it was only laziness that made me choose the Vogue over the Burda....

Ann, the issue I found with the jacket pattern was that not only was it very shapeless as Shannon described, I also found the neckline didn't sit correctly on me. It would gape forward at the centre front in more of a v neck shape, and the two fronts that overlap wouldn't sit on top of each other neatly like the pattern illustration but would rather hang rather haphazardly to the side. At first I thought it was because I used a heavy linen fabric that didn't have enough drape, but I had the same thing occur when I made it out of a soft wool blend as well. But the style certainly suited me when I was pregnant, because the loose fit and cropped style accommodated my growing belly right to the end (although I don't really look all that pregnant in this photo):

And finally I have to share this fantastic giveaway that extremely generous Denise over at The Blue Gardenia is offering: a gorgeous 1950s vintage Butterick pattern, 4 yards of Italian wool fabric in a lovely teal colour, and a Revlon Fire n Ice nailpolish and lipstick. You have until 3 December to think up a comment about why you like vintage patterns that is good enough to impress Denise (which I think will be tough 'cos Denise is one witty lady).

Now I must get back to work (I'm writing this in my lunch hour) before the cranky IT people dob me in to my boss, and helpfully provide him with a graph showing how many hours and how many websites I visit during work hours. Yes they have done that before, and yes it was bad.....

easy DIY custom clothing labels

Monday, 6 September 2010
Thanks for all the lovely comments on The Dress - if everyone loves it as much as you guys do that fabric prize will be mine! I'm already mentally picturing what I'll buy, nothing like a bit of positive thinking.

I did forget to show you all one detail though - I made some custom labels to sew in to the dress since this one will be going off to live in someone else's wardrobe. Actually I've been meaning to order some labels for a long time, since I saw the simple but stylish labels that Lindsay T had made. But like a lot of things, I left it too late to order them in time for this dress, so I came up with a quick and easy DIY option:


I also used a decorative stitch from my machine along the seam where the facing and lining meet - it looks all puckered in this photo but it looks quite nice in real life. I never usually bother with making the inside as pretty as the outside of a garment, but maybe I should because it looks so much more professional and "finished", even if I'm going to be the only one that can see it.

These labels turned out really well, and I made 48 of them so this will be a suitable interim measure until I decide on a design to get made. These were so easy, and cost at most $5 to make so I'd thought I share how I made them with you all in case you want to do something similar.

1. Gather your supplies:

  • Ribbon - I used white satin 25mm wide ribbon, but you could use narrower if you wanted smaller labels. You can also used coloured ribbon, just buy the right transfer paper.
  • T-shirt transfer paper - you can buy these from any office stationery supply store
  • An inkjet or bubblejet printer (NOT a laser printer, the paper will stick to the drums and stuff up your printer. Trust me, I know this.)
2. Design your labels

I used Microsoft Publisher to create text boxes with my name in the French Script font that comes with the program, and put a dashed line around the box that looks like a sewing stitch. You could do a simple text only in Microsoft Word or similar word processing program, or get even fancier by downloading special fonts and graphics if you like, or use a specific label maker program. Go wild, the options are endless.

Because t-shirt transfer paper is fairly pricey, I crammed as many text boxes onto the page as I could, like thus:
3. Print out your labels

Because of the way you iron the labels face down, your text needs to be mirror reversed. If you're lucky, when you go to print you get an option to select t-shirt transfer paper as the paper option and it will print out the labels mirrored reverse automatically for you. Brilliant! I only discovered this after spending almost an hour trying to figure out how to mirror reverse text (to do that you need to save the text as an image and then you can rotate it).

4. Cut out your labels

Cut around each little label using your paper scissors (not your fabric scissors for heaven's sake!), so you end up with little rectangles.

5. Iron your labels onto the ribbon

Follow the directions for the particular paper you've bought, but all I had to do was iron the paper onto the ribbon using a very hot iron on a hard surface and 10 seconds later it was well and truly stuck down.


And you're all done, told you it was easy!

I left mine on the ribbon roll because otherwise I would probably lose them, and all I did was cut a label off the ribbon roll, tuck the raw ends under and sew it onto the facing of my dress.

I've seen some interesting tutorials recently on how to screen print labels, stamp labels or use a printable fabric, but the iron on transfer method is the easiest and quickest I think. Plus these stand up to multiple washes (just don't iron the surface of the label). And for a few dollars, if you don't like the look of your label you can easily do some more!

Note: these labels were made for my own personal use, if you intend to sell your made pieces check what other labels you legally need such as fibre composition, country of origin and sizing etc.

how cute is this?

Friday, 8 May 2009
just popping in to share with you this ultra cute button pillow, the tutorial for which I spied over at curbly.com (via oneprettything):


I think I can see a future for two or three of these on my new lounges in the near future. Look out husband, no room for boring or bland interiors on my watch!

You say trousers, I say pants

Tuesday, 10 March 2009
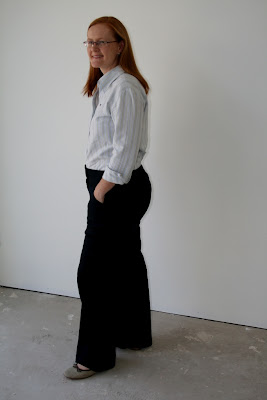
Ok enough harping on by me about how none of my clothes fit my post baby body, I figured there were two things I could do about it: either lose the weight or sew some new clothes. Given that I have the means and materials (many, many materials) to sew some new clothes I took the easy option and made some new pants.


I don't often make pants because I'm really bad at it. Well I suppose I'm good at sewing pants, I'm just bad at making pants that fit me! Since I'm a pear shape with quite a large difference between my hip and waist measurements with some saddlebags thrown in for good measure, getting pants that skim over my hips but fit around the waist with any gaposis is actually difficult.

But I have found that Vogue 2907, an Alice + Oliver pattern is actually quite good for my body shape because they are hipsters and they have a centre back seam which allows for adjustment. Although I did make some adjustments to them because they are obscenely low waisted, so I raised the centre back by 5cm, grading down to 2cm at the sides and then blending down to the original waistline at the front. I also put two darts in the back and pinched the centre back seam of the waistband in at the top to get a nice snug fit around my waist and prevent the old 'plumbers crack' whenever I bend over or sit down!


I dug out some stretch polished cotton in a navy colour from the stash which sewed up beautifully and wears really well with minmal wrinkling. However I may have too smart for my own pants (ha ha pun intended) because these pants wear like jeans, they loosen up after a while and then they are a little too big! You just can't win sometimes.....

I also think that the fly zipper method used by this pattern is way too fiddly - it requires cutting out a seperate tab piece for the fly cover and sewing it on, instead of just cutting it out from the fabric and folding it back. Thank god for Sandra Betzina's video tutorial over on the Threads website about how to do a foolproof fly zipper which is the easiest way I've found to do a zipper and it always come out perfectly following her directions.

Jean - in answer to your question in the comments to my last post about the curtains in Anna's room, they are these ones from Ikea. They are a bit Orla Kiely inspired (ripped off?) and similar to the lovely fabric Erin used for her mini duro dress but a bit more bright and on a larger scale.