Showing posts with label Style Arc patterns. Show all posts

Style Arc Olivia: the jungle dress

Sunday, 4 March 2018

The oppressive summer heat and humidity is continuing in these parts, so last week I made a quick and simple summer dress. This is the Style Arc Olivia, which I bought during the 50% Valentine's Day sale but have now only got around to using it.

image via Style Arc

The fabric I've used is a Cotton and Steel cotton called "Paradise Garden" that I won from Brave Fabrics in the Australian Sewing Guild Castaway to Couture competition I entered last year with this refashioned dress. This fabric has lovely colours that didn't fade at all after washing which is always a good start, but it might be a bit too thick for this style - versions made by other people in rayon and polyester seem to drape much better than my version.


I've only made separates by Style Arc before, so I wasn't sure how I would go in their dress sizes. I ended up cutting a size 6 for the bodice and a size 12 for the skirt which most closely matched my measurements. However, like some other bloggers who made this dress, I found the neckline to be too wide and too scooped. I have narrow rounded shoulders, and a flat chest so I should have fixed this before cutting out the pattern, but I did not.


It's not really obvious from this photo, but the neckline tended to fall off my shoulders and just had too much fabric across the front. So to do a quick and easy fix I literally lifted up that shoulders until the neckline was at a good point and the armhole wasn't too tight and then just sewed a new shoulder seam about 3.5cm down from the original, as you can see in the photo below.


This fixed the neckline a bit - it sits in a much better place on me but is still a little low for my liking. I don't need my bony and freckly decolletage out on display so I do prefer a little higher neckline.


The width of the bodice is still an issue though - I can easily pinch out a few centimetres at the centre front and if I make this again I will redraft the bodice to make it less wide at the bustline and with a higher neckline.


I also found this dress really long. My hem is about 10cm deep, even with reducing the overall length by increasing the shoulder seam. The waistline now sits at my natural waist because of the shoulder adjustment, which is fine for this style, although it would help if I wore my belt straight around the waist instead of crooked like I have in these photos!


So overall it's a simple sweet dress that I will make again, but with adjustments to the bodice and neckline. If you have a long torso and are blessed with an ample chest this may probably work for you straight out of the packet. Apart from that issue it's a really quick project and easy for the beginner even with the usual sparse Style Arc instructions.

Frocktails outfit! Burda of the month 10/2017 #109 and Style Arc Skye

Monday, 19 February 2018
Last Saturday night was another fabulous Sydney Frocktails, organised by the lovely Caz of Useful Box. Lots of ladies wearing beautiful frocks, drinks a plenty and a night out in the city sans husbands and kids - all the right ingredients for a great night!

Even though I have loads of outfits already in my wardrobe that I could have worn, of course I had to make a new one. In a fit of efficiency I combined by Burda of the month project for last November with a bit of stash busting to come up with this outfit:

copper top and black pleated skirt

The top is Style Arc 'Skye' and the skirt is Burda 10/2017 #109 which is the cover pattern for that month:


The skirt is a pretty easy project to sew although there are quite a few pattern pieces to it. You just need to piece the yoke pieces together and sew those to the main skirt pieces and then it's just a matter of sewing it up as a normal skirt so it didn't really take too much longer.

The fabric I've used is a raw silk I bought in Cambodia or Laos (can't quite recall) way back in 2008 when I travelled there in my pre children days. It was rather cheap so I have several metres in a few colours that I've never really found anything to make with it. It's a bit thin but stiff at the same time and the black is a bit of a faded black colour.


It looks like Burda have used a jacquard fabric with quite some body for their version, and I was hoping that my stiff fabric would work just the same at making those pleats stand out.After pressing the skirt though it's turned out rather flat.

And I'm just not sure that a pleated skirt is the most flattering cut for a heavy pear shape, even with the flat fitted portion over the hips. I think this skirt accentuates the heaviness of the bottom half of my body.

copper top and black silk skirt

The back of the skirt is a plain a-line skirt, which reduces bulk there, and the lining is also an aline skirt shape. Please excuse my posture in the photo below, I don't know what I was doing but it looks terrible!


I've made this Style Arc top several times now and I still love it. It's a simple shape but it has nice curves and is a very quick sew. The fabric I've made this version from is a metallic woven fabric in a copper colour that I bought from the Remnant Warehouse last year:


The fabric frayed like crazy so I had to overlock every edge, and it didn't really hold a press very well either so the seams look a bit puffy but I think a sparkly fabric pairs well with a simple pattern. The fabric is also quite stiff, so when it was tucked in it was quite bulky which you can see in the photo below :


The top also didn't stay tucked in either, so even though I prefer the look of it tucked in to the skirt I ended up wearing it loose. I have lengthened the front by 3cm so that I don't have any bare flesh showing at the side slits which is my usual adjustment for this pattern and usually sits in the right spot but looks a smidgen too long with this skirt:


Although the fabric wouldn't press that well it certainly did wrinkly around the bottom where it was tucked in - typical! The back neckline is a simple slit opening that I held closed with a hook and eye instead of the recommended loop and button.


So my verdict on these patterns: the skirt is great pattern because it looks exactly as the pattern picture and was an easy sew, but I think it's a frumpy look on a pear shaped body. So I give it a pass for me, but it would look great on other body types, especially in a lofty jacquard or brocade in a fabulous print like Burda has used. The Style Arc Skye top remains a favourite but I will pair it with a more fitted skirt or slim fitting pants so that I can wear it out because it's too bunchy to wear tucked in.

And yes your eyes aren't deceiving you - my hair is now a brighter shade of red! I used a home dye kit on a whim because I was a bit bored with my hair but I didn't want to cut it shorter. I feel like a teenager again with crazy bright hair and it's certainly getting lots of comments but it's only hair - it'll fade soon enough.

Burda pants again and bonus Style Arc top

Friday, 16 June 2017
Usually when I make a dud project I put it into a big box with all the other less than ideal projects with the vague idea that one day I'll remake it into something else. That box is as large as my UFO box! Unfortunately the allure of a new project, from a fresh length of fabric is too strong and those projects sit there for a long time.

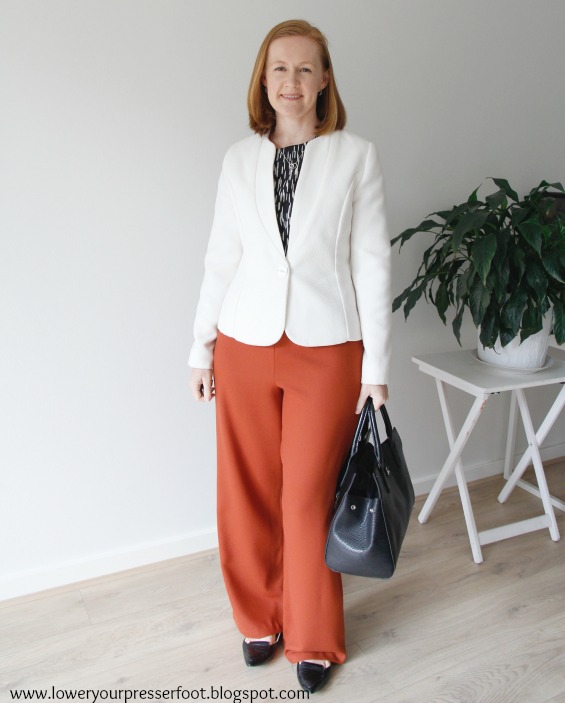
Not this time though - I've remade the ridiculous wide leg pants that I made last month (posted here). Partly because my refashion box is in storage with the rest of my sewing room supplies, but mainly because I really love this beautiful rust coloured wool fabric.

The original pants (3/2017 #115) had very wide legs, pleats at the front and angled pockets at the side. I remade them using Burda 10/2016 #113 which I made last year in white and blue pinstripe fabric (posted here), which I thought were really wide leg pants until I made this pair!


These new pants are flat fronted with a wider waistband and slightly narrower legs. I decided to leave off those curved patch pockets because I think that's more of a casual look and I wanted to be able to wear these to work. I also hemmed these short enough to wear flat shoes with them, which works because of the slightly narrower legs:


I still have those annoying wrinkles at the back of my legs though - the combination of my saddlebag thighs and prominent calves make fitting my legs an absolute nightmare. 


Now I am much happier with these pants, they are far more wearable in this form. I wore these to work with my new top and a white tailored jacket I made back in 2015 from an old Vogue pattern (posted here) - a far more interesting combination than my usual matching top and bottom suits!


The top I'm wearing in these photos is new too - it's the Style Arc Skye top. This top is super simple - it took me less than 3 hours to cut it out and sew it up at a sewing weekend away I went to in May, but it took me 3 weeks to sew a button on the back to finish it! My approach to sewing is so illogical sometimes....

image via Style Arc
The fabric I've used is a polyester woven fabric called 'Shooting Star' from Pitt Trading, which they still have on their on-line store if you're interested. I don't normally sew with polyester fabric because I don't like wearing it, but this graphic print really caught my eye. The fabric is really spongy though and it was quite difficult to press, although it doesn't wrinkle when wearing it so I guess that's the trade off! 


The top is essentially a front and a back with facings so it made up quite quickly. The hem has two curved facings which makes it far easier to finish off the rather than trying to turn up a hem.


I do think the method of sewing the top could be even more simplified though. The back is sewn in two pieces, with the facings sewn to the right side and flipped to the inside, and then the centre back seam sewn below the facings. The Burda method for this style of top - sewing the facing as one piece, stitching a long 'v' down the centre back and then cutting it before flipping it to the inside is far neater, quicker and means you can cut on the fold.


Likewise, the sleeves are finished by turning under twice, and then sewing the side seams from the marked point down which I think could be made simpler and neater simply by folding it over once only so that it goes from the sleeve hem into the pressed open seam allowances without the need for clipping.


The only change I would make to the pattern itself would be to lengthen it slightly. The sides curve up quite high, and if I'm not wearing something high waisted a bit of skin peeks out which is not a good look.


I'm happy that I made the effort to remake these pants and that it turned out far better than the original, which is fortunate because I have a few other projects I've made recently that I've stuffed up haven't turned out as well as expected and now need the same treatment!

Lining the Style Arc Marni

Tuesday, 28 May 2013
I sewed a lining into the jacket I showed you in the last post, and thanks to the feedback from all the lovely ladies at the ASG sewing group at Rhodes on Saturday I've decided that this jacket is completed and is good enough to wear - a great outcome for what was essentially a test version. 

I travelled into work this morning with my husband and I forced him take some photos for me next to an old sandstone building near our offices, so you all get a different background than my usual lounge room. I wore it today with a black dress I'd made pre-blogging days (Vogue 8280), so it's too bad I'm not doing MMM because I nailed it today.  The jacket was very comfortable and kept me warm on a chilly day and it wore so much better with a lining as it didn't catch on my clothes at all. It does need some slight fitting adjustments for the next version - mainly a forward shoulder adjustment and a bit more interfacing, but overall this one is still pretty good.


excuse those squinty eyes - it was early morning and I'm soooo tired!
For the closure I decided to sew a loop from some black hat elastic into one side and sewed on a button which was much easier than fiddling with a buttonhole or doing a covered snap:


It also looks much better on the inside having a lining covering up all those seams:


Making a lining for it wasn't that difficult either, and whilst I don't particular like doing tutorials since I'm not an expert in these things (my pet hate is newbie sewists doing tutorials on their blogs) I will share how I did here partly because BeaJay asked me on Saturday but mainly so that when I go to do this again I remember exactly how I did it!

First up the fabric - back in 2011 when I wondered what fabric to use to line this New Look 6000 dress I made from ponte, a few people suggested a stretch knit fabric so I picked up a roll of black stretch knit from the Remnant Warehouse on one of their two for one rolls Tuesday, which has a soft, slippery hand almost like fabric you would use for a slip. I still haven't lined that purple ponte dress yet, but the fabric is perfect for lining this jacket.  It does have more stretch to it than the ponte I used for the outer fabric, but I figured that would be fine.

Next the pattern pieces - for the lining I used the side front, sleeve, back peplum and back pattern pieces as drafted.  I didn't add a pleat to the back pattern piece for wearing ease that you would normally see in a jacket at the neckline because I made the lining from stretch fabric.  I drafted new pattern pieces for the front and front peplum.

For the jacket front lining pattern piece, I laid the front facing piece over the jacket front piece and traced off a new pattern piece, remembering to add a seam allowance and rounding off the pointy corner bit because that was designed to be sewn down to the shoulder seam which now isn't needed because it's going to be sewn to the lining instead: 


neckline as per the pattern drafting


neckline when rounded off for the lining

For the front peplum lining pattern piece I made a new pattern piece by folding over the centre front facing bit and folding the dart over too and added a seam allowance to the centre front, so that I had a pattern piece that was the same shape but much narrower.


Finally the construction order - I sewed all the lining pieces together, and then sewed the lining to the jacket at the collar/centre front and the sleeves ends (not the cuffs).  Then I hemmed the jacket (2cm deep) and lining (3cm deep) separately to each other so that the lining would hang freely which I figured was the best way to deal with the pleated fabric at the front. 


I sewed the lining to the jacket on the inside along the waist seam allowance just to anchor the lining in place and so it wouldn't twist around when being worn. Then I sewed the cuffs back on, not bothering to sandwich the raw edges in the middle of the cuff layer because it won't be visible and I was feeling lazy, but next time I probably would just to make it look better.

And that's all it took - pretty easy really and I still can't understand why the pattern didn't include a lining.

Style Arc Marni - the first attempt

Thursday, 23 May 2013
I really, really wanted this pattern to work because it has so many things I like in a jacket - a shawl collar which is not just easier to sew than a notched collar but is also a more feminine look when worn with a dress or a top, princess seams and a waist seam which really helps in getting a close fit especially for a sway back and three quarter sleeves with turned up cuffs which might give you cold wrists but makes you look like you're ready to get stuck into work.  Plus the name of the pattern has a hold on me - if Toby was born a girl he would have been called Marnie after the title character in a book I read as a child but still vividly remember even though it's been more than 20 years since I last read it - When Marnie was There by Joan G Robinson.  The other character in that book is called Anna, so it would have turned out nicely except Toby decided to come out a boy!

Thankfully my first attempt at the Style Arc Marni has turned out brilliantly!


I made this as a hopefully wearable test version from some cheap, rather thin ponti bought from Spotlight two years ago during one of their very frequent sales.  I had intended to make a stretchy dress from it whilst I pregnant with Toby but never got around to it which left me with 3m of this in the stash.  For this version I've made no changes whatsoever to the pattern pieces - just cut them out and sewed them up exactly according to the pattern. As you can see from the photo above I haven't added a closure to the front yet and nor have I hemmed the peplum, but overall I think the fit is pretty good and I need only make small changes for the final version.  There is  a bit of excess fabric at the front near the armhole which I think is caused by my forward rounded shoulders, so I need to pinch a bit out there and maybe take in a little along the princess seam at the bust, but otherwise not too bad.

What I like about this pattern:
  • as others have noted about Style Arc patterns, the drafting is spot on. All the notches lined up exactly, and the individual pieces fit together properly, without any one bit being too short or too long in comparison with the piece it is to be sewn too.
  • the jacket turned out looking exactly as the diagram and there was no surprise or shock at the finished garment as can (and does often) happens with a pattern that only comes with an illustration and not a photo of the finished pattern on the envelope! It looks good with a belt as illustrated and turned up cuffs:

  •  the fit is excellent as there isn't any crazy amount of excess ease as there usually is with commercial patterns. The Style Arc pattern has turned out to be more like RTW than nearly any other jacket I've made using commercial patterns. Having a waist seam with darts at the back means I was able to get a very close fit:


  • the pattern is printed on durable white paper instead of thin, too easily torn tissue paper. Yes it means it's harder to pin to the fabric and make fitting adjustments but for an expensive pattern at least it's not going to fall apart any time soon. 
What I don't like about this pattern:
  • The jacket is unlined.  I think this jacket is intended to be a softly draping unstructured jacket, and no one else has seemed to complain about this, but I just found that the jacket clung really badly to the clothes underneath and I had to keep readjusting it every time I moved.  You can see the drag lines in a few photos above. It's also really hard to slide my arm into it when I was wearing sleeves underneath because the fabric kept bunching.  I just think that unlined jackets should only be made out of stiff fabrics just denim or heavy drill.  Plus the inside looks really messy without a lining to cover up the seams and stabilising tape along the shoulder seam.  Sure I could have bound each of those seams with bias binding which a more meticulous and patient sewist would do, but I prefer to take the easy route and just to cover them up with a lining.  So my next attempt will be to draft a lining for this jacket.
 

  • Too little is interfacing suggested. The pattern calls for only the collar facing to be interfaced, which I'd say is because it's unlined and you'd be able to see any other interfacing used in the jacket.  I did interface the cuffs with some whisperweft which gave them more substance when folded up, but I wish I used some more especially around the shoulders as the sleeve head seems to have collapsed. The next version I make which will have a lining I will add some interfacing to the jacket in the same manner I would for a tailored jacket.
  • The instructions are super sparse and was a bit confusing in parts - for example the notch in the cuff lines up with sleeve seam, and not another notch.  Luckily there was a diagram to indicate how to do the cuffs because I don't think I would have worked them out at all. I've made a few shawl collar jackets before so I knew how the collar attaches, but I think if you were a beginner sewist the lack of instructions and diagrams for the rest of the jacket would make this a semi challenging project.
  • Changes in the seam allowances. This pattern uses what I understand is the industry standard of 1cm (3/8 in) seam allowance instead of the overly generous 1.5cm (5/8 in) that the other commercial patterns use.  Whilst I do like having that extra fitting room in the seam allowance when I'm making dresses or pants, I was fine to use the different seam allowance on this jacket.  Except the pattern requires an even narrower seam allowance of 6mm just for the internal seam of the collar and the seam along the slit in the cuff. Which of course I forgot to do - unpicking stitches in knit fabrics is so tedious - yes I should have paid more attention when I was sewing but I'm so used to just sitting down and sewing all the seams at the same width!
  • Single size pattern - maybe I've been using the Big 4 patterns for too long but I am just so used to getting a range of sizes in the one pattern which is really helpful for easily grading up or down between sizes as required, plus having the option to sew a different size if you wanted to make the pattern for someone else.  It's not really a problem for me on this jacket because it did fit, but it would make me think twice about ordering a Style Arc pattern for a dress or pants where I do need to grade between 3 different sizes for my  bust, waist and hips.
Hmmm, it seems I am being a bit critical aren't I? That list of things above of the things I didn't like are really quite minor issues and overall I really like this pattern.  I will try out a lining in the jacket which hopefully turns out well so I can wear this version because it goes so well with this red dress I made recently.  I'll also definitely make this in the lovely blueberry ponte I have left over from this dress that I bought from Tessuti's at the first Sydney sewists meetup last year. 

Speaking of the Sydney sewists meetup it's not too late to RSVP for our next event on Sunday June 23 - High Tea at the American Club in Sydney - the more the merrier I say!