Showing posts with label fabric from the stash. Show all posts

Vintage wing tipped dress in red: Butterick 6473

Monday, 29 February 2016
At the start of spring last year I pulled out a few fabrics that had been sitting in the stash for a while that I really wanted to use and left them on my cutting table, in the hopes that looking at them all the time would prompt me to make something. Well that didn't work because I ended up using any fabrics other than those I had picked out especially to use, and all it meant was that my cutting table was cluttered! But finally I've used one of the fabrics to make this dress:

vintage Butterick 6473 red white graphic print wiggle dress www.loweryourpresserfoot.blogspot.com

The fabric is a printed cotton sateen bought from Spotlight a few years ago when their sateen was still quite thick and stretchy. I had originally planned to make a simple sheath dress from New Look 6968 because I've made it several times successfully (here, here and here) but also because this exact fabric appears on the pattern envelope - yes I am way too influenced by the pattern...

But instead I decided to use a vintage that I've had in the stash for a while now. I can't remember quite where it came from but most likely picked up from an op shop. The pattern is undated, but the vintage pattern Wiki places it at 1953:


I have been wanting to make this pattern for a long time but could never quite decide on the right fabric. I don't think I've used the right fabric in this version though, because even though the cotton sateen has the right amount of body and stretch to make it fit really well the busy print hides those special details. I think I will make this again in a solid colour, perhaps with a contrast collar and pocket to make those details stand out.

You can see below that the pocket flap is hardly visible:

butterick 6473 vintage wing collar wiggle dress in red and white www.loweryourpresserfoot.blogspot.com

But, oh that collar! I do love an oversized, dramatic collar:

butterick 6473 vintage wing collar wiggle dress in red and white www.loweryourpresserfoot.blogspot.com

I also left off those buttons down the side. It is a key feature of this dress and I think it would look amazing in a solid colour, but the buttons would be completely lost on this dress so I just put in an invisible zip instead:

butterick 6473 vintage wing collar wiggle dress in red and white www.loweryourpresserfoot.blogspot.com

This dress wasn't that easy to make and it took longer than I expected. While there wasn't any particularly tricky sewing involved, just figuring out the pattern took a lot of concentration. It's one of those very old patterns that have no printed instructions, but rather perforated dots of various sizes that you need to connect and figure out the connections.  And for all my complaints about the brevity of Burda instructions, this pattern is just as bad. One page of instructions, and one page of fabric cutting layouts and then you're on your own to muddle your way through.

butterick 6473 vintage wing collar wiggle dress in red and white www.loweryourpresserfoot.blogspot.com


The pattern incorporates an extension to the left side of the bodice and the skirt that gets folded under to form a facing for the buttons which I didn't need since I just used an invisible zip. Which meant I had to cut a few inches from the side seams and sew the side seams a few times to get a close fit, but  got there in the end. No swayback puddle of fabric and only a few wrinkles emanating from the armpit which is to be expected with cut on sleeves like these.

butterick 6473 vintage wing collar wiggle dress in red and white www.loweryourpresserfoot.blogspot.com

butterick 6473 vintage wing collar wiggle dress in red and white www.loweryourpresserfoot.blogspot.com

The skirt isn't as slim fitting as the pattern illustration suggests, in fact it is rather an a-line shape as you can see in the photo below. However that is a good thing, because there is enough room to walk comfortably in this dress without having to leave a split open along a side seam:

butterick 6473 vintage wing collar wiggle dress in red and white www.loweryourpresserfoot.blogspot.com

Overall I'm really pleased with this project. Not only did I use a fabric and a pattern that I've been meaning to use for a long time now, but I also got a very cool dress that is perfect for the still very hot summer weather we're having. And in a great coincidence there happens to be a red dress contest running over at Pattern Review that I will enter, if any of you would like to vote for me! 

Burda of the month: 1/2016 #120 bright yellow jacket

Friday, 29 January 2016
Thank you to everyone who has left a comment on the last post - I really appreciate all the good advice. Who would have thought that we'd have so much to say about irons?!

I've got my Burda challenge off to a good start this year  - not only have I made a project from the January issue in the actual month of January, but I really love how it has turned out and I used a long term stash resident. All round winner in my books. I made jacket 1/2016 #120 which has turned out like this:

Burda 1/2016 #120 tailored yellow jacket www.loweryourpresserfoot.blogspot.com

It looks very different from the pattern in the magazine, mainly because Burda has made their version in a fake fur:
Burda 1/2016 #120 tailored yellow jacket www.loweryourpresserfoot.blogspot.com
image via Burda Style
I've made mine in a thick textured cotton that originally came from my grandmother's stash so it could be many many decades old. But it's such a cheerful colour, and the fabric has a nice thick weight to it so I just knew it would be perfect for a boxy jacket like this.

Except, I don't do boxy very well. I couldn't help myself, I had to shape this jacket by taking in the side seams a little and adding two vertical darts to the back:

Burda 1/2016 #120 tailored yellow jacket www.loweryourpresserfoot.blogspot.com

There is still a little too much fabric there in the back view, especially around the armscye, which if I had made a muslin version I would have resolved but of course I didn't make one so I'm just going to live with this:

Burda 1/2016 #120 tailored yellow jacket www.loweryourpresserfoot.blogspot.com

The other change I made was to draft a neck and front facing from the lining pattern. The pattern suggests using a poplin fabric as the inner fabric and lining to the edge, which probably works ok when using a thick fabric like a fake fur.  But I think a tailored jacket made with a jacket weight fabric looks better with self fabric facings because it prevents the lining peeking out and it sits better as well.

Burda 1/2016 #120 tailored yellow jacket www.loweryourpresserfoot.blogspot.com

I was super short on both lining fabric and the outer fabric for this project. As you can see in the photo above, the sleeve lining is only half the sleeve purely because I didn't have enough yellow lining to make a full sleeve length and nor did I have any other light coloured lining fabric on hand for the sleeves. It's a bit slip shod, but it works and I've tacked it down to the seam allowance so it will stay in place.

I also just managed to eek out the sleeves of the outer fabric by placing the sleeve end on the selvedge of the fabric with no fabric to turn up for the hem. Originally I thought I would just make this a bracelet length sleeve, but it finishes as just the right spot on me so I've left it unhemmed. For the seam allowances of the sleeve I turned the raw edges under and slipstitched them down, so it's quite a neat finish. Again, it's a bit of a dodgy solution but it works!

Burda 1/2016 #120 tailored yellow jacket www.loweryourpresserfoot.blogspot.com

The pattern calls for a snap to be placed there at the centre front of the jacket. This fabric was too thick to make a covered snap, and nor did I have any big enough in my stash but I did have a hook and bar salvaged from a RTW garment some time ago. This is one of those that instead of sewing on you just push the ends through the fabric and use some pliers to squeeze the ends closed. Except I squeezed a little too hard with my pliers and the bar got a little bent as you can see below! (Ignore the colour of this photo, the yellow turned out all shades wrong in this picture for some reason).

Burda 1/2016 #120 tailored yellow jacket www.loweryourpresserfoot.blogspot.com

I do like the discreet look of the hook and bar though - it's hardly visible at all when the jacket is worn open, and it looks very polished not having any visible stitches.

Burda 1/2016 #120 tailored yellow jacket www.loweryourpresserfoot.blogspot.com

As you can see in the photos above, I used some canvas interfacing across the back and part fronts, as well as a lightweight whisper weft iron on interfacing at the top of the sleeve. The thickness of the fabric along with the interfacing has made a beautiful shoulder cap, with no collapsing at all which is a look that I absolutely hate. So happy with how this one turned out:

Burda 1/2016 #120 tailored yellow jacket www.loweryourpresserfoot.blogspot.com

I've seen lots of collarless jackets with pointed front lapels in the stores recently, including the one below left in Trenery which originally retailed for $299, so I was very happy to see that Burda had included one in the January issue. The yellow colour came from an inspiration image I recently pinned from Table Eight - I'm quite glad that I finally used Pinterest for a real, actual use!

left: Trenery Jacket, right: Table Eight jacket
Burda 1/2016 #120 tailored yellow jacket www.loweryourpresserfoot.blogspot.com

So overall, I love this jacket immensely. It's very simple to make and doesn't use a great deal of fabric - I eked it out of 1.2m fabric but I did have to cut a few corners to make it work. For the next version (and yes, there defintely will be one) I will work on that excess fabric at the back, possibly by putting in a centre back seam instead of the darts and reshaping the armscye. I would also narrow the sleeves somewhat as you can see in the photo above that they are quite wide. But apart from these minor fitting changes it is a great pattern that I can recommend if you're after something simple.

Good luck to all of you doing a Burda challenge this year or those thinking about doing one - there were quite a few good patterns in this issue that should make it easier to choose, including this gorgeous vintage dress, this cute draped jersey skirt and this interesting double layer top. 

Same but badly different! Burda Sailor Shorts and retro Vogue boxy top

Thursday, 22 January 2015
Isn't it funny (and annoying) how you can take a pattern that you've used before successfully only to have it turn out badly? If I use a pattern a second time I expect to able to whip it up without needing to try it on and make fitting changes during the construction - silly me! Lesson learnt: no matter how many times I've used a pattern I will try on and check before finishing it.....

Just before Christmas I bought some vibrant chilli red stretch cotton drill from Spotlight  and immediately cut out a pair of the Burda sailor shorts from 6/2014 #123 I made back in October which look great and I wear quite often. I didn't get it sewn before Christmas but I did finish them last week when I finally bought some buttons for them, and well what a disappointment:


The only change I made to the pattern was to lengthen the legs from mid thigh to above the knee, but the stretch in the fabric made a huge difference to the fit. I had to take the shorts in all over, but those horizontal lines at the front aren't the usual crotch 'whiskers' caused by it being tight but rather it's the bottom edge of the panel that goes across the stomach underneath the outer layer with the end of the zipper in particular sticking out. When I look at the photos of the previous version I can see it happening slightly, but because that fabric is thicker and non stretch it isn't as obvious:


Oh well, maybe I'll think about what can be fixed, but I have worn the red pair a few times already and since they're just casual shorts they don't need to be perfect. I have too many other things on my sewing list that I want to make instead of spending time obsessing over these minor details.

I've been doing a bit of a wardrobe audit and realised I don't have many tops at all so I decided to make something to wear with these, otherwise I would probably just always wear a black and white stripe tee with them. I pulled out a vintage pattern picked up in the past from an op shop - Vogue 8291 which is undated but I think may be 1980s judging by the style?

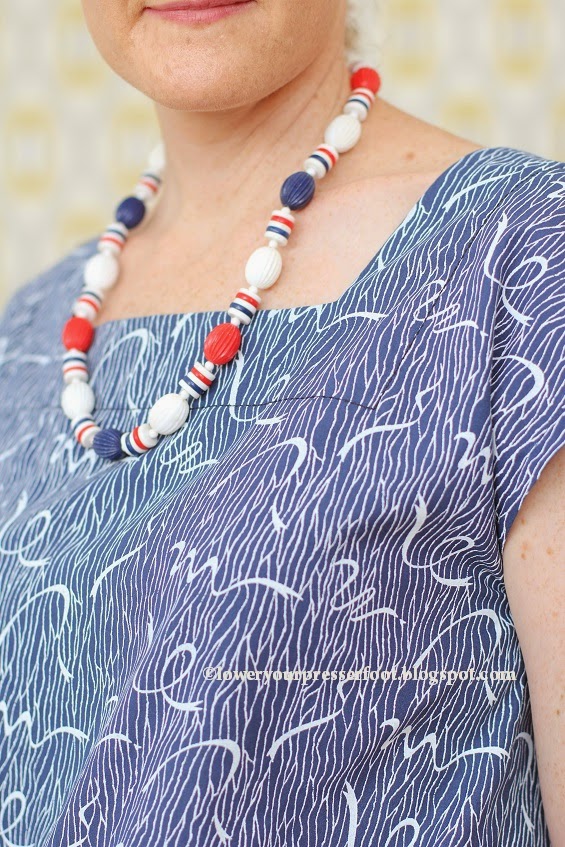
It's just a simple boxy top but is perfect for a casual summer top and it didn't turn out as potato sack like as I had expected. I used a blue printed cotton fabric that was a long term stash resident, also bought from an op shop long ago that to me also has an 80s vibe to it. And to top it off I've got on some terribly 80s plastic beads that my grandma used to wear all the time that I always thought were hideous but couldn't bring myself to chuck them because of sentimental value.


The squared neckline has a wide facing that I topstitched down for a bit of interest. I think the neckline is lovely, but ironically it shows a little too much skin for me because getting enough sunscreen on the back of my neck is always fiddly.


One side has a sewn on tab to put the buttons on, and this side of the top the sleeve hems are just an extension of the hem of the body of the top - folded under and stitched.


I did lengthen this top by about 5cm which was lucky I did because it turned out quite short. You can see in the photo above that I had to sew an extra bit on button tab to get that top button on - carelessly I cut the extra tab with the grain going the other way which you probably didn't notice until I pointed it out right? Those buttons also originated from an op shop and have been in the stash a long time, so overall this top was very cheap and sort of good for the stash (it barely used a metre of fabric).

Surprisingly I quite like this top and I'm already thinking of another version in a stripe fabric or one perhaps with a contrasting neckline by sewing the facing on the outside. So many possibilities for such a simple pattern!

Lastly, that wall you can see in the background of these photos is a sneak peek of my newly revamped sewing room - it's about 75% done and it's going to be fantastic when it's all done and my sewing supplies have come home to me.

Burda of the month: 1/2014 #107 - A summer white dress

Thursday, 23 January 2014
I am the very model of efficiency this month I tell you! Not only have I finished my January Burda project within the month of January (the second Burda project I've made this month), but I also used this month's pattern as my entry into the Pattern Review Little White Dress contest. And I used some more fabric from the stash, so even if I don't rate a mention in the contest I'm already a winner. Of course if you want to vote for me I wouldn't mind at all! (You need to be a member of PR though and voting doesn't start until the 18 Feb).


I made 1/2014 #107, a dress with a cross over bodice and a lightly gathered skirt from a crisp white linen I've had in my stash for quite a few years.


I didn't make a muslin for this dress because I happen to have 5 metres of this linen, purchased in Bangkok many years ago (pre children - a lifetime ago!) and I figured that it would probably only be the bodice that may not work and anyway if it didn't work out first time I had enough fabric to cut out another. Happily though this dress worked out perfectly first time with no changes other than cutting out a size 34 at the shoulders and bust, flaring out to size 36 at the waist and using the size 40 skirt pattern piece so that I could have a few more gathers than the pattern.


Usually I have problems with cross over bodices gaping open since I have a very small bust but not only does this bodice fit closely I think those pleats on the front pieces (they are on both front pieces) give a bit more body to my skeletal chest region.  It does get a bit bulky there at the front waist seam because of those pleats meeting the gathers, so I'd recommend sticking to a lightweight fabric if you're thinking of making this dress.

The back has two small pleats at the waistline instead of darts, which I think suits this dress ok as it's a casual summer dress but if I were to make this again in a more dressier fabric I would probably convert them to darts to get a nice close finish.


As is typical with Burda patterns the skirt is about 5cm too long for me, but I left it that long so I could make a nice deep hem to give the skirt a bit of weight. I also knew that the hem would be visible because the fabric is still rather lightweight, so I decided to give the hem some visual weight too by top stitching the hem line with a triple stitch in a longer stitch - it makes the hem a feature rather a sloppy job.


I'm not particularly liking those sleeves though - they sit a bit awkwardly and finish at a rather unflattering part of my arm. And even though I pressed the seam allowances down the flip up under my arms which you can just catch a glimpse of. If I were to make this dress again I would make the sleeves a traditional cap sleeve instead and make a facing or lining under the arm opening instead.


And no I'm not doing the 'squinch' (a pose that is supposed to make you look more attractive in photos), it was either because of glare or my children being naughty behind the camera!

After getting a bit cross a few posts back about the wrinkliness of cotton sateen you must all think I'm mad making something from linen! But the difference for me is that linen is expected to wrinkle, in fact it's the hallmark of linen and something about wrinkled linen screams summer outfit to me. I've never claimed to be consistent or to make sense all the time though, have I? Anyway I underlined all the pattern pieces with a white poly-cotton because the linen is rather lightweight and too sheer to be unlined, but also because I'm hoping that underlining it with a fabric with a bit of polyester content may help reduce the wrinkling a little. I didn't bother making an additional lining though because I still want this to be a light summer dress, and the bodice front has a fold over facing which gives a nice clean edge to the fronts.

I decided to enter the Pattern Review contest on a whim after seeing this month's Burda magazine patterns and figuring I could kill two birds with one stone. I haven't entered a contest on there before, in fact I've really only become active on Pattern Review in the last year after letting my paid membership lapse for many years but I am trying to post more reviews in an effort to give back to the community there.  The competition rules require a simple, classic style that could be worn for many years and dressed up or down. I think a dress with a surplice bodice and a gathered skirt is both simple and classic and I can see me wearing this for years to come, depending on how long the fabric stays this white of course!

The entry requirement is to show the dress styled for both day and night, so here's my interpretation:


For day I chose to pair it with a tan leather bag, belt and heels and a wide brimmed white hat. During summer I'm never without a hat outdoors so this outfit really is something I would wear, but only when I don't have my children with me because a white dress to those two is like a red flag to a bull. I would barely last a microsecond before they left a grubby mark on me!


I found trying to style this for night time was a little more difficult because I probably wouldn't wear a loose fitting white dress out at night given that I have many other more sophisticated and colourful dresses already in my wardrobe. So I decided to go with classic black and white, pairing it with black peeptoe shoes, chunky black necklace and black belt. If only I had a classic Chanel camellia brooch to go with it (hint, hint husband!).

So overall this pattern is a winner, it seems to be well drafted and the style is one that is fairly easy to fit because the cross over part can be crossed over slightly more or less depending on what you need (a larger bust would probably need a FBA though I'm not an expert in that area never having needed one!), and the gathered skirt can just be drawn in to suit the finished waist circumference. Looks like my 2014 Burda challenge is off to a promising start.

Thank you for all your lovely comments on my last post. Even though there was no common theme or consistency to what I made from the Burda magazine last year I'm glad it didn't turn out like rag bag collection!

Burda of the month: 12/2013 #118 Floral Pencil Skirt - I blame Pinterest!

Friday, 17 January 2014
I know this is the Burda project of last month, but I only received the December issue a few days before Christmas when I was busy sewing other things, so it had to wait until January to get made. But happily the completion of this skirt means I achieved a 100% completion rate for my Burda challenge of 2013. And I've already traced off the January 2014 pattern and I spent today pre-treating the fabric, so I should be able to get 2014 off to a good start too!

For my December project I chose a simple pencil skirt, because after two children my body has changed somewhat and it was time to do all the fitting changes again and redraft the pattern I usually use so I decided to give 12/2013 #118 a try instead:


And as we all know sometimes it's the simplest patterns that take the most effort to work! I spent all day Saturday making a muslin and tweaking the fit. I think I got it about 90% right - but with a fitted garment like a pencil skirt I prefer to wear it a few times before making any other changes to make sure it's wearable because there's a danger that you can overfit it and have it looking perfect while standing still for photographs but can't actually walk in it!


Indoor photographs today I'm afraid - I spent five minutes outside taking photos before I wilted in the extreme heatwave we're currently having and had to retreat inside. Of course those outdoor photos that I suffered for so much were no good because I had two children getting in the photo, running into me with their scooters and bumping the tripod. Those fashion bloggers with their photographer boyfriends and ample, uninterrupted time to take photos in beautiful locations have no idea of how much real life can get in your way sometime!

The fabric is a beautiful cream textured cotton with a floral print that came from the dark recesses of the stash, so deep in fact that I've completely forgotten where or when I acquired it. All I know is that I have about 5 metres of it, and it's quite narrow which suggests that it's a vintage fabric because not many come in those widths anymore. The texture is a raised narrow chevron pattern which obviously it was cool before it's time given the obsession with chevron prints in recent years.


This somewhat unusual fabric choice for me was inspired by an image I pinned on Pinterest a while back:

original image from mango-watermelon-love.tumblr.com
My floral is obviously a much smaller scale and I didn't have a gingham check shirt in my wardrobe, and all my crisp white shirts have now worn out beyond the rejuvenating ability of bleach/soaking powders (another thing to add to my to sew list) so instead I decided to mix it up and wear it with my polka dotted white silk shell top I made last year. And I happened to have a coral coloured RTW blazer in a ponte knit that goes perfectly with the skirt so I haven't created an orphan (phew!).


There's not much to say about this pattern since it's just a simple straight skirt and it was really easy to sew, but fiddly to fit. For my future self the changes I made to the pattern were:
  • I traced a size 38, and took out 1.5cm from the centre front along the fold line;
  • I didn't add the suggested 4cm hem allowance, took a further 5cm of length off and still have a 5cm hem to get it to sit at knee length. This skirt is extraordinarily long on me.
  • Moved the front darts towards the centre by 4cm as the pattern has them drafted too close to the sides for my shape, and shortened the front dart by 3cm. I still need to work on this because there is a bit of puffiness at the front under those darts, but this could be because I wear my skirts lower on my hips under the waistline;

  • I took out a wedge shape in the centre back seam under the zipper to get a closer fit and made a vented opening instead of a split in the centre back seam - I find the mitred vent to be a more professional and durable finish that just a split. I think I achieved a pretty good fit in the back (I just need to stand up a little straighter!).

  • The pattern uses a long narrow rectangle folded in half for a waistband but instead I drafted one with a slight curve that is in three pieces sewn together at the side seams, and instead of folding it in half I made a facing for it from the same fabric. This type of waistband is better suited to my swayback.
For the next version I need to sort out that puffiness and the front darts, and probably taper in the skirt at the side seams a bit because it's not as tapered as the line drawing from Burda suggests, but that will depend on how easy this version is to walk around in and do all the things one normally needs to in a normal day!

So overall there's not much exciting about this pattern. If you already have a pencil skirt TNT pattern then carry on, but if you don't then this is a good a starting point as any because pretty much any pattern will need fitting changes. 
  
But the other good thing about this project is that I can finally demonstrate to my husband the point of Pinterest - he's always asking me why I bother pinning images!

Thanks for all your comments on the cotton sateen issue - I'm glad I'm not the only one that feels that way about it and I hope I've helped alert those of you that haven't used it yet what to expect. Badmomgoodmom made a good point about fabric quality being the key to how it wears, unfortunately you can't tell that until you've already bought and washed the fabric! I don't think I've ever seen Robert Kaufman fabric for sale here in Australia, but I certainly shall keep my eyes open for it now - fabric purchasing purely for the purpose of scientific testing you see!

Vogue 2783: another cotton sateen dress

Thursday, 14 November 2013
Thanks everyone for your amazing comments on my skirt in the last post - it's funny how sometimes the simplest projects really hit the nail on the head!

I've had such a slow sewing week, in fact it's taken me since last Sunday to finally finish this post and publish it. Toby has been quite unsettled this week and of course it's only mum that he wants when he's crying his little eyes out! It's nice to be wanted, but for crying out loud why did I have to get two children lousy at sleeping?

But I did manage to finish this dress before our Pattern Review high tea last Saturday afternoon - nothing like a deadline to get me motivated. I started sewing it on Friday night and finished it on Saturday morning about an hour before I had to leave. Luckily the day turned out to be very hot and sunny because I made a very summery dress:


I used Vogue 2783, a DKNY A-line dress that I've had in the pattern stash for a long time just waiting for the right fabric to come along. I tempted fate by using another cotton sateen fabric in the stash bought last year I think, but this one is a floral print instead of a solid and it seems to have a bit more stretch content than the green sateen I sewed with recently. Either way it doesn't seem to wrinkle as much which is good!


I love the seam lines in this dress, it's what makes it a bit more special than your ordinary fit'n'flare dress. I made some piping from navy blue lining fabric since there seems to be a city wide shortage of ready made piping at the moment, which was fiddly and time consuming but very much worth it because it really shows off those lines:


The back has matching princess seam lines and shoulder panel too:


I didn't leave myself time to  make a muslin, which actually since I'm a bit lazy when it comes to muslins I probably wouldn't have made one anyway but I did check the reviews on Pattern Review. All of which said that the dress runs large and all the reviewers made at least a size smaller.  After checking the flat pattern measurements I made a size 6 at the bust grading out to a size 8 at the waist and hips, even though according to their body measurements I needed a size 12/14/16 sized pattern.

But this pattern still turned out absolutely huge! I ended up taking in another 5cm on each side down the side seams just to get it to fit across the bust and waist, and it's not skin tight. If I had more time I would have pulled it apart and distributed that evenly along all the seams but it seems to be ok just narrowing the side seam. I can't understand why Vogue would draft a princess seam dress, which needs to be fitted to have a nice shape, with 10cm of ease at the bustline and 15cm of ease at the waistline!

The skirt is rather full even with taking it in down the side seams:


although the fullness hangs rather awkwardly because the piped seam makes it kink out a bit and the hem looks rather crooked even though I think it's pretty straight:


The another annoying thing about this pattern is that it is unlined but there are no facings drafted - the pattern requires self fabric binding strips to be sewn around the neck and sleeve openings. Which given it has piping around the neckline it seemed to be unnecessary to me so I just overlocked the edge of the bias piping strip I made with the edge of the fabric, and stitched in the ditch to keep the binding from flipping it out. To make sure I did a few handstitches at each seam line to keep the binding on the inside which seemed to work pretty well:


I suppose you've noticed I left off the hem band too? Well it turns out this dress is really long as well as really big! I did a tissue pin fit and took out 6cm in length from the body of the dress but even that wasn't anywhere near enough because my finished dress has a 5cm hem even without sewing on that band. The pattern is described as mid knee length, and I know that I'm nowhere near model height, but this pattern as drafted would be more like mid calf length on me. Instead of hacking off a huge amount off the bottom of the dress to sew the band on I just chose to leave it off.

I also chose not to make the fabric belt as shown in the pattern because it doesn't look too flattering on those models - it's too loose and droopy I think. I think the dress looks fine without a belt though.

As for the high tea it was delightful. Thanks to the lovely Velosewer for organising it in a chocolate shop, we all got to eat yummy food and a wide variety of teas finished up with a smash cake filled with delicious chocolates. It was great to meet a few new faces in real life and spend a few hours chit chatting about sewing. Of course I forgot to even get my camera out, but Maria has some great shots on her blog of all of us in our self made outfits.